Java 多线程:彻底搞懂线程池_java线程池-程序员宅基地
熟悉 Java 多线程编程的同学都知道,当我们线程创建过多时,容易引发内存溢出,因此我们就有必要使用线程池的技术了。
目录
5.2 定时线程池(ScheduledThreadPool )
5.4 单线程化线程池(SingleThreadExecutor)
1 线程池的优势
总体来说,线程池有如下的优势:
(1)降低资源消耗。通过重复利用已创建的线程降低线程创建和销毁造成的消耗。
(2)提高响应速度。当任务到达时,任务可以不需要等到线程创建就能立即执行。
(3)提高线程的可管理性。线程是稀缺资源,如果无限制的创建,不仅会消耗系统资源,还会降低系统的稳定性,使用线程池可以进行统一的分配,调优和监控。
2 线程池的使用
线程池的真正实现类是 ThreadPoolExecutor,其构造方法有如下4种:
public ThreadPoolExecutor(int corePoolSize,
                          int maximumPoolSize,
                          long keepAliveTime,
                          TimeUnit unit,
                          BlockingQueue<Runnable> workQueue) {
    this(corePoolSize, maximumPoolSize, keepAliveTime, unit, workQueue,
         Executors.defaultThreadFactory(), defaultHandler);
}

public ThreadPoolExecutor(int corePoolSize,
                          int maximumPoolSize,
                          long keepAliveTime,
                          TimeUnit unit,
                          BlockingQueue<Runnable> workQueue,
                          ThreadFactory threadFactory) {
    this(corePoolSize, maximumPoolSize, keepAliveTime, unit, workQueue,
         threadFactory, defaultHandler);
}

public ThreadPoolExecutor(int corePoolSize,
                          int maximumPoolSize,
                          long keepAliveTime,
                          TimeUnit unit,
                          BlockingQueue<Runnable> workQueue,
                          RejectedExecutionHandler handler) {
    this(corePoolSize, maximumPoolSize, keepAliveTime, unit, workQueue,
         Executors.defaultThreadFactory(), handler);
}

public ThreadPoolExecutor(int corePoolSize,
                          int maximumPoolSize,
                          long keepAliveTime,
                          TimeUnit unit,
                          BlockingQueue<Runnable> workQueue,
                          ThreadFactory threadFactory,
                          RejectedExecutionHandler handler) {
    if (corePoolSize < 0 ||
        maximumPoolSize <= 0 ||
        maximumPoolSize < corePoolSize ||
        keepAliveTime < 0)
        throw new IllegalArgumentException();
    if (workQueue == null || threadFactory == null || handler == null)
        throw new NullPointerException();
    this.corePoolSize = corePoolSize;
    this.maximumPoolSize = maximumPoolSize;
    this.workQueue = workQueue;
    this.keepAliveTime = unit.toNanos(keepAliveTime);
    this.threadFactory = threadFactory;
    this.handler = handler;
}
可以看到,其需要如下几个参数:
- corePoolSize(必需):核心线程数。默认情况下,核心线程会一直存活,但是当将 allowCoreThreadTimeout 设置为 true 时,核心线程也会超时回收。
- maximumPoolSize(必需):线程池所能容纳的最大线程数。当活跃线程数达到该数值后,后续的新任务将会阻塞。
- keepAliveTime(必需):线程闲置超时时长。如果超过该时长,非核心线程就会被回收。如果将 allowCoreThreadTimeout 设置为 true 时,核心线程也会超时回收。
- unit(必需):指定 keepAliveTime 参数的时间单位。常用的有:TimeUnit.MILLISECONDS(毫秒)、TimeUnit.SECONDS(秒)、TimeUnit.MINUTES(分)。
- workQueue(必需):任务队列。通过线程池的 execute() 方法提交的 Runnable 对象将存储在该参数中。其采用阻塞队列实现。
- threadFactory(可选):线程工厂。用于指定为线程池创建新线程的方式。
- handler(可选):拒绝策略。当达到最大线程数时需要执行的饱和策略。
线程池的使用流程如下:
// 创建线程池
ThreadPoolExecutor threadPool = new ThreadPoolExecutor(CORE_POOL_SIZE,
                                             MAXIMUM_POOL_SIZE,
                                             KEEP_ALIVE,
                                             TimeUnit.SECONDS,
                                             sPoolWorkQueue,
                                             sThreadFactory);
// 向线程池提交任务
threadPool.execute(new Runnable() {
    @Override
    public void run() {
        ... // 线程执行的任务
    }
});
// 关闭线程池
threadPool.shutdown(); // 设置线程池的状态为SHUTDOWN,然后中断所有没有正在执行任务的线程
threadPool.shutdownNow(); // 设置线程池的状态为 STOP,然后尝试停止所有的正在执行或暂停任务的线程,并返回等待执行任务的列表
3 线程池的工作原理
下面来描述一下线程池工作的原理,同时对上面的参数有一个更深的了解。其工作原理流程图如下:
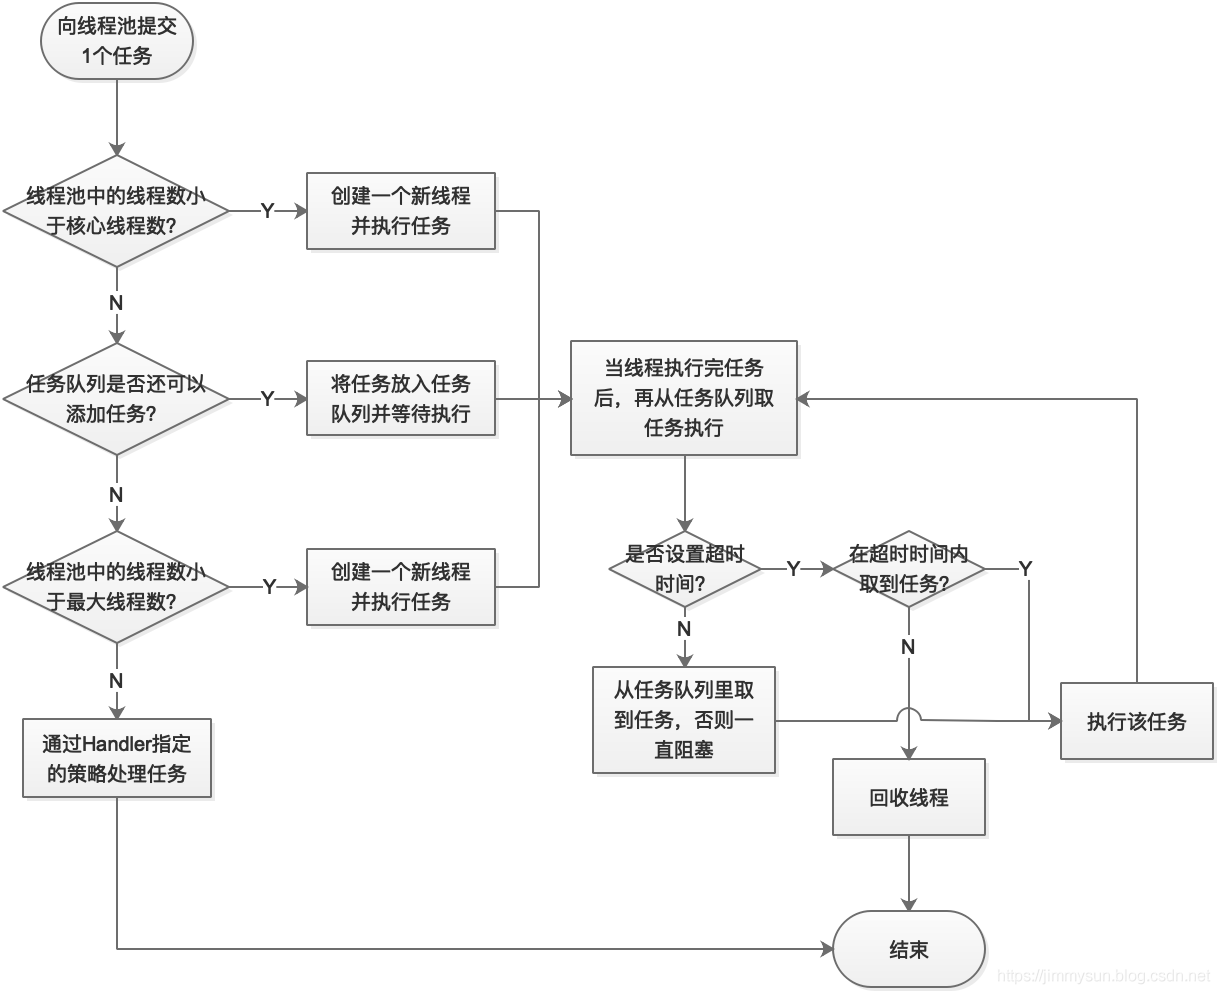
通过上图,相信大家已经对所有参数有个了解了。下面再对任务队列、线程工厂和拒绝策略做更多的说明。
4 线程池的参数
4.1 任务队列(workQueue)
任务队列是基于阻塞队列实现的,即采用生产者消费者模式,在 Java 中需要实现 BlockingQueue 接口。但 Java 已经为我们提供了 7 种阻塞队列的实现:
- ArrayBlockingQueue:一个由数组结构组成的有界阻塞队列(数组结构可配合指针实现一个环形队列)。
- LinkedBlockingQueue: 一个由链表结构组成的有界阻塞队列,在未指明容量时,容量默认为 Integer.MAX_VALUE。
- PriorityBlockingQueue: 一个支持优先级排序的无界阻塞队列,对元素没有要求,可以实现 Comparable 接口也可以提供 Comparator 来对队列中的元素进行比较。跟时间没有任何关系,仅仅是按照优先级取任务。
- DelayQueue:类似于PriorityBlockingQueue,是二叉堆实现的无界优先级阻塞队列。要求元素都实现 Delayed 接口,通过执行时延从队列中提取任务,时间没到任务取不出来。
- SynchronousQueue: 一个不存储元素的阻塞队列,消费者线程调用 take() 方法的时候就会发生阻塞,直到有一个生产者线程生产了一个元素,消费者线程就可以拿到这个元素并返回;生产者线程调用 put() 方法的时候也会发生阻塞,直到有一个消费者线程消费了一个元素,生产者才会返回。
- LinkedBlockingDeque: 使用双向队列实现的有界双端阻塞队列。双端意味着可以像普通队列一样 FIFO(先进先出),也可以像栈一样 FILO(先进后出)。
- LinkedTransferQueue: 它是ConcurrentLinkedQueue、LinkedBlockingQueue 和 SynchronousQueue 的结合体,但是把它用在 ThreadPoolExecutor 中,和 LinkedBlockingQueue 行为一致,但是是无界的阻塞队列。
注意有界队列和无界队列的区别:如果使用有界队列,当队列饱和时并超过最大线程数时就会执行拒绝策略;而如果使用无界队列,因为任务队列永远都可以添加任务,所以设置 maximumPoolSize 没有任何意义。
4.2 线程工厂(threadFactory)
线程工厂指定创建线程的方式,需要实现 ThreadFactory 接口,并实现 newThread(Runnable r) 方法。该参数可以不用指定,Executors 框架已经为我们实现了一个默认的线程工厂:
/**
 * The default thread factory.
 */
private static class DefaultThreadFactory implements ThreadFactory {
    private static final AtomicInteger poolNumber = new AtomicInteger(1);
    private final ThreadGroup group;
    private final AtomicInteger threadNumber = new AtomicInteger(1);
    private final String namePrefix;

    DefaultThreadFactory() {
        SecurityManager s = System.getSecurityManager();
        group = (s != null) ? s.getThreadGroup() :
                              Thread.currentThread().getThreadGroup();
        namePrefix = "pool-" +
                      poolNumber.getAndIncrement() +
                     "-thread-";
    }

    public Thread newThread(Runnable r) {
        Thread t = new Thread(group, r,
                              namePrefix + threadNumber.getAndIncrement(),
                              0);
        if (t.isDaemon())
            t.setDaemon(false);
        if (t.getPriority() != Thread.NORM_PRIORITY)
            t.setPriority(Thread.NORM_PRIORITY);
        return t;
    }
}
4.3 拒绝策略(handler)
当线程池的线程数达到最大线程数时,需要执行拒绝策略。拒绝策略需要实现 RejectedExecutionHandler 接口,并实现 rejectedExecution(Runnable r, ThreadPoolExecutor executor) 方法。不过 Executors 框架已经为我们实现了 4 种拒绝策略:
- AbortPolicy(默认):丢弃任务并抛出 RejectedExecutionException 异常。
- CallerRunsPolicy:由调用线程处理该任务。
- DiscardPolicy:丢弃任务,但是不抛出异常。可以配合这种模式进行自定义的处理方式。
- DiscardOldestPolicy:丢弃队列最早的未处理任务,然后重新尝试执行任务。
5 功能线程池
嫌上面使用线程池的方法太麻烦?其实Executors已经为我们封装好了 4 种常见的功能线程池,如下:
- 定长线程池(FixedThreadPool)
- 定时线程池(ScheduledThreadPool )
- 可缓存线程池(CachedThreadPool)
- 单线程化线程池(SingleThreadExecutor)
5.1 定长线程池(FixedThreadPool)
创建方法的源码:
public static ExecutorService newFixedThreadPool(int nThreads) {
    return new ThreadPoolExecutor(nThreads, nThreads,
                                  0L, TimeUnit.MILLISECONDS,
                                  new LinkedBlockingQueue<Runnable>());
}
public static ExecutorService newFixedThreadPool(int nThreads, ThreadFactory threadFactory) {
    return new ThreadPoolExecutor(nThreads, nThreads,
                                  0L, TimeUnit.MILLISECONDS,
                                  new LinkedBlockingQueue<Runnable>(),
                                  threadFactory);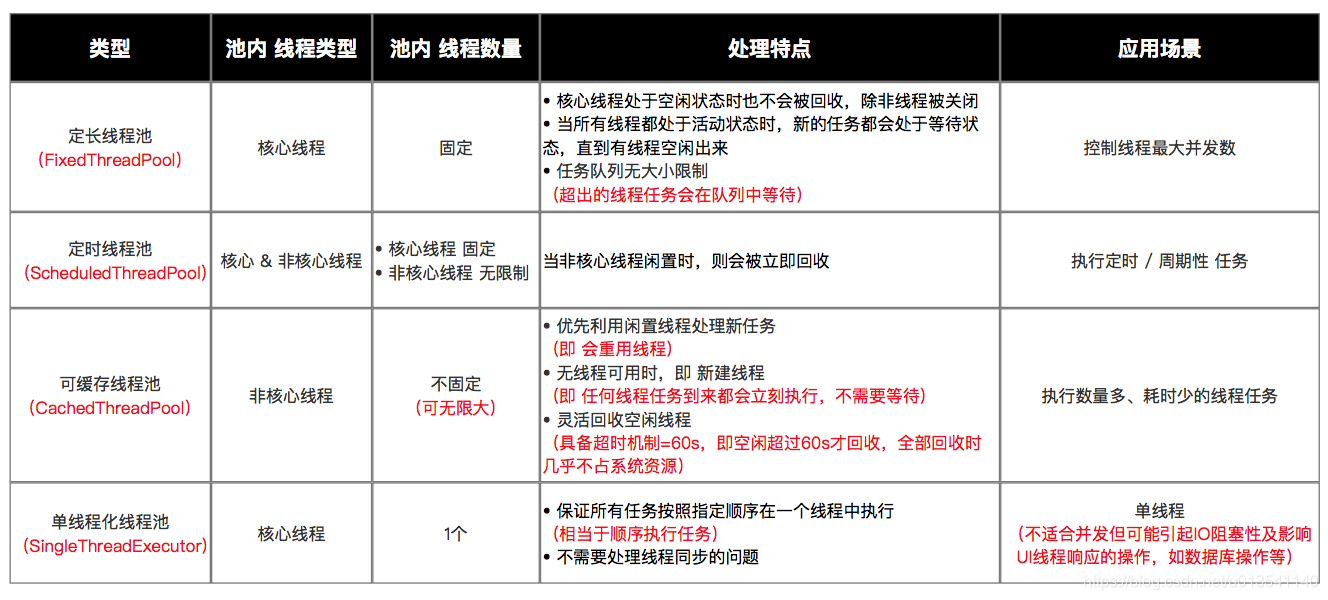
}- 特点:只有核心线程,线程数量固定,执行完立即回收,任务队列为链表结构的有界队列。
- 应用场景:控制线程最大并发数。
使用示例:
// 1. 创建定长线程池对象 & 设置线程池线程数量固定为3
ExecutorService fixedThreadPool = Executors.newFixedThreadPool(3);
// 2. 创建好Runnable类线程对象 & 需执行的任务
Runnable task =new Runnable(){
  public void run() {
     System.out.println("执行任务啦");
  }
};
// 3. 向线程池提交任务
fixedThreadPool.execute(task);
5.2 定时线程池(ScheduledThreadPool )
创建方法的源码:
private static final long DEFAULT_KEEPALIVE_MILLIS = 10L;

public static ScheduledExecutorService newScheduledThreadPool(int corePoolSize) {
    return new ScheduledThreadPoolExecutor(corePoolSize);
}
public ScheduledThreadPoolExecutor(int corePoolSize) {
    super(corePoolSize, Integer.MAX_VALUE,
          DEFAULT_KEEPALIVE_MILLIS, MILLISECONDS,
          new DelayedWorkQueue());
}

public static ScheduledExecutorService newScheduledThreadPool(
        int corePoolSize, ThreadFactory threadFactory) {
    return new ScheduledThreadPoolExecutor(corePoolSize, threadFactory);
}
public ScheduledThreadPoolExecutor(int corePoolSize,
                                   ThreadFactory threadFactory) {
    super(corePoolSize, Integer.MAX_VALUE,
          DEFAULT_KEEPALIVE_MILLIS, MILLISECONDS,
          new DelayedWorkQueue(), threadFactory);
}- 特点:核心线程数量固定,非核心线程数量无限,执行完闲置 10ms 后回收,任务队列为延时阻塞队列。
- 应用场景:执行定时或周期性的任务。
使用示例:
// 1. 创建 定时线程池对象 & 设置线程池线程数量固定为5
ScheduledExecutorService scheduledThreadPool = Executors.newScheduledThreadPool(5);
// 2. 创建好Runnable类线程对象 & 需执行的任务
Runnable task =new Runnable(){
  public void run() {
     System.out.println("执行任务啦");
  }
};
// 3. 向线程池提交任务
scheduledThreadPool.schedule(task, 1, TimeUnit.SECONDS); // 延迟1s后执行任务
scheduledThreadPool.scheduleAtFixedRate(task,10,1000,TimeUnit.MILLISECONDS);// 延迟10ms后、每隔1000ms执行任务
5.3 可缓存线程池(CachedThreadPool)
创建方法的源码:
public static ExecutorService newCachedThreadPool() {
    return new ThreadPoolExecutor(0, Integer.MAX_VALUE,
                                  60L, TimeUnit.SECONDS,
                                  new SynchronousQueue<Runnable>());
}
public static ExecutorService newCachedThreadPool(ThreadFactory threadFactory) {
    return new ThreadPoolExecutor(0, Integer.MAX_VALUE,
                                  60L, TimeUnit.SECONDS,
                                  new SynchronousQueue<Runnable>(),
                                  threadFactory);
}- 特点:无核心线程,非核心线程数量无限,执行完闲置 60s 后回收,任务队列为不存储元素的阻塞队列。
- 应用场景:执行大量、耗时少的任务。
使用示例:
// 1. 创建可缓存线程池对象
ExecutorService cachedThreadPool = Executors.newCachedThreadPool();
// 2. 创建好Runnable类线程对象 & 需执行的任务
Runnable task =new Runnable(){
  public void run() {
     System.out.println("执行任务啦");
  }
};
// 3. 向线程池提交任务
cachedThreadPool.execute(task);
5.4 单线程化线程池(SingleThreadExecutor)
创建方法的源码:
public static ExecutorService newSingleThreadExecutor() {
    return new FinalizableDelegatedExecutorService
        (new ThreadPoolExecutor(1, 1,
                                0L, TimeUnit.MILLISECONDS,
                                new LinkedBlockingQueue<Runnable>()));
}
public static ExecutorService newSingleThreadExecutor(ThreadFactory threadFactory) {
    return new FinalizableDelegatedExecutorService
        (new ThreadPoolExecutor(1, 1,
                                0L, TimeUnit.MILLISECONDS,
                                new LinkedBlockingQueue<Runnable>(),
                                threadFactory));
}- 特点:只有 1 个核心线程,无非核心线程,执行完立即回收,任务队列为链表结构的有界队列。
- 应用场景:不适合并发但可能引起 IO 阻塞性及影响 UI 线程响应的操作,如数据库操作、文件操作等。
使用示例:
// 1. 创建单线程化线程池
ExecutorService singleThreadExecutor = Executors.newSingleThreadExecutor();
// 2. 创建好Runnable类线程对象 & 需执行的任务
Runnable task =new Runnable(){
  public void run() {
     System.out.println("执行任务啦");
  }
};
// 3. 向线程池提交任务
singleThreadExecutor.execute(task);
5.5 对比
6 总结
Executors 的 4 个功能线程池虽然方便,但现在已经不建议使用了,而是建议直接通过使用 ThreadPoolExecutor 的方式,这样的处理方式让写的同学更加明确线程池的运行规则,规避资源耗尽的风险。
其实 Executors 的 4 个功能线程有如下弊端:
- FixedThreadPool 和 SingleThreadExecutor:主要问题是堆积的请求处理队列均采用 LinkedBlockingQueue,可能会耗费非常大的内存,甚至 OOM。
- CachedThreadPool 和 ScheduledThreadPool:主要问题是线程数最大数是 Integer.MAX_VALUE,可能会创建数量非常多的线程,甚至 OOM。
参考
智能推荐
while循环&CPU占用率高问题深入分析与解决方案_main函数使用while(1)循环cpu占用99-程序员宅基地
文章浏览阅读3.8k次,点赞9次,收藏28次。直接上一个工作中碰到的问题,另外一个系统开启多线程调用我这边的接口,然后我这边会开启多线程批量查询第三方接口并且返回给调用方。使用的是两三年前别人遗留下来的方法,放到线上后发现确实是可以正常取到结果,但是一旦调用,CPU占用就直接100%(部署环境是win server服务器)。因此查看了下相关的老代码并使用JProfiler查看发现是在某个while循环的时候有问题。具体项目代码就不贴了,类似于下面这段代码。while(flag) {//your code;}这里的flag._main函数使用while(1)循环cpu占用99
【无标题】jetbrains idea shift f6不生效_idea shift +f6快捷键不生效-程序员宅基地
文章浏览阅读347次。idea shift f6 快捷键无效_idea shift +f6快捷键不生效
node.js学习笔记之Node中的核心模块_node模块中有很多核心模块,以下不属于核心模块,使用时需下载的是-程序员宅基地
文章浏览阅读135次。Ecmacript 中没有DOM 和 BOM核心模块Node为JavaScript提供了很多服务器级别,这些API绝大多数都被包装到了一个具名和核心模块中了,例如文件操作的 fs 核心模块 ,http服务构建的http 模块 path 路径操作模块 os 操作系统信息模块// 用来获取机器信息的var os = require('os')// 用来操作路径的var path = require('path')// 获取当前机器的 CPU 信息console.log(os.cpus._node模块中有很多核心模块,以下不属于核心模块,使用时需下载的是
数学建模【SPSS 下载-安装、方差分析与回归分析的SPSS实现(软件概述、方差分析、回归分析)】_化工数学模型数据回归软件-程序员宅基地
文章浏览阅读10w+次,点赞435次,收藏3.4k次。SPSS 22 下载安装过程7.6 方差分析与回归分析的SPSS实现7.6.1 SPSS软件概述1 SPSS版本与安装2 SPSS界面3 SPSS特点4 SPSS数据7.6.2 SPSS与方差分析1 单因素方差分析2 双因素方差分析7.6.3 SPSS与回归分析SPSS回归分析过程牙膏价格问题的回归分析_化工数学模型数据回归软件
利用hutool实现邮件发送功能_hutool发送邮件-程序员宅基地
文章浏览阅读7.5k次。如何利用hutool工具包实现邮件发送功能呢?1、首先引入hutool依赖<dependency> <groupId>cn.hutool</groupId> <artifactId>hutool-all</artifactId> <version>5.7.19</version></dependency>2、编写邮件发送工具类package com.pc.c..._hutool发送邮件
docker安装elasticsearch,elasticsearch-head,kibana,ik分词器_docker安装kibana连接elasticsearch并且elasticsearch有密码-程序员宅基地
文章浏览阅读867次,点赞2次,收藏2次。docker安装elasticsearch,elasticsearch-head,kibana,ik分词器安装方式基本有两种,一种是pull的方式,一种是Dockerfile的方式,由于pull的方式pull下来后还需配置许多东西且不便于复用,个人比较喜欢使用Dockerfile的方式所有docker支持的镜像基本都在https://hub.docker.com/docker的官网上能找到合..._docker安装kibana连接elasticsearch并且elasticsearch有密码
随便推点
Python 攻克移动开发失败!_beeware-程序员宅基地
文章浏览阅读1.3w次,点赞57次,收藏92次。整理 | 郑丽媛出品 | CSDN(ID:CSDNnews)近年来,随着机器学习的兴起,有一门编程语言逐渐变得火热——Python。得益于其针对机器学习提供了大量开源框架和第三方模块,内置..._beeware
Swift4.0_Timer 的基本使用_swift timer 暂停-程序员宅基地
文章浏览阅读7.9k次。//// ViewController.swift// Day_10_Timer//// Created by dongqiangfei on 2018/10/15.// Copyright 2018年 飞飞. All rights reserved.//import UIKitclass ViewController: UIViewController { ..._swift timer 暂停
元素三大等待-程序员宅基地
文章浏览阅读986次,点赞2次,收藏2次。1.硬性等待让当前线程暂停执行,应用场景:代码执行速度太快了,但是UI元素没有立马加载出来,造成两者不同步,这时候就可以让代码等待一下,再去执行找元素的动作线程休眠,强制等待 Thread.sleep(long mills)package com.example.demo;import org.junit.jupiter.api.Test;import org.openqa.selenium.By;import org.openqa.selenium.firefox.Firefox.._元素三大等待
Java软件工程师职位分析_java岗位分析-程序员宅基地
文章浏览阅读3k次,点赞4次,收藏14次。Java软件工程师职位分析_java岗位分析
Java:Unreachable code的解决方法_java unreachable code-程序员宅基地
文章浏览阅读2k次。Java:Unreachable code的解决方法_java unreachable code
标签data-*自定义属性值和根据data属性值查找对应标签_如何根据data-*属性获取对应的标签对象-程序员宅基地
文章浏览阅读1w次。1、html中设置标签data-*的值 标题 11111 222222、点击获取当前标签的data-url的值$('dd').on('click', function() { var urlVal = $(this).data('ur_如何根据data-*属性获取对应的标签对象