旋转拖动验证码解决方案_load_model("keras2.hdf5", custom_objects={'angle_e-程序员宅基地
前因
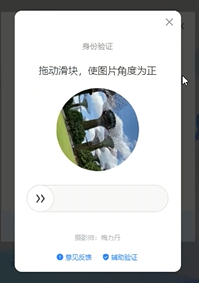
曾几何时,你是否被一个旋转验证码而困扰,没错今日主题——旋转验证码。

之前也是被他伤透了心,研究了好几天的js,想直接通过接口传输直接解决验证码的,然而我失败了,不过这一次,他来了他来了,他带着RotNet走来了。
彩虹屁
RotNet也是我无意间发现的,没错时隔了好几个月,他自己出现在我眼前的。这是他的github:https://github.com/d4nst/RotNet/tree/master,他主要是预测图像的旋转角度以校正其方向,库中包括很全,数据集的下载,训练,预测全都有,而且最最最重要的是,大神提供了模型,我的天。。。这是什么神仙,你是孙悟空派来拯救我的吧!兄弟!!!
当然有兴趣的同学可以看看他的文章,有具体的思路和网络实现。还有觉得有用的同学可以星一下他的github
好的,话不多说,先看看我最后的成果吧,

思路和修改
然后因为在跳出验证码的时候一般是直接给出图片的网址,所以我修改了源文件,用来直接读取网络图片和修整图片大小来适应网络,
#utils.py


#在RotNetDataGenerator._get_batches_of_transformed_samples中添加响应代码
#增加读取网络图片的函数

class RotNetDataGenerator(Iterator):
    def _get_batches_of_transformed_samples(self, index_array):
        # create array to hold the images
        batch_x = np.zeros((len(index_array),) + self.input_shape, dtype='float32')
        # create array to hold the labels
        batch_y = np.zeros(len(index_array), dtype='float32')

        # iterate through the current batch
        for i, j in enumerate(index_array):
            if self.filenames is None:
                image = self.images[j]
            else:
                is_color = int(self.color_mode == 'rgb')
                #修改这这一块{
   {
   {
   {
   {
   {
   {
   {
   {
                image = ImageScale(self.filenames[j]) if self.filenames[j][:4].lower()=="http" else cv2.imread(self.filenames[j], is_color)
                h,w=image.shape[:2]
                if h !=224 or w !=224:
                    image = cv2.resize(image, (224, 224), interpolation=cv2.INTER_CUBIC)

                #}}}}}}}}
                if is_color:
                    image = cv2.cvtColor(image, cv2.COLOR_BGR2RGB)

            if self.rotate:
                # get a random angle
                rotation_angle = np.random.randint(360)
            else:
                rotation_angle = 0

            # generate the rotated image
            rotated_image = generate_rotated_image(
                image,
                rotation_angle,
                size=self.input_shape[:2],
                crop_center=self.crop_center,
                crop_largest_rect=self.crop_largest_rect
            )

            # add dimension to account for the channels if the image is greyscale
            if rotated_image.ndim == 2:
                rotated_image = np.expand_dims(rotated_image, axis=2)

            # store the image and label in their corresponding batches
            batch_x[i] = rotated_image
            batch_y[i] = rotation_angle

        if self.one_hot:
            # convert the numerical labels to binary labels
            batch_y = to_categorical(batch_y, 360)
        else:
            batch_y /= 360

        # preprocess input images
        if self.preprocess_func:
            batch_x = self.preprocess_func(batch_x)

        return batch_x, batch_y

def ImageScale(url):
    resp = request.urlopen(url)
    image = np.asarray(bytearray(resp.read()), dtype="uint8")
    image = cv2.imdecode(image, cv2.IMREAD_COLOR)
    return image
预测角度,也是根据他的源码基础上做修改的,需要注意的是模型位置和测试图片的位置需要修改为你电脑上的文件位置
from __future__ import print_function

import os
import numpy as np

from keras.applications.imagenet_utils import preprocess_input
from keras.models import load_model

from utils import RotNetDataGenerator, angle_error


def process_images(input_path,
                   batch_size=64, crop=True):
    #需要修改模型文件位置
    model = load_model("I:\\pythonProject\\RotNet\\rotnet_models\\rotnet_street_view_resnet50_keras2.hdf5", custom_objects={'angle_error': angle_error}, compile=False)

    extensions = ['.jpg', '.jpeg', '.bmp', '.png']

    if os.path.isfile(input_path) or input_path[:4].lower()=="http":
        image_paths = [input_path]

    else:
        image_paths = [os.path.join(input_path, f)
                       for f in os.listdir(input_path)
                       if os.path.splitext(f)[1].lower() in extensions]


    predictions = model.predict_generator(
        RotNetDataGenerator(
            image_paths,
            input_shape=(224, 224, 3),
            batch_size=batch_size,
            one_hot=True,
            preprocess_func=preprocess_input,
            rotate=False,
            crop_largest_rect=True,
            crop_center=True
        ),
        val_samples=len(image_paths)
    )

    predicted_angles = np.argmax(predictions, axis=1)
    print(predicted_angles)
    return predicted_angles


if __name__ == '__main__':
    #修改测试图片位置,本地地址,或是网络图片地址
    process_images("I:\\pythonProject\\RotNet\\data\\test_examples\\008999_4.jpg")
然后通过分析百度指数的js源码发现旋转角度的公式是 angle=o/b*360

即o为拖动的距离,b=底轴宽-按钮宽


所以我们需要知道的拖动的距离就是 o=angle*360*b
好的,汇总到一起,就可以了。模拟登录百度指数,而且支持无头模式
中间有参考一段这位老哥写的pyppeteer的拖动,https://blog.csdn.net/qq393912540/article/details/91956136
还有这位老哥的反爬策略
import asyncio
from pyppeteer import launch
import random
from correct_rotation_for_angle import process_images


async def page_evaluate(page):
    await page.evaluate(
        '''() =>{ Object.defineProperties(navigator,{ webdriver:{ get: () => false } });window.screen.width=1366; }''')
    await page.evaluate('''() =>{ window.navigator.chrome = { runtime: {}, };}''')
    await page.evaluate('''() =>{ Object.defineProperty(navigator, 'languages', { get: () => ['en-US', 'en'] }); }''')
    await page.evaluate('''() =>{ Object.defineProperty(navigator, 'plugins', { get: () => [1, 2, 3, 4, 5,6], }); }''')


async def main(username, password, width, height):

    browser = await launch({'headless': False,#可以无头
                            'slowMo':1.3,
                            'userDataDir': './userdata',
                            'args': [
                              f'--window-size={width},{height}'
                              '--disable-extensions',
                              '--hide-scrollbars',
                              '--disable-bundled-ppapi-flash',
                              '--mute-audio',
                              '--no-sandbox',
                              '--disable-setuid-sandbox',
                              '--disable-gpu',
                              '--disable-infobars'
                            ],
                            'dumpio': True
                            })
    page = await browser.newPage()
    # 设置浏览器头部
    await page.setUserAgent("Mozilla/5.0 (Windows NT 10.0; Win64; x64) AppleWebKit/537.36 (KHTML, like Gecko) Chrome/83.0.4103.97 Safari/537.36")

    # 设置浏览器大小
    await page.setViewport({'width': width, 'height': height})
    # 注入js,防反爬
    await page_evaluate(page)
    res=await page.goto('http://index.baidu.com/v2/index.html')

    await page.waitFor(2000)
    # 获取登录位置的文字,如果是登录就登录,不是就使用cookie
    elements = await (await(await page.querySelector('.username-text')).getProperty('textContent')).jsonValue()

    if elements == "登录":

        await page.click(".username-text")
        await asyncio.sleep(1.6)
        # 填写用户名
        await page.type('.pass-text-input-userName', username)
        # 填写密码
        await page.hover(".pass-text-input-password")
        await asyncio.sleep(0.5)
        await page.mouse.down()
        await asyncio.sleep(random.random())
        await page.mouse.up()
        # await page.click(".pass-text-input-password")
        await page.type('.pass-text-input-password', password)
        # 点击登录
        await page.mouse.move(page.mouse._x+random.randint(50,100), page.mouse._y+random.randint(100,200), options={"step": 3})
        await page.hover(".pass-button-submit")
        await page.mouse.down()
        await asyncio.sleep(random.random())
        await page.mouse.up()
        # await page.click(".pass-button-submit")
        await asyncio.sleep(2)
        rotImg = await page.querySelector('.vcode-spin-img')
        # 如果有验证码就去旋转
        while rotImg:
            img_url=await (await(rotImg).getProperty("src")).jsonValue()
            angle=process_images(img_url)[0]
            bottom_line=await (await(await page.querySelector(".vcode-spin-bottom")).getProperty("offsetWidth")).jsonValue()
            button_line = await (await(await page.querySelector(".vcode-spin-button")).getProperty("offsetWidth")).jsonValue()
            b=bottom_line-button_line
            move_line = angle/360*b
            await try_validation(page,move_line)
            # 停个3秒
            await asyncio.sleep(3)
            rotImg = await page.querySelector('.vcode-spin-img')

        #如果有需要短信验证码的弹窗的就费了
        no_in = await page.querySelector(".pass-forceverify-wrapper .forceverify-header-a")
        if no_in:
            print("有短信验证码废了")
            await no_in.click()
    # 停个2秒
    await asyncio.sleep(2)
    cookies = await page.cookies()
    # 无头模式可以打印一下用户名看看能不能登录
    elements = await (await(await page.querySelector('.username-text')).getProperty('textContent')).jsonValue()
    print(elements)
    await browser.close()
    if elements == "登录":
        return None
    return cookies

async def try_validation(page, distance=308):
    # 将距离拆分成两段,模拟正常人的行为
    distance1 = distance - 10
    distance2 = 10
    btn_position = await page.evaluate('''
       () =>{
        return {
         x: document.querySelector('.vcode-spin-button').getBoundingClientRect().x,
         y: document.querySelector('.vcode-spin-button').getBoundingClientRect().y,
         width: document.querySelector('.vcode-spin-button').getBoundingClientRect().width,
         height: document.querySelector('.vcode-spin-button').getBoundingClientRect().height
         }}
        ''')
    x = btn_position['x'] + btn_position['width'] / 2
    y = btn_position['y'] + btn_position['height'] / 2
    # print(btn_position)
    await page.mouse.move(x, y)
    await page.mouse.down()
    await page.mouse.move(x + distance1, y, {'steps': 30})
    await page.waitFor(800)
    await page.mouse.move(x + distance1 + distance2, y, {'steps': 20})
    await page.waitFor(800)
    await page.mouse.up()

def baidu_login(username, password, width, height):
    return asyncio.get_event_loop().run_until_complete(main(username, password, width, height))


if __name__ == "__main__":

    width, height = 1366, 768
    username = '你的账户'
    password = '你的密码'

    cookies = baidu_login(username, password, width, height)
    print(cookies)
    if cookies:
        string_cookies = ""
        for each in cookies:
            string_cookies += f"{each['name']}={each['value']};"
最后
完整的项目放在https://github.com/ShortCJL/RotateCode,注意:需要把模型下载下来解压到根目录
今天的感触就是,让我们站在巨人的肩膀上快速成长吧。加油,兄弟!!!
智能推荐
页面打印-程序员宅基地
文章浏览阅读92次。最佳答案对JS的打印方法总结一下,方便日后查阅。一.用JS自带函数打印直接调用Java代码 复制代码 1. <a href="javascript:window.print();">打印</a> <a href="javascript:window.print();">打印</a>..._toolbar: true可以打印页面吗
中国操作系统变迁史,鸿蒙之前的尸骨_国产操作系统的崛起之路的相关介绍-程序员宅基地
文章浏览阅读1.3w次,点赞156次,收藏236次。本文转载自程序员极客实验室把时钟调回到16年前,地处北京市东部远郊的平谷区做了一个大胆的决定:在全区行政公务系统全部大范围地使用国产Linux桌面操作系统,并纳入考核。此行的目的,是展开全面取代微软Windows的尝试。然而,国产操作系统并不受欢迎。在一年多的推广过程中,大家像小孩子过家家一样,在检查时用国产,检查完换盗版微软。许多问题暴露出来。比如,本来在使用微软浏览器上网很正常实现的功能,Linux下的浏览器却不能正常使用。16年过去了,6月2日晚间,华为在直播中,向观..._国产操作系统的崛起之路的相关介绍
char格式化linux和windows区别_linux和windows char区别-程序员宅基地
文章浏览阅读980次。在windows下可以使用 ''%C",将char字符格式化输入成大写字母而linux只能使用 "%c"进行格式化输入_linux和windows char区别
PAT-A-1006 Sign In and Sign Out【简单模拟】-程序员宅基地
文章浏览阅读3.8w次。At the beginning of every day, the first person who signs in the computer room will unlock the door, and the last one who signs out will lock the door. Given the records of signing in's and out's, you...
TFTP传输---wireshark抓包工具,听诊器_tftp抓包-程序员宅基地
文章浏览阅读1.9k次,点赞2次,收藏6次。1.广播受限广播2.每两个16位进制组成一个字节,再翻译成ASCII码_tftp抓包
2021年双十一活动,淘宝/天猫喵糖/京东双11任务自动助手软件+淘宝/京东/拼多多/抖音/直播抢购软件,分享代码_天猫双11幻想岛辅助-程序员宅基地
文章浏览阅读3.3k次,点赞5次,收藏26次。软件下载地址https://www.lanzoui.com/b01cfbrbihttps://www.lanzoui.com/b01cfbrbi功能1、支持天猫喵糖/京东双11任务自动完成,领取奖励(亲测可能,部分任务需要手动)2、支持淘宝/天猫/京东/拼多多/抖音/直播抢购,支持BP模式(测试了京东可以自动下单)if (!auto.service) { toast('无障碍服务未启动!退出!') exit()} // 打开淘宝活动页面 .._天猫双11幻想岛辅助
随便推点
pandas合并多个DataFrame_pd.merge多个dataframe-程序员宅基地
文章浏览阅读7.1k次,点赞5次,收藏16次。pandas合并多个DataFrame合并两个DataFrame合并多个DataFrame合并两个DataFrame合并两个DataFrame用pd.mergeimport pandas as pdimport numpy as npdf1 = pd.DataFrame(np.array([ ['a', 1, 2], ['b', 3, 4], ['c', 5, 6]]), columns=['name', 'num11', 'num12'])df2 = pd._pd.merge多个dataframe
ArrayList核心代码注释汉化-程序员宅基地
文章浏览阅读244次。public class ArrayList<E> extends AbstractList<E> implements List<E>, RandomAccess, Cloneable, java.io.Serializable { private sta..._arraylist代码注释汉化
软件测试面试题:怎么设计接口测试用例?_面试题如何设计接口-程序员宅基地
文章浏览阅读2.3k次,点赞5次,收藏27次。怎么设计接口测试用例?通常,设计接口测试用例需要考虑以下几个方面:(1)是否满足前提条件有些接口需要满足前提,才可成功获取数据。常见的,需要登录Token逆向用例:针对是否满足前置条件(假设为n个条件),设计0~n条用例(2)是否携带默认值参数正向用例:带默认值的参数都不填写、不传参,必填参数都填写正确且存在的“常规”值,其他不填写,设计1条用例(3)业务规则、功能需求这里根据时间情况,结合接口参数说明,可能需要设计N条正向用例和逆向用例..._面试题如何设计接口
jQuery实现遮蔽层的弹出层,根据后台循环取出的数据弹出所要的DIV层_jquery 弹出层后端获取-程序员宅基地
文章浏览阅读340次。<style type="text/css"> .bgDiv{ background-color:#e3e3e3; position:absolute; z-index:1; left:0; top:0; display:none; width:100%; ..._jquery 弹出层后端获取
关于sublime3的使用-程序员宅基地
文章浏览阅读40次。一、安装Package Control使用Ctrl+`快捷键或者通过View->Show Console菜单打开命令行,粘贴如下代码:importurllib.request,os; pf ='Package Control.sublime-package'; ipp =sublime.installed_packages_path(); urllib.request.inst...
uni-app 打包 ios 测试包,通过 testFlight 分发测试_uniapp testflight-程序员宅基地
文章浏览阅读5.2k次。uni-app 打包 ios 测试包,通过 testFlight 分发测试_uniapp testflight