numpy+cnn_numpycnn.relu-程序员宅基地
技术标签: deep learning python
import numpy
import sys


def conv_(img, conv_filter):
    filter_size = conv_filter.shape[1]
    result = numpy.zeros((img.shape))
    #Looping through the image to apply the convolution operation.
    for r in numpy.uint16(numpy.arange(filter_size/2.0,
                          img.shape[0]-filter_size/2.0+1)):
        for c in numpy.uint16(numpy.arange(filter_size/2.0,
                                           img.shape[1]-filter_size/2.0+1)):
            """
            Getting the current region to get multiplied with the filter.
            How to loop through the image and get the region based on
            the image and filer sizes is the most tricky part of convolution.
            """
            curr_region = img[r-numpy.uint16(numpy.floor(filter_size/2.0)):r+numpy.uint16(numpy.ceil(filter_size/2.0)),
                              c-numpy.uint16(numpy.floor(filter_size/2.0)):c+numpy.uint16(numpy.ceil(filter_size/2.0))]
            #Element-wise multipliplication between the current region and the filter.
            curr_result = curr_region * conv_filter
            conv_sum = numpy.sum(curr_result) #Summing the result of multiplication.
            result[r, c] = conv_sum #Saving the summation in the convolution layer feature map.

    #Clipping the outliers of the result matrix.
    final_result = result[numpy.uint16(filter_size/2.0):result.shape[0]-numpy.uint16(filter_size/2.0),
                          numpy.uint16(filter_size/2.0):result.shape[1]-numpy.uint16(filter_size/2.0)]
    return final_result
def conv(img, conv_filter):
    if len(img.shape) > 2 or len(conv_filter.shape) > 3: # Check if number of image channels matches the filter depth.
        if img.shape[-1] != conv_filter.shape[-1]:
            print("Error: Number of channels in both image and filter must match.")
            sys.exit()
    if conv_filter.shape[1] != conv_filter.shape[2]: # Check if filter dimensions are equal.
        print('Error: Filter must be a square matrix. I.e. number of rows and columns must match.')
        sys.exit()
    if conv_filter.shape[1]%2==0: # Check if filter diemnsions are odd.
        print('Error: Filter must have an odd size. I.e. number of rows and columns must be odd.')
        sys.exit()

    # An empty feature map to hold the output of convolving the filter(s) with the image.
    feature_maps = numpy.zeros((img.shape[0]-conv_filter.shape[1]+1,
                                img.shape[1]-conv_filter.shape[1]+1,
                                conv_filter.shape[0]))

    # Convolving the image by the filter(s).
    for filter_num in range(conv_filter.shape[0]):
        print("Filter ", filter_num + 1)
        curr_filter = conv_filter[filter_num, :] # getting a filter from the bank.
        """
        Checking if there are mutliple channels for the single filter.
        If so, then each channel will convolve the image.
        The result of all convolutions are summed to return a single feature map.
        """
        if len(curr_filter.shape) > 2:
            conv_map = conv_(img[:, :, 0], curr_filter[:, :, 0]) # Array holding the sum of all feature maps.
            for ch_num in range(1, curr_filter.shape[-1]): # Convolving each channel with the image and summing the results.
                conv_map = conv_map + conv_(img[:, :, ch_num],
                                  curr_filter[:, :, ch_num])
        else: # There is just a single channel in the filter.
            conv_map = conv_(img, curr_filter)
        feature_maps[:, :, filter_num] = conv_map # Holding feature map with the current filter.
    return feature_maps # Returning all feature maps.


def pooling(feature_map, size=2, stride=2):
    #Preparing the output of the pooling operation.
    pool_out = numpy.zeros((numpy.uint16((feature_map.shape[0]-size+1)/stride+1),
                            numpy.uint16((feature_map.shape[1]-size+1)/stride+1),
                            feature_map.shape[-1]))
    for map_num in range(feature_map.shape[-1]):
        r2 = 0
        for r in numpy.arange(0,feature_map.shape[0]-size+1, stride):
            c2 = 0
            for c in numpy.arange(0, feature_map.shape[1]-size+1, stride):
                pool_out[r2, c2, map_num] = numpy.max([feature_map[r:r+size,  c:c+size, map_num]])
                c2 = c2 + 1
            r2 = r2 +1
    return pool_out

def relu(feature_map):
    #Preparing the output of the ReLU activation function.
    relu_out = numpy.zeros(feature_map.shape)
    for map_num in range(feature_map.shape[-1]):
        for r in numpy.arange(0,feature_map.shape[0]):
            for c in numpy.arange(0, feature_map.shape[1]):
                relu_out[r, c, map_num] = numpy.max([feature_map[r, c, map_num], 0])
    return relu_out
import skimage.data
import numpy
import matplotlib
import NumPyCNN as numpycnn
# Reading the image
#img = skimage.io.imread("test.jpg")
#img = skimage.data.checkerboard()
img = skimage.data.chelsea()
#img = skimage.data.camera()
# Converting the image into gray.
img = skimage.color.rgb2gray(img)
# First conv layer
#l1_filter = numpy.random.rand(2,7,7)*20 # Preparing the filters randomly.
l1_filter = numpy.zeros((2,3,3))
l1_filter[0, :, :] = numpy.array([[[-1, 0, 1],
[-1, 0, 1],
[-1, 0, 1]]])
l1_filter[1, :, :] = numpy.array([[[1, 1, 1],
[0, 0, 0],
[-1, -1, -1]]])
print("\n**Working with conv layer 1**")
l1_feature_map = numpycnn.conv(img, l1_filter)
print("\n**ReLU**")
l1_feature_map_relu = numpycnn.relu(l1_feature_map)
print("\n**Pooling**")
l1_feature_map_relu_pool = numpycnn.pooling(l1_feature_map_relu, 2, 2)
print("**End of conv layer 1**\n")
# Second conv layer
l2_filter = numpy.random.rand(3, 5, 5, l1_feature_map_relu_pool.shape[-1])
print("\n**Working with conv layer 2**")
l2_feature_map = numpycnn.conv(l1_feature_map_relu_pool, l2_filter)
print("\n**ReLU**")
l2_feature_map_relu = numpycnn.relu(l2_feature_map)
print("\n**Pooling**")
l2_feature_map_relu_pool = numpycnn.pooling(l2_feature_map_relu, 2, 2)
print("**End of conv layer 2**\n")
# Third conv layer
l3_filter = numpy.random.rand(1, 7, 7, l2_feature_map_relu_pool.shape[-1])
print("\n**Working with conv layer 3**")
l3_feature_map = numpycnn.conv(l2_feature_map_relu_pool, l3_filter)
print("\n**ReLU**")
l3_feature_map_relu = numpycnn.relu(l3_feature_map)
print("\n**Pooling**")
l3_feature_map_relu_pool = numpycnn.pooling(l3_feature_map_relu, 2, 2)
print("**End of conv layer 3**\n")
# Graphing results
fig0, ax0 = matplotlib.pyplot.subplots(nrows=1, ncols=1)
ax0.imshow(img).set_cmap("gray")
ax0.set_title("Input Image")
ax0.get_xaxis().set_ticks([])
ax0.get_yaxis().set_ticks([])
matplotlib.pyplot.savefig("in_img.png", bbox_inches="tight")
matplotlib.pyplot.close(fig0)
# Layer 1
fig1, ax1 = matplotlib.pyplot.subplots(nrows=3, ncols=2)
ax1[0, 0].imshow(l1_feature_map[:, :, 0]).set_cmap("gray")
ax1[0, 0].get_xaxis().set_ticks([])
ax1[0, 0].get_yaxis().set_ticks([])
ax1[0, 0].set_title("L1-Map1")
ax1[0, 1].imshow(l1_feature_map[:, :, 1]).set_cmap("gray")
ax1[0, 1].get_xaxis().set_ticks([])
ax1[0, 1].get_yaxis().set_ticks([])
ax1[0, 1].set_title("L1-Map2")
ax1[1, 0].imshow(l1_feature_map_relu[:, :, 0]).set_cmap("gray")
ax1[1, 0].get_xaxis().set_ticks([])
ax1[1, 0].get_yaxis().set_ticks([])
ax1[1, 0].set_title("L1-Map1ReLU")
ax1[1, 1].imshow(l1_feature_map_relu[:, :, 1]).set_cmap("gray")
ax1[1, 1].get_xaxis().set_ticks([])
ax1[1, 1].get_yaxis().set_ticks([])
ax1[1, 1].set_title("L1-Map2ReLU")
ax1[2, 0].imshow(l1_feature_map_relu_pool[:, :, 0]).set_cmap("gray")
ax1[2, 0].get_xaxis().set_ticks([])
ax1[2, 0].get_yaxis().set_ticks([])
ax1[2, 0].set_title("L1-Map1ReLUPool")
ax1[2, 1].imshow(l1_feature_map_relu_pool[:, :, 1]).set_cmap("gray")
ax1[2, 0].get_xaxis().set_ticks([])
ax1[2, 0].get_yaxis().set_ticks([])
ax1[2, 1].set_title("L1-Map2ReLUPool")
matplotlib.pyplot.savefig("L1.png", bbox_inches="tight")
matplotlib.pyplot.close(fig1)
# Layer 2
fig2, ax2 = matplotlib.pyplot.subplots(nrows=3, ncols=3)
ax2[0, 0].imshow(l2_feature_map[:, :, 0]).set_cmap("gray")
ax2[0, 0].get_xaxis().set_ticks([])
ax2[0, 0].get_yaxis().set_ticks([])
ax2[0, 0].set_title("L2-Map1")
ax2[0, 1].imshow(l2_feature_map[:, :, 1]).set_cmap("gray")
ax2[0, 1].get_xaxis().set_ticks([])
ax2[0, 1].get_yaxis().set_ticks([])
ax2[0, 1].set_title("L2-Map2")
ax2[0, 2].imshow(l2_feature_map[:, :, 2]).set_cmap("gray")
ax2[0, 2].get_xaxis().set_ticks([])
ax2[0, 2].get_yaxis().set_ticks([])
ax2[0, 2].set_title("L2-Map3")
ax2[1, 0].imshow(l2_feature_map_relu[:, :, 0]).set_cmap("gray")
ax2[1, 0].get_xaxis().set_ticks([])
ax2[1, 0].get_yaxis().set_ticks([])
ax2[1, 0].set_title("L2-Map1ReLU")
ax2[1, 1].imshow(l2_feature_map_relu[:, :, 1]).set_cmap("gray")
ax2[1, 1].get_xaxis().set_ticks([])
ax2[1, 1].get_yaxis().set_ticks([])
ax2[1, 1].set_title("L2-Map2ReLU")
ax2[1, 2].imshow(l2_feature_map_relu[:, :, 2]).set_cmap("gray")
ax2[1, 2].get_xaxis().set_ticks([])
ax2[1, 2].get_yaxis().set_ticks([])
ax2[1, 2].set_title("L2-Map3ReLU")
ax2[2, 0].imshow(l2_feature_map_relu_pool[:, :, 0]).set_cmap("gray")
ax2[2, 0].get_xaxis().set_ticks([])
ax2[2, 0].get_yaxis().set_ticks([])
ax2[2, 0].set_title("L2-Map1ReLUPool")
ax2[2, 1].imshow(l2_feature_map_relu_pool[:, :, 1]).set_cmap("gray")
ax2[2, 1].get_xaxis().set_ticks([])
ax2[2, 1].get_yaxis().set_ticks([])
ax2[2, 1].set_title("L2-Map2ReLUPool")
ax2[2, 2].imshow(l2_feature_map_relu_pool[:, :, 2]).set_cmap("gray")
ax2[2, 2].get_xaxis().set_ticks([])
ax2[2, 2].get_yaxis().set_ticks([])
ax2[2, 2].set_title("L2-Map3ReLUPool")
matplotlib.pyplot.savefig("L2.png", bbox_inches="tight")
matplotlib.pyplot.close(fig2)
# Layer 3
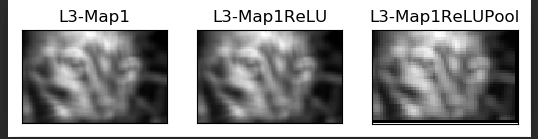
fig3, ax3 = matplotlib.pyplot.subplots(nrows=1, ncols=3)
ax3[0].imshow(l3_feature_map[:, :, 0]).set_cmap("gray")
ax3[0].get_xaxis().set_ticks([])
ax3[0].get_yaxis().set_ticks([])
ax3[0].set_title("L3-Map1")
ax3[1].imshow(l3_feature_map_relu[:, :, 0]).set_cmap("gray")
ax3[1].get_xaxis().set_ticks([])
ax3[1].get_yaxis().set_ticks([])
ax3[1].set_title("L3-Map1ReLU")
ax3[2].imshow(l3_feature_map_relu_pool[:, :, 0]).set_cmap("gray")
ax3[2].get_xaxis().set_ticks([])
ax3[2].get_yaxis().set_ticks([])
ax3[2].set_title("L3-Map1ReLUPool")
matplotlib.pyplot.savefig("L3.png", bbox_inches="tight")
matplotlib.pyplot.close(fig3)
图片保存结果如下:


It's amazing!
卷积层-激活层-池化层
提问:像素全为正,relu激活层还有什么用呢?
答:卷积滤波器的参数可以为负,卷积层的输出可以是负值,所以relu激活层仍然有意义;
提问:池化层后不是就只有一个值了吗?
答:池化层和卷积层一样也有一个类似滤波器进行池化,进行了一个下采样,而不是对整个featuremap选择最大的一个值;比如说2*2 步长为2,每四个元素中选择最大的一个;
提问:为什么没有训练也会不错的效果呢?
答:从逆向思维的角度来看,说明卷积层参数初始值设置得不错;如图所示:本文中的滤波器值如下

智能推荐
python色卡识别_用Python帮小姐姐选口红,人人都是李佳琦-程序员宅基地
文章浏览阅读502次。原标题:用Python帮小姐姐选口红,人人都是李佳琦 对于李佳琦,想必知道他的女生要远远多于男生,李佳琦最早由于直播向广大的网友们推荐口红,逐渐走红网络,被大家称作“口红一哥”。不可否认的是,李佳琦的直播能力确实很强,他能够抓住绝大多数人的心理,让大家喜欢看他的直播,看他直播推荐的口红适不适合自己,色号适合什么样子的妆容。为了提升效率,让自己的家人或者女友能够快速的挑选出合适自己妆容的口红色号,今..._获取口红品牌 及色号,色值api
linux awk命令NR详解,linux awk命令详解-程序员宅基地
文章浏览阅读3.6k次。简介awk命令的名称是取自三位创始人Alfred Aho 、Peter Weinberger 和 Brian Kernighan姓名的首字母,awk有自己的程序设计语言,设计简短的程序,读入文件,数据排序,处理数据,生成报表等功能。awk 通常用于文本处理和报表生成,最基本功能是在文件或者字符串中基于指定规则浏览和抽取信息,awk抽取信息后,才能进行其他文本操作。awk 通常以文件的一行为处理单位..._linux awk nr
android 网络连接失败!failed to connect to /192.168.1.186(port 8080)_failed to connect to 192.168.88.218:80-程序员宅基地
文章浏览阅读1.3w次,点赞5次,收藏2次。在网上找了一个小时,一直没有头绪,因为上个星期还是好好的,最后看到一个大神的解答,只需要将防火墙关闭就好了.原本向测试功能的,却卡在了登录上.以此记录.另外好像还有种错误是电脑与手机连接的WiFi不同,也可以看看...._failed to connect to 192.168.88.218:80
matlab 多径衰落,利用MATLAB仿真多径衰落信道.doc-程序员宅基地
文章浏览阅读1.9k次。利用MATLAB仿真多种多径衰落信道摘要:移动信道的多径传播引起的瑞利衰落,时延扩展以及伴随接收过程的多普勒频移使接受信号受到严重的衰落,阴影效应会是接受的的信号过弱而造成通信的中断:在信道中存在噪声和干扰,也会是接收信号失真而造成误码,所以通过仿真找到衰落的原因并采取一些信号处理技术来改善信号接收质量显得很重要,这里利用MATLAB对多径衰落信道的波形做一比较。一,多径衰落信道的特点关于多径衰落..._matlab多径衰落工具箱
python对json的操作及实例解析_import json灰色-程序员宅基地
文章浏览阅读1w次,点赞2次,收藏17次。Json简介:Json,全名 JavaScript Object Notation,是一种轻量级的数据交换格式。它基于 ECMAScript (w3c制定的js规范)的一个子集,采用完全独立于编程语言的文本格式来存储和表示数据。简洁和清晰的层次结构使得 JSON 成为理想的数据交换语言。 易于人阅读和编写,同时也易于机器解析和生成,并有效地提升网络传输效率。(来自百度百科)python关于json文_import json灰色
mysql实现MHA高可用详细步骤_mysql mha超详细教程-程序员宅基地
文章浏览阅读1.1k次,点赞6次,收藏3次。一、工作原理MHA工作原理总结为以下几条:(1) 从宕机崩溃的 master 保存二进制日志事件(binlog events);(2) 识别含有最新更新的 slave ;(3) 应用差异的中继日志(relay log) 到其他 slave ;(4) 应用从 master 保存的二进制日志事件(binlog events);(5) 通过Manager控制器提升一个 slave 为新 m..._mysql mha超详细教程
随便推点
Linux环境下主从搭建心得(高手勿喷)_linux的java主从策略是什么-程序员宅基地
文章浏览阅读194次。一 java环境安装:1 安装JDK 参考链接地址:https://blog.csdn.net/qq_42815754/article/details/82968464注:有网情况下直接 yum 一键安装:yum -y list java(1)首先执行以下命令查看可安装的jdk版本(2)选择自己需要的jdk版本进行安装,比如这里安装1.8,执行以下命令:yum install -y java-1.8.0-openjdk-devel.x86_64(3)安装完之后,查看安装的jdk 版本,输入以下指令_linux的java主从策略是什么
ACM第四题_acm竞赛题 i 'm from mars-程序员宅基地
文章浏览阅读104次。定义int 类型,由while实现A,B的连续输入,输出A+B的值按Ctrl Z结束循环。#include<iostream>using namespace std;int main(){ int A,B; while(cin>>A>>B) { cout<<A+B<&_acm竞赛题 i 'm from mars
TextView.SetLinkMovementMethod后拦截所有点击事件的原因以及解决方法-程序员宅基地
文章浏览阅读5.2k次。在需要给TextView的某句话添加点击事件的时候,我们一般会使用ClickableSpan来进行富文本编辑。与此同时我们还需要配合 textView.setMovementMethod(LinkMovementMethod.getInstance());方法才能使点击处理生效。但与此同时还会有一个问题:如果我们给父布局添加一个点击事件,需要在点击非链接的时候触发(例如RectclerV..._linkmovementmethod
JAVA实现压缩解压文件_java 解压zip-程序员宅基地
文章浏览阅读1.1w次,点赞6次,收藏31次。JAVA实现压缩解压文件_java 解压zip
JDK8 新特性-Map对key和value分别排序实现_java comparingbykey-程序员宅基地
文章浏览阅读1.3w次,点赞7次,收藏21次。在Java 8 中使用Stream 例子对一个 Map 进行按照keys或者values排序.1. 快速入门 在java 8中按照此步骤对map进行排序.将 Map 转换为 Stream 对其进行排序 Collect and return a new LinkedHashMap (保持顺序)Map result = map.entrySet().stream() .sort..._java comparingbykey
GDKOI2021普及Day1总结-程序员宅基地
文章浏览阅读497次。第一次参加GDKOI,考完感觉还可以,结果发现还是不行,有一些地方细节打错,有些失分严重,总结出以下几点:1.大模拟一定要注意,细节打挂就是没分,像T1就是一道大模拟题,马上切了,后面就没想着检查以下,导致有些地方挂掉了,用民间数据一测,才85分。2.十年OI一场空,不开longlonglong longlonglong见祖宗。今天的T2本来想用暴力水点分的,结果没想到longlong→intlong long\to intlonglong→int,40→040\to040→0。3.代码实现能力太差,_gdkoi