elasticsearch[一]-索引库操作(轻松创建)、文档增删改查、批量写入(效率倍增)_elasticsearch 添加索引-程序员宅基地
技术标签: 索引库创建 elasticsearch 搜索推荐 全文检索 Elastic search ES
elasticsearch[一]-索引库操作(轻松创建)、文档增删改查、批量写入(效率倍增)
1、初始化 RestClient
在 elasticsearch 提供的 API 中,与 elasticsearch 一切交互都封装在一个名为 RestHighLevelClient 的类中,必须先完成这个对象的初始化,建立与 elasticsearch 的连接。
分为三步:
1)引入 es 的 RestHighLevelClient 依赖:
<dependency>
    <groupId>org.elasticsearch.client</groupId>
    <artifactId>elasticsearch-rest-high-level-client</artifactId>
</dependency>
2)因为 SpringBoot 默认的 ES 版本是 7.6.2,所以我们需要覆盖默认的 ES 版本:
<properties>
    <java.version>1.8</java.version>
    <elasticsearch.version>7.12.1</elasticsearch.version>
</properties>
3)初始化 RestHighLevelClient:
初始化的代码如下:
RestHighLevelClient client = new RestHighLevelClient(RestClient.builder(
        HttpHost.create("http://xxx.xxx.xxx.xxx:9200")
));
这里为了单元测试方便,我们创建一个测试类 HotelIndexTest,然后将初始化的代码编写在 @BeforeEach 方法中:
package cn.itcast.hotel;

import org.apache.http.HttpHost;
import org.elasticsearch.client.RestHighLevelClient;
import org.junit.jupiter.api.AfterEach;
import org.junit.jupiter.api.BeforeEach;
import org.junit.jupiter.api.Test;

import java.io.IOException;

public class HotelIndexTest {
    private RestHighLevelClient client;

    @BeforeEach
    void setUp() {
        this.client = new RestHighLevelClient(RestClient.builder(
                HttpHost.create("http://xxx.xxx.xxx.xxx:9200")
        ));
    }

    @AfterEach
    void tearDown() throws IOException {
        this.client.close();
    }
}
1.1、创建索引库
创建索引库的 API 如下:

代码分为三步:
- 1)创建 Request 对象。因为是创建索引库的操作,因此 Request 是 CreateIndexRequest。
- 2)添加请求参数,其实就是 DSL 的 JSON 参数部分。因为 json 字符串很长,这里是定义了静态字符串常量 MAPPING_TEMPLATE,让代码看起来更加优雅。
- 3)发送请求,client.indices() 方法的返回值是 IndicesClient 类型,封装了所有与索引库操作有关的方法。
完整示例
在 hotel-demo 的 cn.itcast.hotel.constants 包下,创建一个类,定义 mapping 映射的 JSON 字符串常量:
package cn.itcast.hotel.constants;

public class HotelConstants {
    public static final String MAPPING_TEMPLATE = "{\n" +
            "  \"mappings\": {\n" +
            "    \"properties\": {\n" +
            "      \"id\": {\n" +
            "        \"type\": \"keyword\"\n" +
            "      },\n" +
            "      \"name\":{\n" +
            "        \"type\": \"text\",\n" +
            "        \"analyzer\": \"ik_max_word\",\n" +
            "        \"copy_to\": \"all\"\n" +
            "      },\n" +
            "      \"address\":{\n" +
            "        \"type\": \"keyword\",\n" +
            "        \"index\": false\n" +
            "      },\n" +
            "      \"price\":{\n" +
            "        \"type\": \"integer\"\n" +
            "      },\n" +
            "      \"score\":{\n" +
            "        \"type\": \"integer\"\n" +
            "      },\n" +
            "      \"brand\":{\n" +
            "        \"type\": \"keyword\",\n" +
            "        \"copy_to\": \"all\"\n" +
            "      },\n" +
            "      \"city\":{\n" +
            "        \"type\": \"keyword\",\n" +
            "        \"copy_to\": \"all\"\n" +
            "      },\n" +
            "      \"starName\":{\n" +
            "        \"type\": \"keyword\"\n" +
            "      },\n" +
            "      \"business\":{\n" +
            "        \"type\": \"keyword\"\n" +
            "      },\n" +
            "      \"location\":{\n" +
            "        \"type\": \"geo_point\"\n" +
            "      },\n" +
            "      \"pic\":{\n" +
            "        \"type\": \"keyword\",\n" +
            "        \"index\": false\n" +
            "      },\n" +
            "      \"all\":{\n" +
            "        \"type\": \"text\",\n" +
            "        \"analyzer\": \"ik_max_word\"\n" +
            "      }\n" +
            "    }\n" +
            "  }\n" +
            "}";
}
在 hotel-demo 中的 HotelIndexTest 测试类中,编写单元测试,实现创建索引:
@Test
void createHotelIndex() throws IOException {
    // 1.创建Request对象
    CreateIndexRequest request = new CreateIndexRequest("hotel");
    // 2.准备请求的参数:DSL语句
    request.source(MAPPING_TEMPLATE, XContentType.JSON);
    // 3.发送请求
    client.indices().create(request, RequestOptions.DEFAULT);
}
1.2、删除索引库
删除索引库的 DSL 语句非常简单:
DELETE /hotel
与创建索引库相比:
- 请求方式从 PUT 变为 DELTE
- 请求路径不变
- 无请求参数
所以代码的差异,注意体现在 Request 对象上。依然是三步走:
- 1)创建 Request 对象。这次是 DeleteIndexRequest 对象
- 2)准备参数。这里是无参
- 3)发送请求。改用 delete 方法
在 hotel-demo 中的 HotelIndexTest 测试类中,编写单元测试,实现删除索引:
@Test
void testDeleteHotelIndex() throws IOException {
    // 1.创建Request对象
    DeleteIndexRequest request = new DeleteIndexRequest("hotel");
    // 2.发送请求
    client.indices().delete(request, RequestOptions.DEFAULT);
}
1.3、判断索引库是否存在
判断索引库是否存在,本质就是查询,对应的 DSL 是:
GET /hotel
因此与删除的 Java 代码流程是类似的。依然是三步走:
- 1)创建 Request 对象。这次是 GetIndexRequest 对象
- 2)准备参数。这里是无参
- 3)发送请求。改用 exists 方法
@Test
void testExistsHotelIndex() throws IOException {
    // 1.创建Request对象
    GetIndexRequest request = new GetIndexRequest("hotel");
    // 2.发送请求
    boolean exists = client.indices().exists(request, RequestOptions.DEFAULT);
    // 3.输出
    System.err.println(exists ? "索引库已经存在!" : "索引库不存在!");
}
1.4、总结
JavaRestClient 操作 elasticsearch 的流程基本类似。核心是 client.indices() 方法来获取索引库的操作对象。
索引库操作的基本步骤:
- 初始化 RestHighLevelClient
- 创建 XxxIndexRequest。XXX 是 Create、Get、Delete
- 准备 DSL( Create 时需要,其它是无参)
- 发送请求。调用 RestHighLevelClient#indices().xxx() 方法,xxx 是 create、exists、delete
2、RestClient 操作文档
为了与索引库操作分离,我们再次参加一个测试类,做两件事情:
- 初始化 RestHighLevelClient
- 我们的酒店数据在数据库,需要利用 IHotelService 去查询,所以注入这个接口
package cn.itcast.hotel;

import cn.itcast.hotel.pojo.Hotel;
import cn.itcast.hotel.service.IHotelService;
import org.junit.jupiter.api.AfterEach;
import org.junit.jupiter.api.BeforeEach;
import org.junit.jupiter.api.Test;
import org.springframework.beans.factory.annotation.Autowired;
import org.springframework.boot.test.context.SpringBootTest;

import java.io.IOException;
import java.util.List;

@SpringBootTest
public class HotelDocumentTest {
    @Autowired
    private IHotelService hotelService;

    private RestHighLevelClient client;

    @BeforeEach
    void setUp() {
        this.client = new RestHighLevelClient(RestClient.builder(
                HttpHost.create("http://192.168.150.101:9200")
        ));
    }

    @AfterEach
    void tearDown() throws IOException {
        this.client.close();
    }
}
2.1、新增文档
我们要将数据库的酒店数据查询出来,写入 elasticsearch 中。
2.1.1、索引库实体类
数据库查询后的结果是一个 Hotel 类型的对象。结构如下:
@Data
@TableName("tb_hotel")
public class Hotel {
    @TableId(type = IdType.INPUT)
    private Long id;
    private String name;
    private String address;
    private Integer price;
    private Integer score;
    private String brand;
    private String city;
    private String starName;
    private String business;
    private String longitude;
    private String latitude;
    private String pic;
}
与我们的索引库结构存在差异:
- longitude 和 latitude 需要合并为 location
因此,我们需要定义一个新的类型,与索引库结构吻合:
package cn.itcast.hotel.pojo;

import lombok.Data;
import lombok.NoArgsConstructor;

@Data
@NoArgsConstructor
public class HotelDoc {
    private Long id;
    private String name;
    private String address;
    private Integer price;
    private Integer score;
    private String brand;
    private String city;
    private String starName;
    private String business;
    private String location;
    private String pic;

    public HotelDoc(Hotel hotel) {
        this.id = hotel.getId();
        this.name = hotel.getName();
        this.address = hotel.getAddress();
        this.price = hotel.getPrice();
        this.score = hotel.getScore();
        this.brand = hotel.getBrand();
        this.city = hotel.getCity();
        this.starName = hotel.getStarName();
        this.business = hotel.getBusiness();
        this.location = hotel.getLatitude() + ", " + hotel.getLongitude();
        this.pic = hotel.getPic();
    }
}
2.1.2. 语法说明
新增文档的 DSL 语句如下:
POST /{索引库名}/_doc/1
{
    "name": "Jack",
    "age": 21
}
对应的 java 代码如图:

可以看到与创建索引库类似,同样是三步走:
- 1)创建 Request 对象
- 2)准备请求参数,也就是 DSL 中的 JSON 文档
- 3)发送请求
变化的地方在于,这里直接使用 client.xxx() 的 API,不再需要 client.indices() 了。
2.1.3、完整代码
我们导入酒店数据,基本流程一致,但是需要考虑几点变化:
- 酒店数据来自于数据库,我们需要先查询出来,得到 hotel 对象
- hotel 对象需要转为 HotelDoc 对象
- HotelDoc 需要序列化为 json 格式
因此,代码整体步骤如下:
- 1)根据 id 查询酒店数据 Hotel
- 2)将 Hotel 封装为 HotelDoc
- 3)将 HotelDoc 序列化为 JSON
- 4)创建 IndexRequest,指定索引库名和 id
- 5)准备请求参数,也就是 JSON 文档
- 6)发送请求
在 hotel-demo 的 HotelDocumentTest 测试类中,编写单元测试:
@Test
void testAddDocument() throws IOException {
    // 1.根据id查询酒店数据
    Hotel hotel = hotelService.getById(61083L);
    // 2.转换为文档类型
    HotelDoc hotelDoc = new HotelDoc(hotel);
    // 3.将HotelDoc转json
    String json = JSON.toJSONString(hotelDoc);

    // 1.准备Request对象
    IndexRequest request = new IndexRequest("hotel").id(hotelDoc.getId().toString());
    // 2.准备Json文档
    request.source(json, XContentType.JSON);
    // 3.发送请求
    client.index(request, RequestOptions.DEFAULT);
}
2.2、查询文档
2.2.1、语法说明
查询的 DSL 语句如下:
GET /hotel/_doc/{id}
非常简单,因此代码大概分两步:
- 准备 Request 对象
- 发送请求
不过查询的目的是得到结果,解析为 HotelDoc,因此难点是结果的解析。完整代码如下:
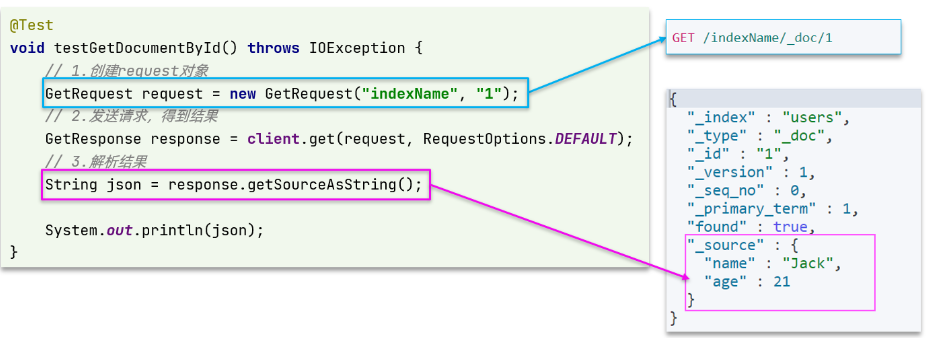
可以看到,结果是一个 JSON,其中文档放在一个_source属性中,因此解析就是拿到_source,反序列化为 Java 对象即可。
与之前类似,也是三步走:
- 1)准备 Request 对象。这次是查询,所以是 GetRequest
- 2)发送请求,得到结果。因为是查询,这里调用 client.get() 方法
- 3)解析结果,就是对 JSON 做反序列化
2.2.2、完整代码
在 hotel-demo 的 HotelDocumentTest 测试类中,编写单元测试:
@Test
void testGetDocumentById() throws IOException {
    // 1.准备Request
    GetRequest request = new GetRequest("hotel", "61082");
    // 2.发送请求,得到响应
    GetResponse response = client.get(request, RequestOptions.DEFAULT);
    // 3.解析响应结果
    String json = response.getSourceAsString();

    HotelDoc hotelDoc = JSON.parseObject(json, HotelDoc.class);
    System.out.println(hotelDoc);
}
2.3. 删除文档
删除的 DSL 为是这样的:
DELETE /hotel/_doc/{id}
与查询相比,仅仅是请求方式从 DELETE 变成 GET,可以想象 Java 代码应该依然是三步走:
- 1)准备 Request 对象,因为是删除,这次是 DeleteRequest 对象。要指定索引库名和 id
- 2)准备参数,无参
- 3)发送请求。因为是删除,所以是 client.delete() 方法
在 hotel-demo 的 HotelDocumentTest 测试类中,编写单元测试:
@Test
void testDeleteDocument() throws IOException {
    // 1.准备Request
    DeleteRequest request = new DeleteRequest("hotel", "61083");
    // 2.发送请求
    client.delete(request, RequestOptions.DEFAULT);
}
2.4、修改文档
2.4.1、语法说明
修改我们讲过两种方式:
- 全量修改:本质是先根据 id 删除,再新增
- 增量修改:修改文档中的指定字段值
在 RestClient 的 API 中,全量修改与新增的 API 完全一致,判断依据是 ID:
- 如果新增时,ID 已经存在,则修改
- 如果新增时,ID 不存在,则新增
这里不再赘述,我们主要关注增量修改。
代码示例如图:
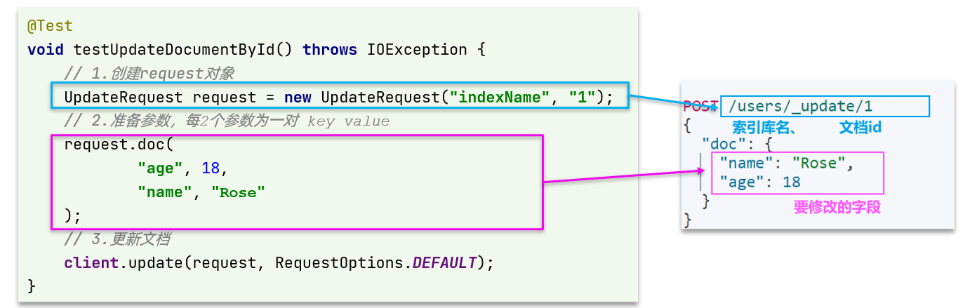
与之前类似,也是三步走:
- 1)准备 Request 对象。这次是修改,所以是 UpdateRequest
- 2)准备参数。也就是 JSON 文档,里面包含要修改的字段
- 3)更新文档。这里调用 client.update() 方法
2.4.2. 完整代码
在 hotel-demo 的 HotelDocumentTest 测试类中,编写单元测试:
@Test
void testUpdateDocument() throws IOException {
    // 1.准备Request
    UpdateRequest request = new UpdateRequest("hotel", "61083");
    // 2.准备请求参数
    request.doc(
        "price", "952",
        "starName", "四钻"
    );
    // 3.发送请求
    client.update(request, RequestOptions.DEFAULT);
}
2.5、批量导入文档
案例需求:利用 BulkRequest 批量将数据库数据导入到索引库中。
步骤如下:
-
利用 mybatis-plus 查询酒店数据
-
将查询到的酒店数据(Hotel)转换为文档类型数据(HotelDoc)
-
利用 JavaRestClient 中的 BulkRequest 批处理,实现批量新增文档
2.5.1. 语法说明
批量处理 BulkRequest,其本质就是将多个普通的 CRUD 请求组合在一起发送。
其中提供了一个 add 方法,用来添加其他请求:
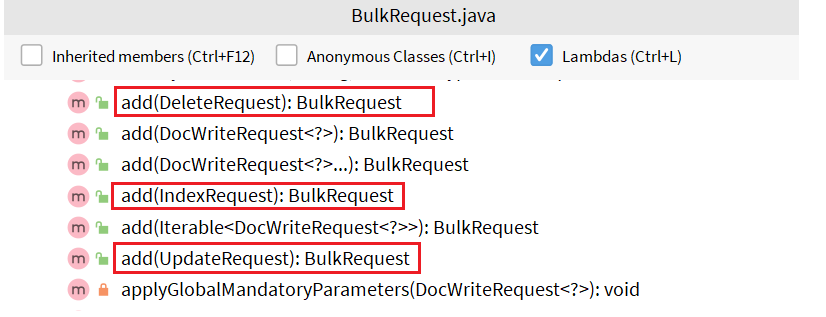
可以看到,能添加的请求包括:
- IndexRequest,也就是新增
- UpdateRequest,也就是修改
- DeleteRequest,也就是删除
因此 Bulk 中添加了多个 IndexRequest,就是批量新增功能了。示例:
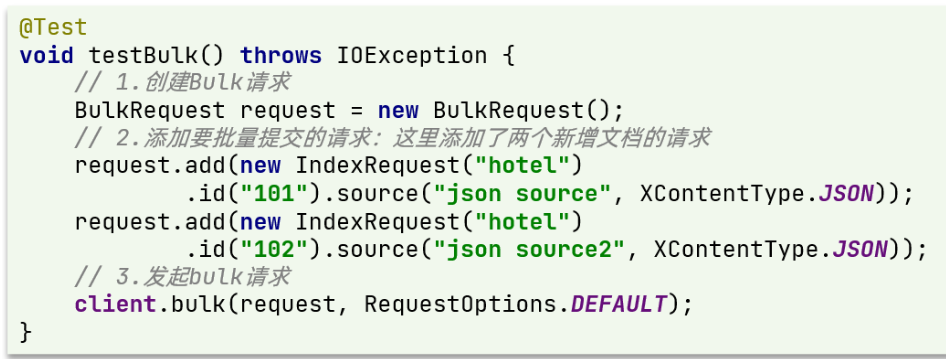
其实还是三步走:
- 1)创建 Request 对象。这里是 BulkRequest
- 2)准备参数。批处理的参数,就是其它 Request 对象,这里就是多个 IndexRequest
- 3)发起请求。这里是批处理,调用的方法为 client.bulk() 方法
我们在导入酒店数据时,将上述代码改造成 for 循环处理即可。
2.5.2. 完整代码
在 hotel-demo 的 HotelDocumentTest 测试类中,编写单元测试:
    /**
     * 批量导入es
     * @throws IOException
     */
    @Test
    void testBatchImportDocument() throws IOException {
        // 1、批量查询数据库数据
        List<Hotel> list = hotelService.list();

        // 2、创建 request 对象
        BulkRequest request = new BulkRequest();

        // 3、转换文档格式
        for (Hotel hotel : list) {
            HotelDoc hotelDoc = new HotelDoc(hotel);
            request.add(new IndexRequest("hotel")
                    .id(hotel.getId().toString())
                    .source(JSON.toJSONString(hotelDoc), XContentType.JSON));
        }

        // 4、发送请求
        client.bulk(request, RequestOptions.DEFAULT);
    }
2.6. 小结
文档操作的基本步骤:
- 初始化 RestHighLevelClient
- 创建 XxxRequest。XXX 是 Index、Get、Update、Delete、Bulk
- 准备参数(Index、Update、Bulk 时需要)
- 发送请求。调用 RestHighLevelClient#.xxx() 方法,xxx 是 index、get、update、delete、bulk
- 解析结果(Get 时需要)
参考链接:https://www.cnblogs.com/DeryKong/p/17002492.html
智能推荐
攻防世界_难度8_happy_puzzle_攻防世界困难模式攻略图文-程序员宅基地
文章浏览阅读645次。这个肯定是末尾的IDAT了,因为IDAT必须要满了才会开始一下个IDAT,这个明显就是末尾的IDAT了。,对应下面的create_head()代码。,对应下面的create_tail()代码。不要考虑爆破,我已经试了一下,太多情况了。题目来源:UNCTF。_攻防世界困难模式攻略图文
达梦数据库的导出(备份)、导入_达梦数据库导入导出-程序员宅基地
文章浏览阅读2.9k次,点赞3次,收藏10次。偶尔会用到,记录、分享。1. 数据库导出1.1 切换到dmdba用户su - dmdba1.2 进入达梦数据库安装路径的bin目录,执行导库操作 导出语句:./dexp cwy_init/[email protected]:5236 file=cwy_init.dmp log=cwy_init_exp.log 注释: cwy_init/init_123..._达梦数据库导入导出
js引入kindeditor富文本编辑器的使用_kindeditor.js-程序员宅基地
文章浏览阅读1.9k次。1. 在官网上下载KindEditor文件,可以删掉不需要要到的jsp,asp,asp.net和php文件夹。接着把文件夹放到项目文件目录下。2. 修改html文件,在页面引入js文件:<script type="text/javascript" src="./kindeditor/kindeditor-all.js"></script><script type="text/javascript" src="./kindeditor/lang/zh-CN.js"_kindeditor.js
STM32学习过程记录11——基于STM32G431CBU6硬件SPI+DMA的高效WS2812B控制方法-程序员宅基地
文章浏览阅读2.3k次,点赞6次,收藏14次。SPI的详情简介不必赘述。假设我们通过SPI发送0xAA,我们的数据线就会变为10101010,通过修改不同的内容,即可修改SPI中0和1的持续时间。比如0xF0即为前半周期为高电平,后半周期为低电平的状态。在SPI的通信模式中,CPHA配置会影响该实验,下图展示了不同采样位置的SPI时序图[1]。CPOL = 0,CPHA = 1:CLK空闲状态 = 低电平,数据在下降沿采样,并在上升沿移出CPOL = 0,CPHA = 0:CLK空闲状态 = 低电平,数据在上升沿采样,并在下降沿移出。_stm32g431cbu6
计算机网络-数据链路层_接收方收到链路层数据后,使用crc检验后,余数为0,说明链路层的传输时可靠传输-程序员宅基地
文章浏览阅读1.2k次,点赞2次,收藏8次。数据链路层习题自测问题1.数据链路(即逻辑链路)与链路(即物理链路)有何区别?“电路接通了”与”数据链路接通了”的区别何在?2.数据链路层中的链路控制包括哪些功能?试讨论数据链路层做成可靠的链路层有哪些优点和缺点。3.网络适配器的作用是什么?网络适配器工作在哪一层?4.数据链路层的三个基本问题(帧定界、透明传输和差错检测)为什么都必须加以解决?5.如果在数据链路层不进行帧定界,会发生什么问题?6.PPP协议的主要特点是什么?为什么PPP不使用帧的编号?PPP适用于什么情况?为什么PPP协议不_接收方收到链路层数据后,使用crc检验后,余数为0,说明链路层的传输时可靠传输
软件测试工程师移民加拿大_无证移民,未受过软件工程师的教育(第1部分)-程序员宅基地
文章浏览阅读587次。软件测试工程师移民加拿大 无证移民,未受过软件工程师的教育(第1部分) (Undocumented Immigrant With No Education to Software Engineer(Part 1))Before I start, I want you to please bear with me on the way I write, I have very little gen...
随便推点
Thinkpad X250 secure boot failed 启动失败问题解决_安装完系统提示secureboot failure-程序员宅基地
文章浏览阅读304次。Thinkpad X250笔记本电脑,装的是FreeBSD,进入BIOS修改虚拟化配置(其后可能是误设置了安全开机),保存退出后系统无法启动,显示:secure boot failed ,把自己惊出一身冷汗,因为这台笔记本刚好还没开始做备份.....根据错误提示,到bios里面去找相关配置,在Security里面找到了Secure Boot选项,发现果然被设置为Enabled,将其修改为Disabled ,再开机,终于正常启动了。_安装完系统提示secureboot failure
C++如何做字符串分割(5种方法)_c++ 字符串分割-程序员宅基地
文章浏览阅读10w+次,点赞93次,收藏352次。1、用strtok函数进行字符串分割原型: char *strtok(char *str, const char *delim);功能:分解字符串为一组字符串。参数说明:str为要分解的字符串,delim为分隔符字符串。返回值:从str开头开始的一个个被分割的串。当没有被分割的串时则返回NULL。其它:strtok函数线程不安全,可以使用strtok_r替代。示例://借助strtok实现split#include <string.h>#include <stdio.h&_c++ 字符串分割
2013第四届蓝桥杯 C/C++本科A组 真题答案解析_2013年第四届c a组蓝桥杯省赛真题解答-程序员宅基地
文章浏览阅读2.3k次。1 .高斯日记 大数学家高斯有个好习惯:无论如何都要记日记。他的日记有个与众不同的地方,他从不注明年月日,而是用一个整数代替,比如:4210后来人们知道,那个整数就是日期,它表示那一天是高斯出生后的第几天。这或许也是个好习惯,它时时刻刻提醒着主人:日子又过去一天,还有多少时光可以用于浪费呢?高斯出生于:1777年4月30日。在高斯发现的一个重要定理的日记_2013年第四届c a组蓝桥杯省赛真题解答
基于供需算法优化的核极限学习机(KELM)分类算法-程序员宅基地
文章浏览阅读851次,点赞17次,收藏22次。摘要:本文利用供需算法对核极限学习机(KELM)进行优化,并用于分类。
metasploitable2渗透测试_metasploitable2怎么进入-程序员宅基地
文章浏览阅读1.1k次。一、系统弱密码登录1、在kali上执行命令行telnet 192.168.26.1292、Login和password都输入msfadmin3、登录成功,进入系统4、测试如下:二、MySQL弱密码登录:1、在kali上执行mysql –h 192.168.26.129 –u root2、登录成功,进入MySQL系统3、测试效果:三、PostgreSQL弱密码登录1、在Kali上执行psql -h 192.168.26.129 –U post..._metasploitable2怎么进入
Python学习之路:从入门到精通的指南_python人工智能开发从入门到精通pdf-程序员宅基地
文章浏览阅读257次。本文将为初学者提供Python学习的详细指南,从Python的历史、基础语法和数据类型到面向对象编程、模块和库的使用。通过本文,您将能够掌握Python编程的核心概念,为今后的编程学习和实践打下坚实基础。_python人工智能开发从入门到精通pdf