史上最细gRPC(Go)入门教程(十)------gRPC压测工具ghz_ghz压测-程序员宅基地
来自:指月 https://lixueduan.com
原文:https://lixueduan.com/post/grpc/10-benchmark/
本文主要介绍了 gRPC 压测工具 ghz ,包括 ghz 的安装、使用及压测计划制定等。
如果你对云原生技术充满好奇,想要深入了解更多相关的文章和资讯,欢迎关注微信公众号。
扫描下方二维码或搜索公众号【探索云原生】即可订阅

gRPC 系列相关代码见 Github
1. 安装
可以直接在Release页面下载二进制文件,也可以 clone 仓库手动编译。
下载解压后即可使用
# 下载
$ wget https://github.91chifun.workers.dev/https://github.com//bojand/ghz/releases/download/v0.94.0/ghz-linux-x86_64.tar.gz
ghz-linux-x86_64.ta 100%[===================>]  10.41M  1.84MB/s    用时 5.7s
# 解压
$ tar -zxvf ghz-linux-x86_64.tar.gz
ghz
ghz-web
LICENSE
$ ls
ghz  ghz-linux-x86_64.tar.gz  ghz-web  LICENSE
# 添加到环境变量
$ sudo vim /etc/profile
$ source /etc/profile
# 具体位置就是刚解压的位置
$ cat /etc/profile
export PATH=$PATH:/home/lixd/17x/env
具体语法
ghz [<flags>] [<host>]
2. 参数说明
只列出了常用参数,其他参数可以查看官方文档或者查阅帮助命令ghz -h
大致可以分为三类参数:
- 基本参数
- 负载参数
- 并发参数
2.1 基本参数
--config:指定配置文件位置--proto:指定 proto 文件位置- 会从 proto 文件中获取相关信息
--call:指定调用的方法。- 具体格式为
包名.服务名.方法名 - 如:
--call helloworld.Greeter.SayHello
- 具体格式为
-c:并发请求数-n:最大请求数,达到后则结束测试-d:请求参数- JSON格式,如
-d '{"name":"Bob"}'
- JSON格式,如
-D:以文件方式指定请求参数,JSON文件位置- 如
-D ./file.json
- 如
-o:输出路径- 默认输出到 stdout
-O/--format:输出格式,有多种格式可选- 便于查看的:csv、json、pretty、html:
- 便于入库的:influx-summary、influx-details:满足InfluxDB line-protocol 格式的输出
以上就是相关的基本参数,有了这些参数基本可以进行测试了。
2.2 负载参数
负载参数主要控制ghz每秒发起的请求数(RPS)。
-r/--rps:指定RPS- ghz以恒定的RPS进行测试
--load-schedule:负载调度算法,取值如下:- const:恒定RPS,也是默认调用算法
- step:步进增长RPS,需要配合
load-start,load-step,load-end,load-step-duration,和load-max-duration等参数 - line:线性增长RPS,需要配合
load-start,load-step,load-end,和load-max-duration等参数,其实line就是 step 算法将load-step-duration时间固定为一秒了。
--load-start:step、line 的起始RPS--load-step:step、line 的步进值或斜率值--load-end:step、line 的负载结束值--load-max-duration:最大持续时间,到达则结束
例如
-n 10000 -c 10 --load-schedule=step --load-start=50 --load-step=10 --load-step-duration=5s
从50RPS开始,每5秒钟增加10RPS,一直到完成10000请求为止。
-n 10000 -c 10 --load-schedule=step --load-start=50 --load-end=150 --load-step=10 --load-step-duration=5s
从50RPS开始,每5秒钟增加10RPS,最多增加到150RPS,一直到完成10000请求为止。
-n 10000 -c 10 --load-schedule=line --load-start=200 --load-step=-2 --load-end=50
从200RPS开始,每1秒钟降低2RPS,一直降低到50RPS,一直到完成10000请求为止。
line 其实就是 step,只不过是把–load-step-duration固定为1秒了
2.3 并发参数
-
-c:并发woker数,- 注意:不是并发请求数
-
--concurrency-schedule:并发调度算法,和--load-schedule类似- const:恒定并发数,默认值
- step:步进增加并发数
- line:线性增加并发数
-
--concurrency-start:起始并发数 -
--concurrency-end:结束并发数 -
--concurrency-step:并发数步进值 -
--concurrency-step-duration:在每个梯段需要持续的时间 -
--concurrency-max-duration:最大持续时间
例子:
-n 100000 --rps 200 --concurrency-schedule=step --concurrency-start=5 --concurrency-step=5 --concurrency-end=50 --concurrency-step-duration=5s
固定RPS200,worker数从5开始,每5秒增加5,最大增加到50。
注意:5个worker时也要完成200RPS,即每个worker需要完成40RPS,到50个worker时只需要每个worker完成4RPS即可达到200RPS。
通过指定负载参数和并发参数可以更加专业的进行压测。
2.4 配置文件
所有参数都可以通过配置文件来指定,这也是比较推荐的用法。
比如这样:
{

    "proto": "/path/to/greeter.proto",
    "call": "helloworld.Greeter.SayHello",
    "total": 2000,
    "concurrency": 50,
    "data": {

        "name": "Joe"
    },
    "metadata": {

        "foo": "bar",
        "trace_id": "{
    {.RequestNumber}}",
        "timestamp": "{
    {.TimestampUnix}}"
    },
    "import-paths": [
        "/path/to/protos"
    ],
    "max-duration": "10s",
    "host": "0.0.0.0:50051"
}
3. 使用
该工具有两种使用方式。
- 1)
ghz二进制文件方式,通过命令行参数或者配置文件指定配置信息 - 2)
ghz/runner编程方式使用,通过代码指定配置信息
二者只是打开方式不同,具体原理是一样的。
首页启动服务端,这里就是要之前HelloWorld教程中的Greeter服务。
lixd@17x:~/17x/projects/grpc-go-example/helloworld/server$ go run main.go
2021/04/17 10:53:46 Serving gRPC on 0.0.0.0:50051
3.1 命令行方式
1)基本参数
首先使用基本参数进行测试
ghz -c 10 -n 1000 \
   --insecure \
   --proto ./hello_world.proto \
   --call helloworld.Greeter.SayHello \
   -d '{"name":"Joe"}' \
   0.0.0.0:50051
--call helloworld.Greeter.SayHello:说明,具体 proto 文件如下
// 省略其他代码...
package helloworld;
service Greeter {
  rpc SayHello (HelloRequest) returns (HelloReply) {}
}
可以看到,包名为helloworld、 service名为Greeter,方法名为 SayHello。
结果如下
Summary:
  Count:        1000
  Total:        87.65 ms
  Slowest:      6.97 ms
  Fastest:      0.12 ms
  Average:      0.75 ms
  Requests/sec: 11409.21

Response time histogram:
  0.118 [1]     |
  0.803 [801]   |∎∎∎∎∎∎∎∎∎∎∎∎∎∎∎∎∎∎∎∎∎∎∎∎∎∎∎∎∎∎∎∎∎∎∎∎∎∎∎∎
  1.487 [131]   |∎∎∎∎∎∎∎
  2.172 [27]    |∎
  2.857 [18]    |∎
  3.542 [12]    |∎
  4.226 [0]     |
  4.911 [0]     |
  5.596 [0]     |
  6.281 [0]     |
  6.966 [10]    |

Latency distribution:
  10 % in 0.35 ms
  25 % in 0.43 ms
  50 % in 0.57 ms
  75 % in 0.75 ms
  90 % in 1.23 ms
  95 % in 1.62 ms
  99 % in 3.31 ms

Status code distribution:
  [OK]   1000 responses
大部分请求都能在3ms左右响应。
2)负载参数
接着增加负载参数
ghz -c 10 -n 1000 \
   --insecure \
   --proto ./hello_world.proto \
   --call helloworld.Greeter.SayHello \
   -d '{"name":"Joe"}' \
   --load-schedule=step --load-start=50 --load-step=10 --load-step-duration=5s \
   -o report.html -O html \
   0.0.0.0:50051
这次指定使用HTML方式输出结果,执行完成后可以在当前目录看到输出的HTML文件
$ ls
report.html
具体内容如下:
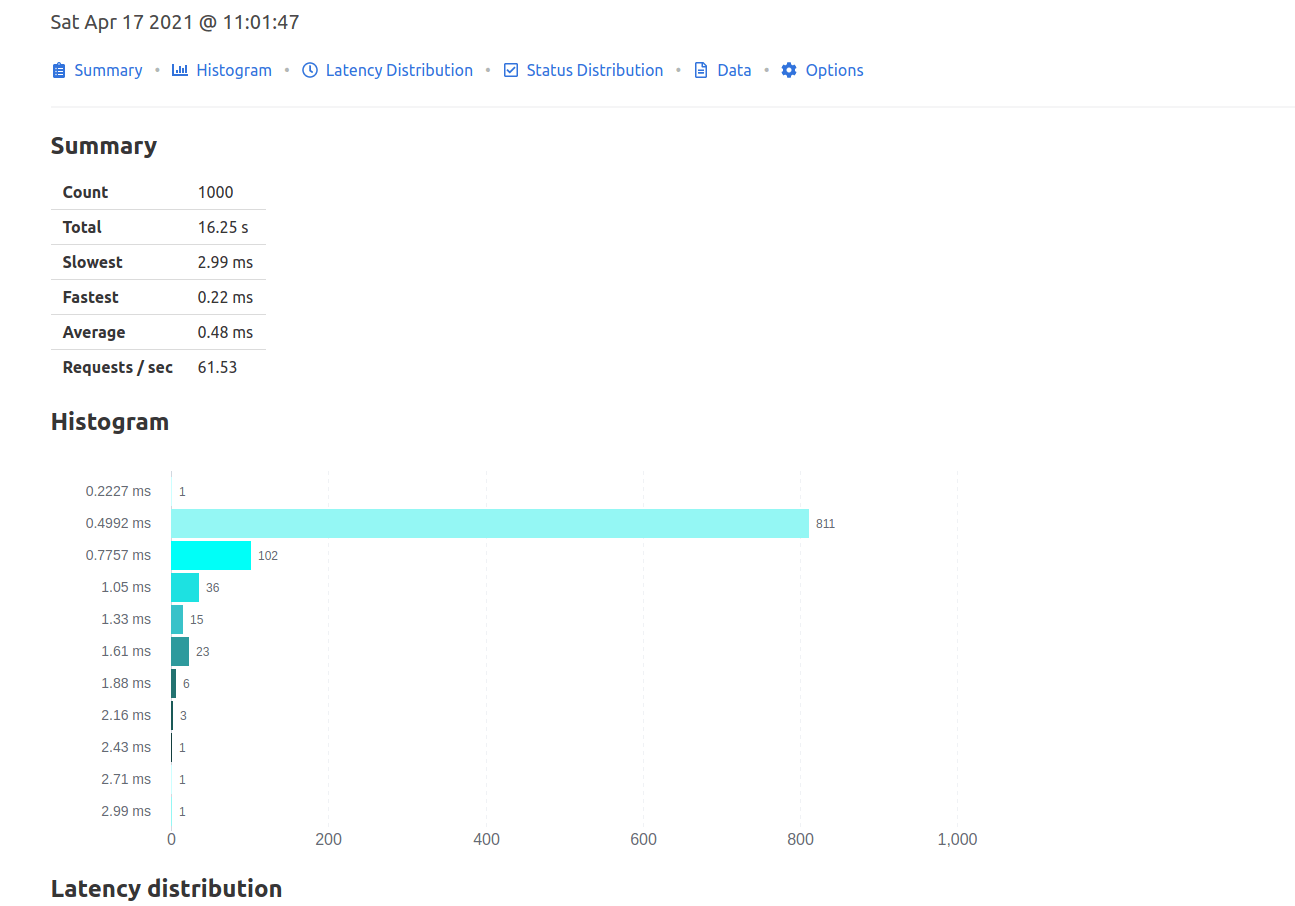
相比之下HTML方式更加直观。
3)并发参数
最后使用并发参数
ghz -c 10 -n 10000 \
   --insecure \
   --proto ./hello_world.proto \
   --call helloworld.Greeter.SayHello \
   -d '{"name":"Joe"}' \
   --rps 200 --concurrency-schedule=step --concurrency-start=5 --concurrency-step=5 --concurrency-end=50 --concurrency-step-duration=5s \
   -o report.json -O pretty \
   0.0.0.0:50051
本次以CSV格式打印输出
duration (ms),status,error
1.05,OK,
0.32,OK,
0.30,OK,
0.36,OK,
0.34,OK,
0.29,OK,
0.40,OK,
0.40,OK,
0.62,OK,
0.31,OK,
0.30,OK,
0.48,OK,
CSV和JSON格式会将每次请求及其消耗时间、状态等信息一一列出,信息比较全,不过相比HTML不够直观。
3.2 ghz/runner编程方式
编程方式更加灵活,同时可以直接使用二进制请求数据也比较方便。
完整代码见 Github
相关代码如下:
package main

import (
	"log"
	"os"

	"github.com/bojand/ghz/printer"
	"github.com/bojand/ghz/runner"
	"github.com/golang/protobuf/proto"
	pb "github.com/lixd/grpc-go-example/helloworld/helloworld"
)

// 官方文档 https://ghz.sh/docs/intro.html
func main() {

	// 组装BinaryData
	item := pb.HelloRequest{
    Name: "lixd"}
	buf := proto.Buffer{
    }
	err := buf.EncodeMessage(&item)
	if err != nil {

		log.Fatal(err)
		return
	}
	report, err := runner.Run(
		// 基本配置 call host proto文件 data
		"helloworld.Greeter.SayHello", //  'package.Service/method' or 'package.Service.Method'
		"localhost:50051",
		runner.WithProtoFile("../helloworld/helloworld/hello_world.proto", []string{
    }),
		runner.WithBinaryData(buf.Bytes()),
		runner.WithInsecure(true),
		runner.WithTotalRequests(10000),
		// 并发参数
		runner.WithConcurrencySchedule(runner.ScheduleLine),
		runner.WithConcurrencyStep(10),
		runner.WithConcurrencyStart(5),
		runner.WithConcurrencyEnd(100),
	)
	if err != nil {

		log.Fatal(err)
		return
	}
	// 指定输出路径
	file, err := os.Create("report.html")
	if err != nil {

		log.Fatal(err)
		return
	}
	rp := printer.ReportPrinter{

		Out:    file,
		Report: report,
	}
	// 指定输出格式
	_ = rp.Print("html")
}
运行测试会在当前目录输出report.html文件
$ go run ghz.go
$ ls
ghz.go  report.html
4. 小结
推荐使用ghz/runner编程方式+HTML格式输出结果。
- ghz/runner编程方式相比二进制方式更加灵活
- HTML格式输出结果更加直观
如果你对云原生技术充满好奇,想要深入了解更多相关的文章和资讯,欢迎关注微信公众号。
扫描下方二维码或搜索公众号【探索云原生】即可订阅

智能推荐
前端开发之vue-grid-layout的使用和实例-程序员宅基地
文章浏览阅读1.1w次,点赞7次,收藏34次。vue-grid-layout的使用、实例、遇到的问题和解决方案_vue-grid-layout
Power Apps-上传附件控件_powerapps点击按钮上传附件-程序员宅基地
文章浏览阅读218次。然后连接一个数据源,就会在下面自动产生一个添加附件的组件。把这个控件复制粘贴到页面里,就可以单独使用来上传了。插入一个“编辑”窗体。_powerapps点击按钮上传附件
C++ 面向对象(Object-Oriented)的特征 & 构造函数& 析构函数_"object(cnofd[\"ofdrender\"])十条"-程序员宅基地
文章浏览阅读264次。(1) Abstraction (抽象)(2) Polymorphism (多态)(3) Inheritance (继承)(4) Encapsulation (封装)_"object(cnofd[\"ofdrender\"])十条"
修改node_modules源码,并保存,使用patch-package打补丁,git提交代码后,所有人可以用到修改后的_修改 node_modules-程序员宅基地
文章浏览阅读133次。删除node_modules,重新npm install看是否成功。在 package.json 文件中的 scripts 中加入。修改你的第三方库的bug等。然后目录会多出一个目录文件。_修改 node_modules
【】kali--password:su的 Authentication failure问题,&sudo passwd root输入密码时Sorry, try again._password: su: authentication failure-程序员宅基地
文章浏览阅读883次。【代码】【】kali--password:su的 Authentication failure问题,&sudo passwd root输入密码时Sorry, try again._password: su: authentication failure
整理5个优秀的微信小程序开源项目_微信小程序开源模板-程序员宅基地
文章浏览阅读1w次,点赞13次,收藏97次。整理5个优秀的微信小程序开源项目。收集了微信小程序开发过程中会使用到的资料、问题以及第三方组件库。_微信小程序开源模板
随便推点
Centos7最简搭建NFS服务器_centos7 搭建nfs server-程序员宅基地
文章浏览阅读128次。Centos7最简搭建NFS服务器_centos7 搭建nfs server
Springboot整合Mybatis-Plus使用总结(mybatis 坑补充)_mybaitis-plus ruledataobjectattributemapper' and '-程序员宅基地
文章浏览阅读1.2k次,点赞2次,收藏3次。前言mybatis在持久层框架中还是比较火的,一般项目都是基于ssm。虽然mybatis可以直接在xml中通过SQL语句操作数据库,很是灵活。但正其操作都要通过SQL语句进行,就必须写大量的xml文件,很是麻烦。mybatis-plus就很好的解决了这个问题。..._mybaitis-plus ruledataobjectattributemapper' and 'com.picc.rule.management.d
EECE 1080C / Programming for ECESummer 2022 Laboratory 4: Global Functions Practice_eece1080c-程序员宅基地
文章浏览阅读325次。EECE 1080C / Programming for ECESummer 2022Laboratory 4: Global Functions PracticePlagiarism will not be tolerated:Topics covered:function creation and call statements (emphasis on global functions)Objective:To practice program development b_eece1080c
洛谷p4777 【模板】扩展中国剩余定理-程序员宅基地
文章浏览阅读53次。被同机房早就1年前就学过的东西我现在才学,wtcl。设要求的数为\(x\)。设当前处理到第\(k\)个同余式,设\(M = LCM ^ {k - 1} _ {i - 1}\) ,前\(k - 1\)个的通解就是\(x + i * M\)。那么其实第\(k\)个来说,其实就是求一个\(y\)使得\(x + y * M ≡ a_k(mod b_k)\)转化一下就是\(y * M ...
android 退出应用没有走ondestory方法,[Android基础论]为何Activity退出之后,系统没有调用onDestroy方法?...-程序员宅基地
文章浏览阅读1.3k次。首先,问题是如何出现的?晚上复查代码,发现一个activity没有调用自己的ondestroy方法我表示非常的费解,于是我检查了下代码。发现再finish代码之后接了如下代码finish();System.exit(0);//这就是罪魁祸首为什么这样写会出现问题System.exit(0);////看一下函数的原型public static void exit (int code)//Added ..._android 手动杀死app,activity不执行ondestroy
SylixOS快问快答_select函数 导致堆栈溢出 sylixos-程序员宅基地
文章浏览阅读894次。Q: SylixOS 版权是什么形式, 是否分为<开发版税>和<运行时版税>.A: SylixOS 是开源并免费的操作系统, 支持 BSD/GPL 协议(GPL 版本暂未确定). 没有任何的运行时版税. 您可以用她来做任何 您喜欢做的项目. 也可以修改 SylixOS 的源代码, 不需要支付任何费用. 当然笔者希望您可以将使用 SylixOS 开发的项目 (不需要开源)或对 SylixOS 源码的修改及时告知笔者.需要指出: SylixOS 本身仅是笔者用来提升自己水平而开发的_select函数 导致堆栈溢出 sylixos