【NS3】NS3安装 visualizer模块安装 (Windows+VMware+Kali) 2022.2_kali安装ns-3-程序员宅基地
NS3安装(Windows+VMware+Kali) 2022.2
文章目录
VMware安装
导入kali
换源
进入root模式
sudo su
配置源
vim /etc/apt/sources.list
注释原本的源,换成国内源地址(下列代码采用阿里云)
ies/
#deb http://http.kali.org/kali kali-rolling main contrib non-free

deb http://mirrors.aliyun.com/kali kali-rolling main non-free contrib
deb-src http://mirrors.aliyun.com/kali kali-rolling main non-free contrib
# Additional line for source packages
# deb-src http://http.kali.org/kali kali-rolling main contrib non-free
~
~
其他源
官方源
deb http://http.kali.org/kali kali-rolling main non-free contrib
deb-src http://http.kali.org/kali kali-rolling main non-free contrib
中科大源
deb http://mirrors.ustc.edu.cn/kali kali-rolling main non-free contrib
deb-src http://mirrors.ustc.edu.cn/kali kali-rolling main non-free contrib
阿里云源
deb http://mirrors.aliyun.com/kali kali-rolling main non-free contrib
deb-src http://mirrors.aliyun.com/kali kali-rolling main non-free contrib
清华大学源
deb http://mirrors.tuna.tsinghua.edu.cn/kali kali-rolling main contrib non-free
deb-src https://mirrors.tuna.tsinghua.edu.cn/kali kali-rolling main contrib non-free
浙大源
deb http://mirrors.zju.edu.cn/kali kali-rolling main contrib non-free
deb-src http://mirrors.zju.edu.cn/kali kali-rolling main contrib non-free
东软大学源
deb http://mirrors.neusoft.edu.cn/kali kali-rolling/main non-free contrib
deb-src http://mirrors.neusoft.edu.cn/kali kali-rolling/main non-free contrib
新加坡kali源
deb http://mirror.nus.edu.sg/kali/kali/ kali main non-free contrib
deb-src http://mirror.nus.edu.sg/kali/kali/ kali main non-free contrib
163 Kali源
deb http://mirrors.163.com/debian wheezy main non-free contrib
deb-src http://mirrors.163.com/debian wheezy main non-free contrib
更新索引、软件
apt-get update
apt-get upgrade
环境搭建
官方tutorial给出
ns-3 has various optional extensions, but the main features just require a C++ compiler (g++ or clang++), Python (version 3.6 or above), CMake and a build-system (e.g. make, ninja, Xcode). We focus in this chapter only on getting ns-3 up and running on a system supported by a recent C++ compiler and Python runtime support.
 apt-get install gcc g++ python python3
 apt-get install gcc g++ python python3 python3-dev
 apt-get install python3-setuptools git mercurial
 apt-get install qt5-default mercurial
 apt-get install gir1.2-goocanvas-2.0 python-gi python-gi-cairo python-pygraphviz python3-gi python3-gi-cairo python3-pygraphviz gir1.2-gtk-3.0 ipython ipython3
 apt-get install openmpi-bin openmpi-common openmpi-doc libopenmpi-dev
 apt-get install autoconf cvs bzr unrar
 apt-get install gdb valgrind
 apt-get install uncrustify
 apt-get install doxygen graphviz imagemagick
 apt-get install texlive texlive-extra-utils texlive-latex-extra texlive-font-utils texlive-lang-portuguese dvipng latexmk
 apt-get install python3-sphinx dia
 apt-get install gsl-bin libgsl-dev libgsl23 libgslcblas0
 apt-get install tcpdump
 apt-get install sqlite sqlite3 libsqlite3-dev
 apt-get install libxml2 libxml2-dev
 apt-get install cmake libc6-dev libc6-dev-i386 libclang-dev llvm-dev automake
 apt-get install python-pip
pip install cxxfilt
 apt-get install libgtk2.0-0 libgtk2.0-dev
 apt-get install vtun lxc
 apt-get install libboost-signals-dev libboost-filesystem-dev
 apt-get install python-dev python-pygraphviz python-kiwi python-pygoocanvas python-gnome2 gir1.2-goocanvas-2.0 python-rsvg
NS3下载与安装
使用git速度非常快,以git下载为例
git只能下载ns本体,如果想要同时安装NetAnim,则下载官网的软件包。然后用build.py 来build(而不是waf)
$ git clone https://gitlab.com/nsnam/ns-3-dev.git
如果想要使用最新版本,可以选择切换分支(202202最新版本为3.35)
$ git checkout -b ns-3.35-branch ns-3.35
个人切换成了最新版本
在正式bulid NS3前可以使用以下代码检查所需的环境是否齐全
$ ./waf configure --enable-examples --enable-tests
如果没有更新成最新版本,从git下载的内容没有waf文件,取代它的是ns3,以上代码改为
./ns3 configure --enable-examples --enable-tests
下面是一些可选模块的安装情况
---- Summary of optional NS-3 features:
Build profile                 : debug
Build directory               :
BRITE Integration             : not enabled (BRITE not enabled (see option --with-brite))
DES Metrics event collection  : not enabled (defaults to disabled)
DPDK NetDevice                : not enabled (libdpdk not found, $RTE_SDK and/or $RTE_TARGET environment variable not set or incorrect)
Emulation FdNetDevice         : enabled
Examples                      : enabled
File descriptor NetDevice     : enabled
GNU Scientific Library (GSL)  : not enabled (GSL not found)
Gcrypt library                : not enabled (libgcrypt not found: you can use libgcrypt-config to find its location.)
GtkConfigStore                : not enabled (library 'gtk+-3 >= 3.22' not found)
MPI Support                   : not enabled (option --enable-mpi not selected)
NS-3 Click Integration        : not enabled (nsclick not enabled (see option --with-nsclick))
NS-3 OpenFlow Integration     : not enabled (OpenFlow not enabled (see option --with-openflow))
Netmap emulation FdNetDevice  : not enabled (needs net/netmap_user.h)
Network Simulation Cradle     : not enabled (NSC not found (see option --with-nsc))
PlanetLab FdNetDevice         : not enabled (PlanetLab operating system not detected (see option --force-planetlab))
PyViz visualizer              : not enabled (Python Bindings are needed but not enabled)
Python Bindings               : not enabled (PyBindGen missing)
Real Time Simulator           : enabled
SQLite stats support          : not enabled (library 'sqlite3' and/or semaphore.h not found)
Tap Bridge                    : enabled
Tap FdNetDevice               : enabled
Tests                         : enabled
Threading Primitives          : enabled
Use sudo to set suid bit      : not enabled (option --enable-sudo not selected)
XmlIo                         : enabled
'configure' finished successfully (3.546s)
visualizer 相关
因为我非常想安装visualizer 模块,所以我继续安装
PyViz visualizer              : not enabled (Python Bindings are needed but not enabled)
Python Bindings               : not enabled
首先解决pyBindings
pip install pybindgen
PyViz visualizer              : not enabled (Missing python modules: gi.repository.GooCanvas)
Python API Scanning Support   : not enabled (Missing 'pygccxml' Python module)
Python Bindings               : enabled
在源中增加
deb http://archive.ubuntu.com/ubuntu/ trusty main universe restricted multiverse
并更新索引、软件
安装后,虚拟机可能出现无法与物理机共享剪切板的情况,此时reboot即可
apt-get install gi.cairo
apt-get install gir1.2-goocanvas-2.0 python3-gi python3-gi-cairo python3-pygraphviz gir1.2-gtk-3.0 ipython3
其他人的解决方法
#安装依赖包(
sudo apt install g++ python3 python3-dev pkg-config sqlite3 python3-setuptools git qt5-default mercurial gir1.2-goocanvas-2.0 python3-gi python3-gi-cairo python3-pygraphviz gir1.2-gtk-3.0 ipython3 openmpi-bin openmpi-common openmpi-doc libopenmpi-dev autoconf cvs bzr unrar gdb valgrind uncrustify doxygen graphviz imagemagick tcpdump sqlite sqlite3 libsqlite3-dev libxml2 libxml2-dev libgtk-3-dev vtun lxc uml-utilities libboost-filesystem-dev python3-pip cmake libc6-dev libc6-dev-i386 automake -y
#安装Python依赖库
sudo pip3 install PyBindGen pygccxml castxml -i https://pypi.douban.com/simple
#build
./build.py
PyViz环境ok!
PyViz visualizer              : enabled
Python API Scanning Support   : not enabled (Missing 'pygccxml' Python module)
Python Bindings               : enabled
Real Time Simulator           : enabled
build NS3
$ ./waf build
常见错误
build中可能存在内存问题(status 4)
法1
sudo dd if=/dev/zero of=/swapfile bs=64M count=16
sudo mkswap /swapfile
sudo swapon /swapfile
编译完成后可以选择撤销该操作(也可以不做)
sudo swapoff /swapfile
sudo rm /swapfile
法2
直接修改内存为4G(或者更高)
status 1的解决方法
CXXFLAGS="-Wall" ./waf configure --enable-examples --enable-tests
然后build
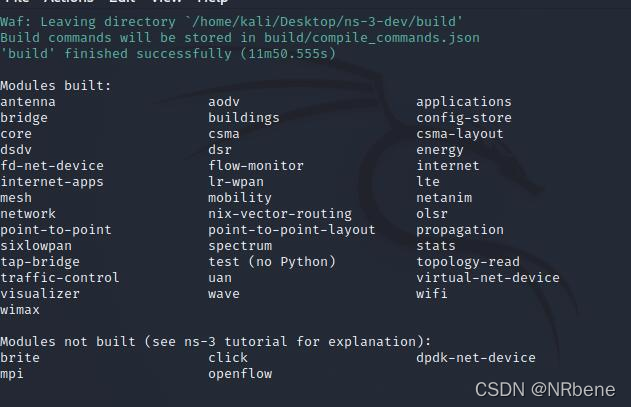
build结果
测试与运行NS3
测试NS3
$ ./test.py
所有的测试要么通过,要么被跳过。如果这样,说明NS3模拟器运行正常。
可以开始运行程序,以系统自带的first.cc为例
$ ./waf --run first
└─# ./waf --run first                                                1 ⨯ 1
Waf: Entering directory `/home/kali/Desktop/ns-3-dev/build'
Waf: Leaving directory `/home/kali/Desktop/ns-3-dev/build'
Build commands will be stored in build/compile_commands.json
'build' finished successfully (1.309s)
At time +2s client sent 1024 bytes to 10.1.1.2 port 9
At time +2.00369s server received 1024 bytes from 10.1.1.1 port 49153
At time +2.00369s server sent 1024 bytes to 10.1.1.1 port 49153
At time +2.00737s client received 1024 bytes from 10.1.1.2 port 9
如果想要获得更多信息,可以输入
$ ./waf --run 'first --PrintHelp'
智能推荐
攻防世界_难度8_happy_puzzle_攻防世界困难模式攻略图文-程序员宅基地
文章浏览阅读645次。这个肯定是末尾的IDAT了,因为IDAT必须要满了才会开始一下个IDAT,这个明显就是末尾的IDAT了。,对应下面的create_head()代码。,对应下面的create_tail()代码。不要考虑爆破,我已经试了一下,太多情况了。题目来源:UNCTF。_攻防世界困难模式攻略图文
达梦数据库的导出(备份)、导入_达梦数据库导入导出-程序员宅基地
文章浏览阅读2.9k次,点赞3次,收藏10次。偶尔会用到,记录、分享。1. 数据库导出1.1 切换到dmdba用户su - dmdba1.2 进入达梦数据库安装路径的bin目录,执行导库操作 导出语句:./dexp cwy_init/[email protected]:5236 file=cwy_init.dmp log=cwy_init_exp.log 注释: cwy_init/init_123..._达梦数据库导入导出
js引入kindeditor富文本编辑器的使用_kindeditor.js-程序员宅基地
文章浏览阅读1.9k次。1. 在官网上下载KindEditor文件,可以删掉不需要要到的jsp,asp,asp.net和php文件夹。接着把文件夹放到项目文件目录下。2. 修改html文件,在页面引入js文件:<script type="text/javascript" src="./kindeditor/kindeditor-all.js"></script><script type="text/javascript" src="./kindeditor/lang/zh-CN.js"_kindeditor.js
STM32学习过程记录11——基于STM32G431CBU6硬件SPI+DMA的高效WS2812B控制方法-程序员宅基地
文章浏览阅读2.3k次,点赞6次,收藏14次。SPI的详情简介不必赘述。假设我们通过SPI发送0xAA,我们的数据线就会变为10101010,通过修改不同的内容,即可修改SPI中0和1的持续时间。比如0xF0即为前半周期为高电平,后半周期为低电平的状态。在SPI的通信模式中,CPHA配置会影响该实验,下图展示了不同采样位置的SPI时序图[1]。CPOL = 0,CPHA = 1:CLK空闲状态 = 低电平,数据在下降沿采样,并在上升沿移出CPOL = 0,CPHA = 0:CLK空闲状态 = 低电平,数据在上升沿采样,并在下降沿移出。_stm32g431cbu6
计算机网络-数据链路层_接收方收到链路层数据后,使用crc检验后,余数为0,说明链路层的传输时可靠传输-程序员宅基地
文章浏览阅读1.2k次,点赞2次,收藏8次。数据链路层习题自测问题1.数据链路(即逻辑链路)与链路(即物理链路)有何区别?“电路接通了”与”数据链路接通了”的区别何在?2.数据链路层中的链路控制包括哪些功能?试讨论数据链路层做成可靠的链路层有哪些优点和缺点。3.网络适配器的作用是什么?网络适配器工作在哪一层?4.数据链路层的三个基本问题(帧定界、透明传输和差错检测)为什么都必须加以解决?5.如果在数据链路层不进行帧定界,会发生什么问题?6.PPP协议的主要特点是什么?为什么PPP不使用帧的编号?PPP适用于什么情况?为什么PPP协议不_接收方收到链路层数据后,使用crc检验后,余数为0,说明链路层的传输时可靠传输
软件测试工程师移民加拿大_无证移民,未受过软件工程师的教育(第1部分)-程序员宅基地
文章浏览阅读587次。软件测试工程师移民加拿大 无证移民,未受过软件工程师的教育(第1部分) (Undocumented Immigrant With No Education to Software Engineer(Part 1))Before I start, I want you to please bear with me on the way I write, I have very little gen...
随便推点
Thinkpad X250 secure boot failed 启动失败问题解决_安装完系统提示secureboot failure-程序员宅基地
文章浏览阅读304次。Thinkpad X250笔记本电脑,装的是FreeBSD,进入BIOS修改虚拟化配置(其后可能是误设置了安全开机),保存退出后系统无法启动,显示:secure boot failed ,把自己惊出一身冷汗,因为这台笔记本刚好还没开始做备份.....根据错误提示,到bios里面去找相关配置,在Security里面找到了Secure Boot选项,发现果然被设置为Enabled,将其修改为Disabled ,再开机,终于正常启动了。_安装完系统提示secureboot failure
C++如何做字符串分割(5种方法)_c++ 字符串分割-程序员宅基地
文章浏览阅读10w+次,点赞93次,收藏352次。1、用strtok函数进行字符串分割原型: char *strtok(char *str, const char *delim);功能:分解字符串为一组字符串。参数说明:str为要分解的字符串,delim为分隔符字符串。返回值:从str开头开始的一个个被分割的串。当没有被分割的串时则返回NULL。其它:strtok函数线程不安全,可以使用strtok_r替代。示例://借助strtok实现split#include <string.h>#include <stdio.h&_c++ 字符串分割
2013第四届蓝桥杯 C/C++本科A组 真题答案解析_2013年第四届c a组蓝桥杯省赛真题解答-程序员宅基地
文章浏览阅读2.3k次。1 .高斯日记 大数学家高斯有个好习惯:无论如何都要记日记。他的日记有个与众不同的地方,他从不注明年月日,而是用一个整数代替,比如:4210后来人们知道,那个整数就是日期,它表示那一天是高斯出生后的第几天。这或许也是个好习惯,它时时刻刻提醒着主人:日子又过去一天,还有多少时光可以用于浪费呢?高斯出生于:1777年4月30日。在高斯发现的一个重要定理的日记_2013年第四届c a组蓝桥杯省赛真题解答
基于供需算法优化的核极限学习机(KELM)分类算法-程序员宅基地
文章浏览阅读851次,点赞17次,收藏22次。摘要:本文利用供需算法对核极限学习机(KELM)进行优化,并用于分类。
metasploitable2渗透测试_metasploitable2怎么进入-程序员宅基地
文章浏览阅读1.1k次。一、系统弱密码登录1、在kali上执行命令行telnet 192.168.26.1292、Login和password都输入msfadmin3、登录成功,进入系统4、测试如下:二、MySQL弱密码登录:1、在kali上执行mysql –h 192.168.26.129 –u root2、登录成功,进入MySQL系统3、测试效果:三、PostgreSQL弱密码登录1、在Kali上执行psql -h 192.168.26.129 –U post..._metasploitable2怎么进入
Python学习之路:从入门到精通的指南_python人工智能开发从入门到精通pdf-程序员宅基地
文章浏览阅读257次。本文将为初学者提供Python学习的详细指南,从Python的历史、基础语法和数据类型到面向对象编程、模块和库的使用。通过本文,您将能够掌握Python编程的核心概念,为今后的编程学习和实践打下坚实基础。_python人工智能开发从入门到精通pdf