介绍与动机 (Intro & Motivation)
Defining infrastructure by writing code has been widely adopted last years. Terraform is one of the leading infrastructure as code tools and known by providing intuitive language, low barrier to get working with, and a lot of providers(integrations to places we are trying to automate).
近年来,通过编写代码定义基础结构已被广泛采用。 Terraform作为代码工具是领先的基础架构之一,以提供直观的语言,较低的使用障碍以及众多的提供程序(集成到我们尝试自动化的地方)而闻名。
Files for Terraform is mostly written in HCL, which is a language used for configuring many HashiCorp products besides Terraform. Terraform’s HCL options are widening day by day and handles many detailed/corner cases. It is also really easy to write and read, even for non-programmers can easily define their infrastructure in it. Still, in some cases, developers still need to be dynamic about the resources we are trying to define as code, define infrastructure needs according to responses of custom integrations in their programming languages. Note that writing custom integrations is possible with Terraform and there are a lot of examples covering that.
Terraform的文件主要是用HCL编写的,该语言是用于配置Terraform之外的许多HashiCorp产品的语言。 Terraform的HCL选项每天都在扩展,并且可以处理许多详细/角落情况。 即使非程序员也可以轻松地在其中定义其基础结构,它的读写也非常容易。 尽管如此,在某些情况下,开发人员仍然需要对我们试图定义为代码的资源保持动态,根据其编程语言中自定义集成的响应来定义基础架构需求。 请注意,使用Terraform可以编写自定义集成,并且有很多示例对此进行了介绍。
Bonus: It is also possible to employ linters/code completion/etc. for Python or TypeScript and they should work!
奖励 :也可以使用lints /代码完成/等。 对于Python或TypeScript,它们应该可以工作!
如何用Python编写Terraform文件? (How to Write Terraform Files in Python?)
As we said before, Terraform takes our definitions in HCL. In addition to HCL, Terraform also accepts JSON formatted files. This means that it is possible to produce JSON files in proper format and Terraform will recognize this files without converting to HCL.
如前所述,Terraform在HCL中采用了我们的定义。 除了HCL,Terraform还接受JSON格式的文件。 这意味着可以生成正确格式的JSON文件,并且Terraform可以识别该文件而无需转换为HCL。
Python and TypeScript are also very common in the last years. So even if a feature is not exists in HCL (yet) or you have a code that should generate infrastructure definitions automatically, integrate with your projects, create SaaS that should create computing resources, … there is a chance to define Terraform resources in Python and TypeScript as well.
过去几年,Python和TypeScript也很常见。 因此,即使HCL中尚不存在某个功能,或者您具有应自动生成基础结构定义,与您的项目集成,创建应创建计算资源的SaaS的代码,也可以在Python中定义Terraform资源,并且以及TypeScript。
Instead of learning Terraform’s JSON format, manually scanning module docs and writing classes/methods to create proper definitions, HashiCorp released CDK for Terraform (details in the link) that automatically does heavy lifting for you by creating classes for which providers you are using in your preferred language (Python or TypeScript).
HashiCorp不再学习Terraform的JSON格式,而是手动扫描模块文档并编写类/方法来创建正确的定义,而是发布了CDK for Terraform (链接中的详细信息),该CDK通过创建要在您的提供程序中使用的提供程序的类为您自动完成繁重的工作首选语言(Python或TypeScript)。
CDK for Terraform also generates the JSON file in the format that Terraform understands.
CDK for Terraform还会以Terraform可以理解的格式生成JSON文件。
Let’s see how to create an Azure Kubernetes Cluster using Terraform CDK.
让我们看看如何使用Terraform CDK创建Azure Kubernetes群集。
安装CDK for Terraform (Installing CDK for Terraform)
In order to use CDK for Terraform, we should install it using via npm (most of it is written in TypeScript). It requires Terraform, Node.js, and Yarn installed on your computer. For up-to-date install instructions, HashiCorp Learn will be a great resource. Just follow the instructions in that link.
为了将CDK用于Terraform,我们应该使用npm来安装它(大多数都是用TypeScript编写的)。 它需要在计算机上安装Terraform,Node.js和Yarn。 有关最新的安装说明, HashiCorp Learn将是一个很好的资源。 只需按照该链接中的说明进行操作即可。
If you use Docker and don’t want to install a package with npm, I prepared a Dockerfile that contains all of them. It is also available as an image on Docker Hub so you may use it directly to try contents of this post without building image. I tagged my image for CDK for Terraform v0.0.14 as guray/tfcdkc:0.0.14. So in that case, there is no requisite other than Docker. Just follow the steps and you should be ready.
如果您使用Docker并且不想使用npm安装软件包,那么我准备了一个包含所有软件包的Dockerfile 。 它也可以作为镜像在Docker Hub上使用,因此您可以直接使用它来尝试本文的内容,而无需构建镜像。 我将Terraform v0.0.14的CDK图像标记为guray / tfcdkc:0.0.14 。 因此,在这种情况下,除Docker之外没有其他要求。 只需执行以下步骤,您就应该准备好了。
Run this if you are using Docker
如果您正在使用Docker,请运行此命令
docker pull guray/tfcdkc:0.0.14使用CDK for Terraform启动新项目 (Starting a New Project with CDK for Terraform)
A project in Terraform-CDK needs include a couple of files to be useful. cdktf command helps us to generate these files automatically.
Terraform-CDK中的一个项目需要包含几个有用的文件。 cdktf命令可帮助我们自动生成这些文件。
If you have installed with npm, go to an empty directory(or create) and run the command:
如果已使用npm安装,请转到一个空目录(或创建)并运行以下命令:
$ mkdir cdktest && cd $_
$ cdktf init --template python
OR if you are using Docker:
或者,如果您使用的是Docker:
$ mkdir cdktest && cd $_
$ docker run -it --rm -v $PWD:/code guray/tfcdkc:0.0.14
(in container)/code # cdktf init --template python
After running the command, it will ask you a couple of questions:
运行命令后,它将询问您几个问题:
If you are using Terraform Cloud and want to store Terraform state there, you can write “yes” and login. In this post, we will store the state locally. So we will say “no” here.
如果您正在使用Terraform Cloud并想在其中存储Terraform状态,则可以输入“是”并登录。 在这篇文章中,我们将状态存储在本地。 因此,我们在这里说“不”。
It will ask a Project Name and Project Description, write answers or just press enter to proceed with the default values. It should look like this:
它将询问项目名称和项目描述 ,编写答案或仅按Enter即可继续使用默认值。 它看起来应该像这样:

Afterwards, it will create an empty project for you:
之后,它将为您创建一个空项目:
$ lsPipfile Pipfile.lock cdktf.json cdktf.out help imports main.py发生了什么? 这些文件是什么?为什么在这里? (What Happened? What are These Files and Why They Are Here?)
cdktf command line interface has created a Python virtual environment with pipenv and it installed cdktf module in it using pip.
cdktf命令行界面已使用pipenv创建了一个Python虚拟环境,并使用pip在其中安装了cdktf模块。
By default, it bootstraps the project for AWS(Terraform’s AWS provider). This is defined in cdktf.json and we will change that file soon. Generated Python modules for Terraform’s AWS provider is resides in imports directory.
默认情况下,它会为AWS(Terraform的AWS提供程序)引导项目。 这是在cdktf.json中定义的,我们将尽快更改该文件。 为Terraform的AWS提供程序生成的Python模块位于imports目录中。
Pipfile and Pipfile.lock are for pipenv to record & lock installed module versions & requirements.
Pipfile和Pipfile.lock用于pipenv记录并锁定已安装的模块版本和要求。
help file includes a basic documentation showing useful subcommands of cdktf. Taking a look at that file will be useful.
帮助文件包括基本文档,该文档显示了cdktf的有用子命令。 查看该文件将很有用。
main.py is the vital thing for us here. We will write our definition of Azure resources (AKS in this case) here. It includes a fundamental template to work on, so we will add our resources/providers here.
main.py对我们来说至关重要。 我们将在此处编写Azure资源(在本例中为AKS)的定义。 它包括一个基础模板,因此我们将在此处添加我们的资源/提供者。
cdktf.out is a directory that includes our JSON file (output).
cdktf.out是包含我们的JSON文件(输出)的目录。
使用CDK为Azure编码Azure Kubernetes服务 (Coding Azure Kubernetes Service With CDK for Terraform)
Now we have main.py and a working project.
现在我们有了main.py和一个正在运行的项目。
At this point, you can use your IDE and its features to define resources here. Many IDEs will automatically recogize the virtual environment created by pipenv and use it. This way they will autocomplete your code by using cdktf module and other modules created automatically for defining resources.
此时,您可以使用IDE及其功能在此处定义资源。 许多IDE会自动识别Pipenv创建的虚拟环境并使用它。 这样,他们将使用cdktf模块和为定义资源而自动创建的其他模块自动完成代码。
将Azure定义为CDK的提供者 (Defining Azure as a Provider to CDK)
By default, CDK for Terraform creates a config file that includes AWS as a provider. We can use any number of Terraform providers(there are a lot!) at there. Let’s add Azure to the list. cdktf.json file will look like this(you can also remove AWS provider if you will not use):
默认情况下,CDK for Terraform创建一个包含AWS作为提供程序的配置文件。 我们在那里可以使用任何数量的Terraform提供程序(数量很多!)。 让我们将Azure添加到列表中。 cdktf.json文件将如下所示(如果您不使用,也可以删除AWS提供程序):
{

  "language": "python",
  "app": "pipenv run ./main.py",
  "terraformProviders": [
    "aws@~> 2.0",
    "azurerm@~> 2.22.0"
  ],
  "codeMakerOutput": "imports"
}
After adding the provider, we should ask cdktf to generate Python modules for these providers:
添加提供程序之后,我们应要求cdktf为这些提供程序生成Python模块:
$ cdktf get
⠴ downloading and generating providers...
... after a while
Generated python constructs in the output directory: imports
It may take some time but you will not need to change it if you are not changing the config file(which will probably be very rare). Now, import directory is updated. Just make sure your code completion saw the new modules in this directory to write code easily.
这可能会花费一些时间,但是如果您不更改配置文件,则无需更改它(这可能非常少见)。 现在, 导入目录已更新。 只需确保您的代码完成情况看到该目录中的新模块即可轻松编写代码。
Note that if you want to use Terraform modules, it is also possible. Just define them in this file and run the ‘cdktf get’ command again.
请注意,如果要使用Terraform模块,也可以。 只需在此文件中定义它们,然后再次运行“ cdktf get”命令即可。
在CDK中导入Terraform资源 (Importing Terraform Resources in CDK)
The complete source code is at the end.
完整的源代码在最后。
Now we have the modules we need. Start with importing them:
现在,我们有了所需的模块。 从导入它们开始:
from imports.azurerm import \
    AzurermProvider, \
    KubernetesCluster, \
    KubernetesClusterDefaultNodePool, \
    KubernetesClusterIdentity, ResourceGroupConfig, AzurermProviderFeatures
If you need to know how to decide which Python modules should be used, they are named like Terraform resource names. Also writing a couple of characters from resource name will trigger autocompletion to suggest related modules.
如果您需要了解如何决定使用哪个Python模块,它们的名称就像Terraform资源名称一样 。 另外,从资源名称中写入几个字符将触发自动补全功能以建议相关模块。
We have imported required modules and are ready to define our resources.
我们已经导入了必需的模块,并准备定义我们的资源。
在Python中定义Terraform资源 (Defining Terraform Resources in Python)
There is a comment line sayin # define resources here” in our code. We will add the lines after it, in the same method (which is __init__).
在我们的代码中,有一条注释行“在此处定义资源”。 我们将使用相同的方法(即__init__ )在其后添加行。
Firstly, we should define our provider(Azurerm in our case):
首先,我们应该定义我们的提供者(在我们的例子中是Azurerm):
        features = AzurermProviderFeatures()
        provider = AzurermProvider(self, 'azure', features=[features])
Features is empty in our case(required by the provider even if it is empty, see the docs). For details like KeyVault, Terraform docs will help to clarify and write.
在我们的情况下,功能为空(即使它为空,提供者也需要它,请参阅文档)。 有关KeyVault之类的详细信息,Terraform文档将有助于澄清和编写。
Afterwards, create a default node pool for our cluster:
然后,为我们的集群创建一个默认的节点池:
        node_pool = KubernetesClusterDefaultNodePool(
            name='default', node_count=1, vm_size='Standard_D2_v2')
In this example, node count is set to 1 and VM size is Standart_D2_v2. You may need to change them according to your needs.
在此示例中,节点计数设置为1,VM大小为Standart_D2_v2。 您可能需要根据需要进行更改。
We will use a resource group which already exists in our Azure subscription. Either select an existing one or create a new one and provide its name:
我们将使用Azure订阅中已经存在的资源组。 选择一个现有的或创建一个新的并提供其名称:
resource_group = ResourceGroupConfig(name='OUR_RESOURCE_GROUP', location='East US')Replace OUR_RESOURCE_GROUP and location. This will help Terraform to create the AKS cluster in that resource group & region.
替换OUR_RESOURCE_GROUP和位置。 这将帮助Terraform在该资源组和区域中创建AKS集群。
Kubernetes cluster identity is needed to create the cluster, so let’s define it:
创建集群需要Kubernetes集群标识,因此让我们对其进行定义:
identity = KubernetesClusterIdentity(type='SystemAssigned')There is currently nothing to change(only supported type is ‘SystemAssigned’ right now), so we will define it and continue.
当前没有任何更改(现在仅支持的类型为'SystemAssigned'),因此我们将对其进行定义并继续。
Finally, define our cluster:
最后,定义我们的集群:
cluster = KubernetesCluster(
            self, 'our-kube-cluster',
            name='our-kube-cluster',
            default_node_pool=[node_pool],
            dns_prefix='test',
            location=resource_group.location,
            resource_group_name=resource_group.name,
            identity=[identity],
            tags={"foo": "bar"}
        )
Now we can arrange the parameters like cluster name, DNS prefix, and tags to fit our requirements.
现在,我们可以安排参数,例如群集名称,DNS前缀和标签,以满足我们的要求。
At this point we are ready to synthesize JSON file for Terraform. Before continuing, here is the complete source (main.py):
至此,我们准备为Terraform合成JSON文件。 在继续之前,这里是完整的源代码(main.py):
#!/usr/bin/env python
from constructs import Construct
from cdktf import App, TerraformStack, TerraformOutput
from imports.azurerm import \
    AzurermProvider, \
    KubernetesCluster, \
    KubernetesClusterDefaultNodePool, \
    KubernetesClusterIdentity, ResourceGroupConfig, AzurermProviderFeatures


class MyStack(TerraformStack):
    def __init__(self, scope: Construct, ns: str):
        super().__init__(scope, ns)


        # define resources here
        features = AzurermProviderFeatures()
        provider = AzurermProvider(self, 'azure', features=[features])


        node_pool = KubernetesClusterDefaultNodePool(
            name='default', node_count=1, vm_size='Standard_D2_v2')


        resource_group = ResourceGroupConfig(name='OUR_RESOURCE_GROUP', location='East US')


        identity = KubernetesClusterIdentity(type='SystemAssigned')


        cluster = KubernetesCluster(
            self, 'our-kube-cluster',
            name='our-kube-cluster',
            default_node_pool=[node_pool],
            dns_prefix='test',
            location=resource_group.location,
            resource_group_name=resource_group.name,
            identity=[identity],
            tags={"foo": "bar"}
        )


app = App()
MyStack(app, "test")


app.synth()
部署集群 (Deploy the Cluster)
Firstly we will generate the JSON file:
首先,我们将生成JSON文件:
$ cdktf synth
⠼ synthesizing ...
After command is completed, there will be a file named “cdk.tf.json” in cdktf.out.
命令完成后,cdktf.out中将有一个名为“ cdk.tf.json”的文件。
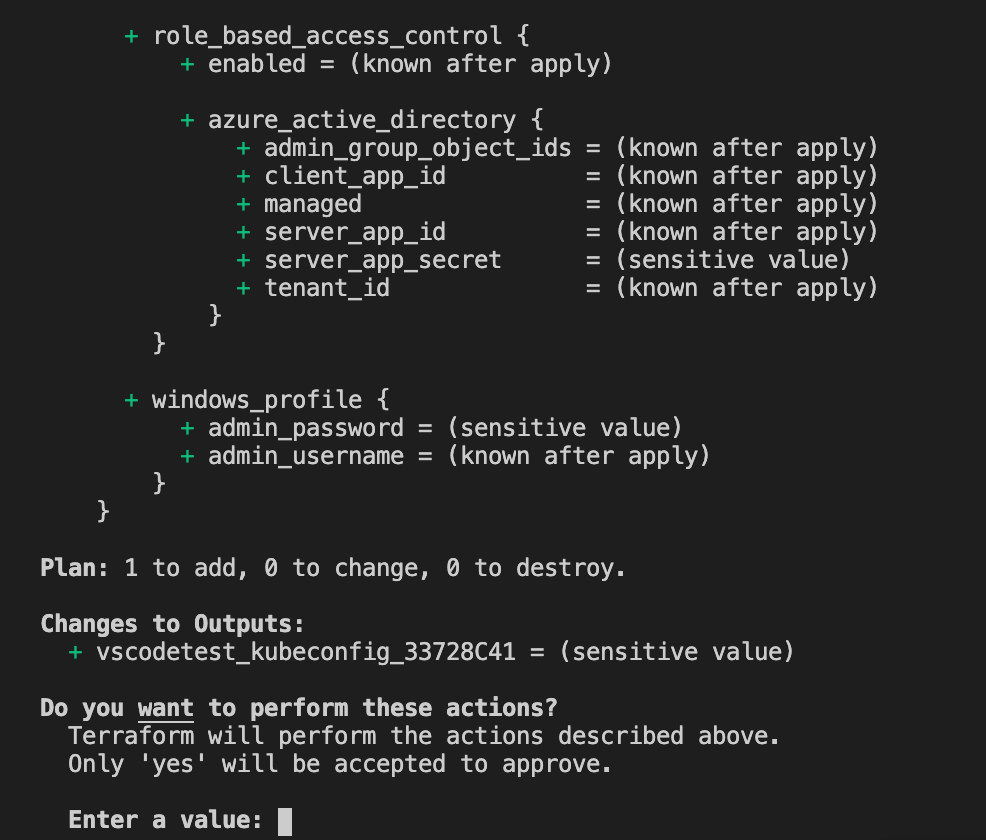
We can give this file to Terraform and use Terraform subcommands like plan/apply/destroy/… using:
我们可以将此文件提供给Terraform并使用Terraform子命令,例如plan / apply / destroy /…,使用:
$ cd cdktf.out
$ terraform init
...
$ terraform apply
...
OR, we can use cdktf’s subcommands to apply the same procedure:
或者,我们可以使用cdktf的子命令来应用相同的过程:
$ cdktf deployThis command will automatically run cdktf synth and terraform apply.
该命令将自动运行cdktf synth和terraform apply 。
Note that you need to have az installed and logged in, in order to apply this JSON file otherwise it will throw an error.
请注意,您需要先安装az并登录,然后才能应用此JSON文件,否则它将引发错误。