--micro_out=._.NET Micro Framework-适用于软件人员的硬件-程序员宅基地
技术标签: python java 字符串 人工智能 大数据
--micro_out=.
I'm definitely a software person. I took EE in school and made an LED class, then a small computer like everyone else, and I know my volts and my amps for the most part, but that's about it. The limits of my skills are somewhere around adding an LED and some resistors to leech power off a USB adapter (which I recently did while working on the Hanselcade retro arcade build).
我绝对是软件人。 我在学校上了EE,并开了LED课,然后像其他所有人一样参加了一台小型计算机,我基本上了解我的伏特和安培,但是仅此而已。 我的技能极限是在添加LED和一些电阻器以关闭USB适配器的电源方面(我最近在进行Hanselcade复古街机构建时做了此操作)。
I look at hardware guys like Clint Rutkas in awe. I mean, seriously, who builds a T-shirt cannon from scratch for fun? Amazing.
我敬畏地看着像Clint Rutkas这样的硬件专家。 我的意思是说,认真地说,谁从头开始建造T恤大炮是为了娱乐? 惊人。
Clint sent me a "Netduino" board today. It's similar to an Arduino board, except it uses the .NET Micro Framework. Micro you say? That's techie-speak for "tiny ass framework." I spoke to Colin Miller about this earlier in the year on video at Channel 9.
克林特今天给我寄了一个“ Netduino”板。 除了使用.NET Micro Framework之外,它类似于Arduino板。 微你说? 那是“小屁股框架”的技术代表。 我在今年早些时候通过第9频道的视频与Colin Miller进行了交谈。

Remember my SPOT watch from 2004? That's Smart Personal Objects Technology, which is marketing-speak for "tiny ass framework." That watch is six years old (and still running nicely, sitting on my desk, in fact) and ran .NET.
还记得2004年的SPOT手表吗? 那就是Smart Personal Objects Technology,它在市场上被称为“小屁股框架”。 那只手表已经六岁了(实际上仍然很好地运行,坐在我的桌子上),并且运行.NET 。
Fast forward to today and I find myself plugging in this Netduino board to my computer and following Pete's Hello World Tutorial and I'm looking at this namespace.
快进到今天,我发现自己将这个Netduino板插入到我的计算机中,并遵循Pete的Hello World Tutorial ,我正在寻找这个名称空间。
using Microsoft.SPOT;
using Microsoft.SPOT.Hardware;
使用Microsoft.SPOT; 使用Microsoft.SPOT.Hardware;
It's back!
回来了!
Ok, putting it all together in context. The Netduino is a board that's mostly Arduino compatible and has a published schematic (PDF here) so you could make one yourself, if you wanted. The .NET Micro Framework (or TinyCLR as some folks have called it) is literally that - it's a tiny CLR that runs .NET byte code. You can write C# and it'll run on tiny CPUs with tiny amounts of memory (like 64k or something similarly smallish.) It's been with us all this time, and there is an enthusiastic community built around it.
好的,将它们放在上下文中。 Netduino是一个与Arduino基本兼容的电路板,并具有已发布的原理图(此处为PDF ),因此您可以根据需要自己制作。 .NET Micro Framework(或某些人称为TinyCLR)的字面意义是-它是运行.NET字节码的微型CLR。 您可以编写C#,它将在具有少量内存(例如64k或类似的较小内存)的微型CPU上运行。这一直伴随着我们,并且围绕它建立了一个热情的社区。
The .NET Micro Framework 4.1 source is available, it's Open Source under the Apache 2.0 License. (Ya, the new Microsoft is freaking me out also. There's a lot of source that's quietly making its way out under increasingly liberal licenses.) There's lots of great details at Pete's blog.
可以使用.NET Micro Framework 4.1源,根据Apache 2.0许可,它是开放源。 (是的,新的Microsoft也在吓我一跳。在越来越自由的许可下,有很多消息来源悄悄地将其淘汰。) Pete的博客中有很多重要细节。
Here's what a Netduino looks like:
Netduino的外观如下:
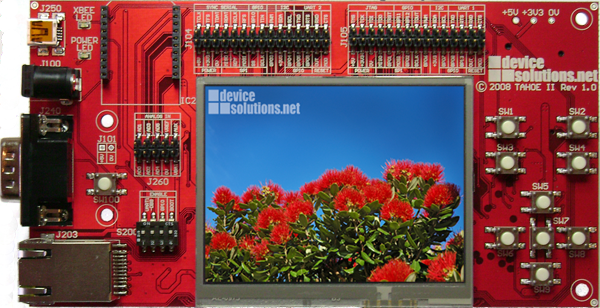
I'm going to think of some hardware ideas that I can build with this. I also have a more capable and fancy Tahoe II with a touch-screen, accelerometer, buttons and more. If you're looking to prototype something quick, or even build a complete system with an off-the-shelf board, do check it out! Here's what a Tahoe II looks like. Remember, all these boards use C# and .NET. It's amazing writing something for hardware using a language and framework I already know how to use. It literally gets me 80% of the way there from a learning curve perspective.
我将考虑一些可以以此为基础的硬件思想。 我还拥有功能更强大,更漂亮的Tahoe II ,配备触摸屏,加速度计,按钮等。 如果您希望快速制作原型,或者甚至使用现成的板构建完整的系统,请进行检查! 这就是Tahoe II的外观。 请记住,所有这些开发板都使用C#和.NET。 使用我已经知道如何使用的语言和框架为硬件编写一些东西真是太神奇了。 从学习曲线的角度来看,从字面上看,它可以让我80%地达到目标。
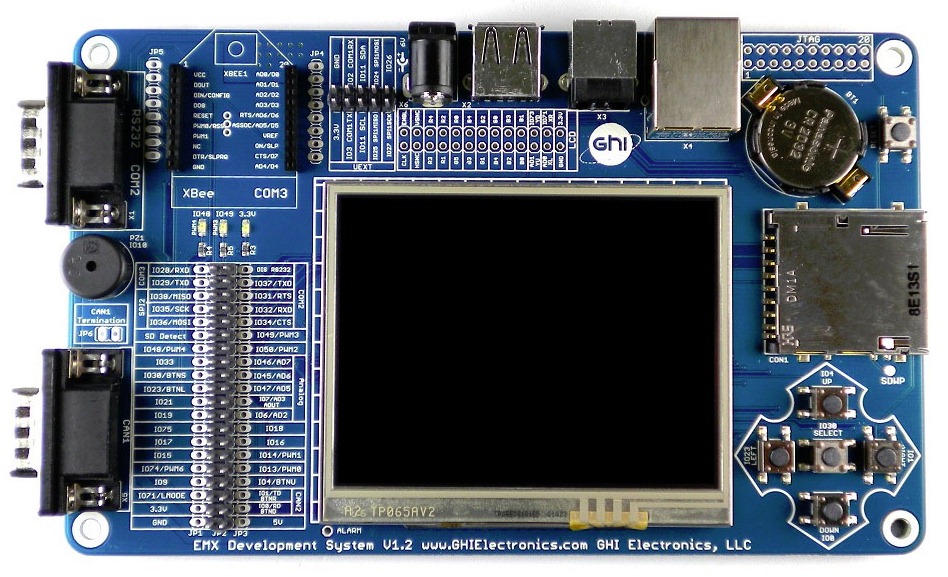
There's also the GHI Electronics EMX Development system, so there's a lot of choices.
还有GHI Electronics EMX开发系统,因此有很多选择。
With each of these boards (and others) you just need to get the Micro Framework 4.1, then the SDK for that specific board. It integrates into Visual Studio 2010. If you want to change the product, they are taking proposals in the .NETMF Forums.
对于这些板(和其他板),您只需要获取Micro Framework 4.1 ,然后获取该特定板的SDK。 它已集成到Visual Studio 2010中。如果要更改产品,他们将在.NETMF论坛中提出建议。
Directly from Pete's blog:
直接来自Pete的博客:
入门 (Getting Started)
What you'll need:
您需要什么:
Netduino (Scott: or some other .NET Micro Framework board)
Netduino (斯科特:或其他一些.NET Micro Framework板)
USB Cable (early Netduino units come with the USB cable) (Scott: Usually a micro- or mini-USB)
USB电缆(早期Netduino设备随附USB电缆) (斯科特:通常为微型USB或微型USB)
Visual Studio 2010 and the .NET Micro Framework 4.1 SDK (you can use C# Express 2010 if you don't have Visual Studio)
Visual Studio 2010和.NET Micro Framework 4.1 SDK (如果没有Visual Studio,则可以使用C#Express 2010)
Netduino SDK in 32 bit or 64 bit, depending on your host OS.
Optional: shields and starter kits to do cool things with netduino. Existing Arduino shields are compatible. A shield is just an add-on card that fits the pins on the board.
可选:防护罩和入门套件,用于使用netduino进行散热。 现有的Arduino防护板兼容。 屏蔽层只是适合主板上引脚的附加卡。
The SDK installs a device driver for talking to the Netduino. Make sure you select the one with the appropriate bitness, and that you install it before connecting the Netduino to the PC. I installed the VS2010 bits before the SDK, but it shouldn't matter.
SDK安装了用于与Netduino对话的设备驱动程序。 将Netduino连接到PC之前,请确保选择具有适当位数的适配器,并进行安装。 我在SDK之前安装了VS2010,但没关系。
Once you plug in the Netduino, using the USB cable, you should see the device driver get installed, and the power LED on the board light up.
使用USB电缆插入Netduino后,应该会看到设备驱动程序已安装,并且板上的电源LED点亮。
莫尔斯电码的Hello World (Hello World with Morse Code)
Now I just have the Netduino for now, so I haven't got any attachments. If I was a hardware guy, I'm sure I'd go try to take apart a toaster or remote control and declare something like "this toaster just needs a one OHM resister on pin-out 5A so I can invert the voltage and it'll toast bread over Bluetooth" but I have no idea what that means. All I can do with the Netduino out of the box to flash its LED, as Pete points out:
现在我现在只有Netduino,所以没有任何附件。 如果我是硬件人员,我敢肯定,我会尝试拆开烤面包机或遥控器,并声明类似“此烤面包机只需要在引脚5A上安装一个OHM电阻器,这样我就可以反转电压了“将通过蓝牙烤面包”,但我不知道那是什么意思。 正如Pete所指出的,我可以使用Netduino开箱即用的所有功能来闪烁其LED。
public static void Main()
{
   OutputPort onboardLed = new OutputPort(Pins.ONBOARD_LED, false);

   while (true)
   {
      onboardLed.Write(true);
      Thread.Sleep(500);

      onboardLed.Write(false);
      Thread.Sleep(500);
   }
}
Let's make it fancier. How about outputting string using Morse Code? Wikipedia says a dot is 100ms long and a dash is 300ms. How hard can it be?
让我们变得更奇特。 使用摩尔斯电码输出字符串怎么样? 维基百科说一个点长100毫秒,一个破折号长300毫秒。 它能有多难?
I could go to StackOverflow as they had a contest to see who could make the SMALLEST implementation that would take a string and output Morse Code. They have an extremely optimized (for lines of code) solution. But it's extremely silly. Certainly no more silly than me making an LED blink Morse Code as well, but I'd like to be able to actually read my code. ;)
我可以去StackOverflow,因为他们有一个竞赛,看谁可以做一个最小的实现,该实现需要一个字符串并输出莫尔斯电码。 他们有一个非常优化的(针对代码行)解决方案。 但这非常愚蠢。 当然,也比让我让LED闪烁摩尔斯电码更傻,但是我希望能够真正读取我的代码。 ;)
So, here's a naive 10 minutes solution using this guys' two arrays because I'm too lazy to type up the Morse myself. I could have use a Hashtable also, but two parallel arrays was fine too. The .NET Micro Framework, being micro, doesn't have everything the full framework has. However, being open source, it has taken contributions and version 4.1 includes a Hashtable implementation.
因此,这是一个使用这两个人的数组的10天幼稚解决方案,因为我太懒了,无法自己输入摩尔斯电报。 我也可以使用Hashtable,但是两个并行数组也可以。 微型的.NET Micro Framework并不具备完整框架的所有功能。 但是,它是开源的,它已经做出了贡献,并且4.1版包含一个Hashtable实现。
I can even debug directly connected to the board!
我什至可以直接将调试连接到板上!
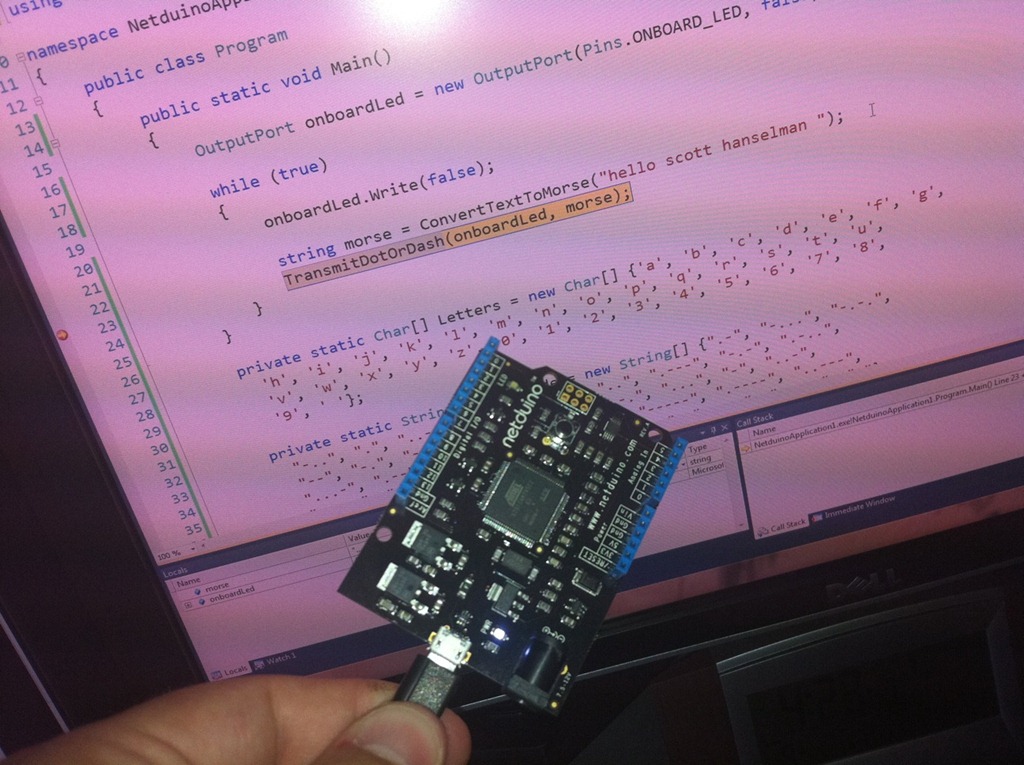
Here's my sad little program (it was very easy!)
这是我悲伤的小程序(非常简单!)
using System;
using System.Threading;
using Microsoft.SPOT;
using Microsoft.SPOT.Hardware;
using SecretLabs.NETMF.Hardware;
using SecretLabs.NETMF.Hardware.Netduino;
using System.Text;
using System.Collections;

namespace NetduinoApplication1
{

    public class Program
    {

        public static void Main()
        {

            OutputPort onboardLed = new OutputPort(Pins.ONBOARD_LED, false);

            while (true)
            {

                onboardLed.Write(false);

                foreach (char c in " hello scott hanselman ")
                {

                    string morse = ConvertTextToMorse(c);
                    Debug.Print(c + " = " + morse);
                    TransmitDotOrDash(onboardLed, morse);
                }

            }
        }

        private static Char[] Letters = new Char[] {'a', 'b', 'c', 'd', 'e', 'f', 'g',
          'h', 'i', 'j', 'k', 'l', 'm', 'n', 'o', 'p', 'q', 'r', 's', 't', 'u',
          'v', 'w', 'x', 'y', 'z', '0', '1', '2', '3', '4', '5', '6', '7', '8',
          '9', ' '};

        private static String[] MorseCode = new String[] {".-", "-...", "-.-.",
          "-..", ".", "..-.", "--.", "....", "..", ".---", "-.-", ".-..",
          "--", "-.", "---", ".--.", "--.-", ".-.", "...", "-", "..-",
          "...-", ".--", "-..-", "-.--", "--..", "-----", ".----", "..---",
          "...--", "....-", ".....", "-....", "--...", "---..", "----.", " "};

        public static String ConvertTextToMorse(char c)
        {

            int index = -1;
            index = Array.IndexOf(Letters, c);
            if (index != -1)
                return MorseCode[index];
            return string.Empty;
        }


        public static void TransmitDotOrDash(OutputPort port, string dotordash)
        {

            foreach (char c in dotordash)
            {

                TransmitDotOrDash(port, c);
            }
            Thread.Sleep(300); //gap between letters
        }

        public static void TransmitDotOrDash(OutputPort port, char dotordash)
        {

            if (dotordash == ' ')
            {

                port.Write(false);
                Thread.Sleep(700); //gap between words
            }
            else //it's something
            {

                port.Write(true);
                if (dotordash == '.')
                    Thread.Sleep(100); //dot
                else
                    Thread.Sleep(300); //dash
                port.Write(false);
            }
        }
    }
}
Here's the debug output as I flash "hello scott hanselman" from the board.
这是我从板上刷新“ hello scott hanselman”时的调试输出。

All it all, it really couldn't be much easier. Next I'll try to get the Tahoe II working and maybe make a game for the boys. Perhaps hook up a speaker and a proximity sensor and see if they can sneak up on it.
所有这一切,真的很容易。 接下来,我将尝试使Tahoe II正常工作,并可能为男孩们制作游戏。 也许挂上扬声器和接近传感器,看看它们是否可以潜入其上。
Related Links
相关链接
翻译自: https://www.hanselman.com/blog/the-net-micro-framework-hardware-for-software-people
--micro_out=.
智能推荐
oracle 12c 集群安装后的检查_12c查看crs状态-程序员宅基地
文章浏览阅读1.6k次。安装配置gi、安装数据库软件、dbca建库见下:http://blog.csdn.net/kadwf123/article/details/784299611、检查集群节点及状态:[root@rac2 ~]# olsnodes -srac1 Activerac2 Activerac3 Activerac4 Active[root@rac2 ~]_12c查看crs状态
解决jupyter notebook无法找到虚拟环境的问题_jupyter没有pytorch环境-程序员宅基地
文章浏览阅读1.3w次,点赞45次,收藏99次。我个人用的是anaconda3的一个python集成环境,自带jupyter notebook,但在我打开jupyter notebook界面后,却找不到对应的虚拟环境,原来是jupyter notebook只是通用于下载anaconda时自带的环境,其他环境要想使用必须手动下载一些库:1.首先进入到自己创建的虚拟环境(pytorch是虚拟环境的名字)activate pytorch2.在该环境下下载这个库conda install ipykernelconda install nb__jupyter没有pytorch环境
国内安装scoop的保姆教程_scoop-cn-程序员宅基地
文章浏览阅读5.2k次,点赞19次,收藏28次。选择scoop纯属意外,也是无奈,因为电脑用户被锁了管理员权限,所有exe安装程序都无法安装,只可以用绿色软件,最后被我发现scoop,省去了到处下载XXX绿色版的烦恼,当然scoop里需要管理员权限的软件也跟我无缘了(譬如everything)。推荐添加dorado这个bucket镜像,里面很多中文软件,但是部分国外的软件下载地址在github,可能无法下载。以上两个是官方bucket的国内镜像,所有软件建议优先从这里下载。上面可以看到很多bucket以及软件数。如果官网登陆不了可以试一下以下方式。_scoop-cn
Element ui colorpicker在Vue中的使用_vue el-color-picker-程序员宅基地
文章浏览阅读4.5k次,点赞2次,收藏3次。首先要有一个color-picker组件 <el-color-picker v-model="headcolor"></el-color-picker>在data里面data() { return {headcolor: ’ #278add ’ //这里可以选择一个默认的颜色} }然后在你想要改变颜色的地方用v-bind绑定就好了,例如:这里的:sty..._vue el-color-picker
迅为iTOP-4412精英版之烧写内核移植后的镜像_exynos 4412 刷机-程序员宅基地
文章浏览阅读640次。基于芯片日益增长的问题,所以内核开发者们引入了新的方法,就是在内核中只保留函数,而数据则不包含,由用户(应用程序员)自己把数据按照规定的格式编写,并放在约定的地方,为了不占用过多的内存,还要求数据以根精简的方式编写。boot启动时,传参给内核,告诉内核设备树文件和kernel的位置,内核启动时根据地址去找到设备树文件,再利用专用的编译器去反编译dtb文件,将dtb还原成数据结构,以供驱动的函数去调用。firmware是三星的一个固件的设备信息,因为找不到固件,所以内核启动不成功。_exynos 4412 刷机
Linux系统配置jdk_linux配置jdk-程序员宅基地
文章浏览阅读2w次,点赞24次,收藏42次。Linux系统配置jdkLinux学习教程,Linux入门教程(超详细)_linux配置jdk
随便推点
matlab(4):特殊符号的输入_matlab微米怎么输入-程序员宅基地
文章浏览阅读3.3k次,点赞5次,收藏19次。xlabel('\delta');ylabel('AUC');具体符号的对照表参照下图:_matlab微米怎么输入
C语言程序设计-文件(打开与关闭、顺序、二进制读写)-程序员宅基地
文章浏览阅读119次。顺序读写指的是按照文件中数据的顺序进行读取或写入。对于文本文件,可以使用fgets、fputs、fscanf、fprintf等函数进行顺序读写。在C语言中,对文件的操作通常涉及文件的打开、读写以及关闭。文件的打开使用fopen函数,而关闭则使用fclose函数。在C语言中,可以使用fread和fwrite函数进行二进制读写。 Biaoge 于2024-03-09 23:51发布 阅读量:7 ️文章类型:【 C语言程序设计 】在C语言中,用于打开文件的函数是____,用于关闭文件的函数是____。
Touchdesigner自学笔记之三_touchdesigner怎么让一个模型跟着鼠标移动-程序员宅基地
文章浏览阅读3.4k次,点赞2次,收藏13次。跟随鼠标移动的粒子以grid(SOP)为partical(SOP)的资源模板,调整后连接【Geo组合+point spirit(MAT)】,在连接【feedback组合】适当调整。影响粒子动态的节点【metaball(SOP)+force(SOP)】添加mouse in(CHOP)鼠标位置到metaball的坐标,实现鼠标影响。..._touchdesigner怎么让一个模型跟着鼠标移动
【附源码】基于java的校园停车场管理系统的设计与实现61m0e9计算机毕设SSM_基于java技术的停车场管理系统实现与设计-程序员宅基地
文章浏览阅读178次。项目运行环境配置:Jdk1.8 + Tomcat7.0 + Mysql + HBuilderX(Webstorm也行)+ Eclispe(IntelliJ IDEA,Eclispe,MyEclispe,Sts都支持)。项目技术:Springboot + mybatis + Maven +mysql5.7或8.0+html+css+js等等组成,B/S模式 + Maven管理等等。环境需要1.运行环境:最好是java jdk 1.8,我们在这个平台上运行的。其他版本理论上也可以。_基于java技术的停车场管理系统实现与设计
Android系统播放器MediaPlayer源码分析_android多媒体播放源码分析 时序图-程序员宅基地
文章浏览阅读3.5k次。前言对于MediaPlayer播放器的源码分析内容相对来说比较多,会从Java-&amp;gt;Jni-&amp;gt;C/C++慢慢分析,后面会慢慢更新。另外,博客只作为自己学习记录的一种方式,对于其他的不过多的评论。MediaPlayerDemopublic class MainActivity extends AppCompatActivity implements SurfaceHolder.Cal..._android多媒体播放源码分析 时序图
java 数据结构与算法 ——快速排序法-程序员宅基地
文章浏览阅读2.4k次,点赞41次,收藏13次。java 数据结构与算法 ——快速排序法_快速排序法