TensorFlow2学习25、TF2.0使用YoloV3_用tfds下载coco2014-程序员宅基地
一、说明
本文学习资源来自Github开源项目:
https://github.com/breadbread1984/YOLOv3-tf2.0
由于条件限制,本文部分内容我没有实际运行测试。
本文摘选注释部分功能代码,完整项目代码可到开源地址获取。
二、代码实现
1. 训练COCO数据集
下载COCO数据集download_dataset.py
#!/usr/bin/python3

import tensorflow_datasets as tfds;

def main():

    # load dataset
    coco2014_builder = tfds.builder("coco");
    coco2014_builder.download_and_prepare();
    # try to load the dataset once
    coco2014_train = tfds.load(name = "coco", split = tfds.Split.TRAIN, download = False);
    coco2014_test = tfds.load(name = "coco", split = tfds.Split.TEST, download = False);

if __name__ == "__main__":

    assert tf.executing_eagerly();
    main();
数据集37.57GiB比较大,在google colab上超出了磁盘使用量,不适合在colab上复现。
tf eager训练coco数据集 train_eager.py
#!/usr/bin/python3

import os;
import numpy as np;
import cv2;
import tensorflow as tf;
import tensorflow_datasets as tfds;
from YOLOv3 import YOLOv3, Loss;
from Predictor import Predictor;
from preprocess import map_function;

os.environ['TF_ENABLE_AUTO_MIXED_PRECISION'] = '1';
#os.environ['TF_CPP_MIN_VLOG_LEVEL'] = '3';
#os.environ['CUDA_VISIBLE_DEVICES'] = '';
batch_size = 8; # images of different sizes can't be stack into a batch

def main():

    # yolov3 model  导入yolov3模型
    yolov3 = YOLOv3((416,416,3), 80);
    yolov3_loss = Loss((416,416,3), 80);
    # load downloaded dataset 加载数据集
    trainset = tfds.load(name = "coco", split = tfds.Split.TRAIN, download = False);
    trainset = trainset.map(map_function).repeat(100).shuffle(batch_size).batch(batch_size).prefetch(tf.data.experimental.AUTOTUNE);
    validationset = tfds.load(name = "coco", split = tfds.Split.VALIDATION, download = False);
    validationset_iter = validationset.map(map_function).repeat(100).shuffle(batch_size).batch(batch_size).prefetch(tf.data.experimental.AUTOTUNE).__iter__();
    testset = tfds.load(name = "coco", split = tfds.Split.TEST, download = False); # without label
    testset = testset.repeat(100).prefetch(tf.data.experimental.AUTOTUNE);
    testset_iter = testset.__iter__();
    # restore from existing checkpoint 加载checkpoint
    optimizer = tf.keras.optimizers.Adam(1e-4);
    if False == os.path.exists('checkpoints'): os.mkdir('checkpoints');
    checkpoint = tf.train.Checkpoint(model = yolov3, optimizer = optimizer, optimizer_step = optimizer.iterations);
    checkpoint.restore(tf.train.latest_checkpoint('checkpoints'));
    # tensorboard summary
    log = tf.summary.create_file_writer('checkpoints');
    # train model 训练模型
    print("training...");
    train_loss = tf.keras.metrics.Mean(name = 'train loss', dtype = tf.float32);
    validation_loss = tf.keras.metrics.Mean(name = 'validation loss', dtype = tf.float32);
    for images, labels in trainset:
        with tf.GradientTape() as tape:
            outputs = yolov3(images);
            loss = yolov3_loss([*outputs, *labels]);
        # check whether the loss numberic is correct
        try:
            loss_check = tf.debugging.check_numerics(loss, 'the loss is not correct! cancel train_loss update!');
            with tf.control_dependencies([loss_check]):
                train_loss.update_state(loss);
                print('Step #%d Loss: %.6f' % (optimizer.iterations, loss));
        except BaseException as e:
            print(e.message);
        # write log
        if tf.equal(optimizer.iterations % 10, 0):
            with log.as_default():
                tf.summary.scalar('train loss',train_loss.result(), step = optimizer.iterations);
            train_loss.reset_states();
        grads = tape.gradient(loss, yolov3.trainable_variables);
        # check whether the grad numerics is correct
        try:
            grads_check = [tf.debugging.check_numerics(grad, 'the grad is not correct! cancel gradient apply!') for grad in grads];
            with tf.control_dependencies(grads_check):
                optimizer.apply_gradients(zip(grads, yolov3.trainable_variables));
        except BaseException as e:
            print(e.message);
        # save model
        if tf.equal(optimizer.iterations % 2000, 0):
            # save checkpoint every 1000 steps
            checkpoint.save(os.path.join('checkpoints','ckpt'));
            yolov3.save('yolov3.h5');
        # eval on testset 测试集
        if tf.equal(optimizer.iterations % 100, 0):
            # validate with latest model
            print("validating on validation set...");
            for i in range(10):
                images, labels = next(validationset_iter);
                outputs = yolov3(images);
                loss = yolov3_loss([*outputs, *labels]);
                # NOTE: validation loss is not important, numeric validity is not checked
                validation_loss.update_state(loss);
            with log.as_default():
                tf.summary.scalar('validation loss', validation_loss.result(), step = optimizer.iterations);
            validation_loss.reset_states();
            # evaluate every 1000 steps
            print("testing on test set...");
            features = next(testset_iter);
            img = features["image"].numpy().astype('uint8');
            predictor = Predictor(yolov3 = yolov3);
            boundings = predictor.predict(img);
            color_map = dict();
            for bounding in boundings:
                if bounding[5].numpy().astype('int32') in color_map:
                    clr = color_map[bounding[5].numpy().astype('int32')];
                else:
                    color_map[bounding[5].numpy().astype('int32')] = tuple(np.random.randint(low=0, high=256,size=(3,)).tolist());
                    clr = color_map[bounding[5].numpy().astype('int32')];
                cv2.rectangle(img, tuple(bounding[0:2].numpy().astype('int32')), tuple(bounding[2:4].numpy().astype('int32')), clr, 5);
            img = tf.expand_dims(img, axis = 0);
            with log.as_default():
                tf.summary.image('detect', img, step = optimizer.iterations);
    yolov3.save('yolov3.h5'); # 保存模型

if __name__ == "__main__":

    assert tf.executing_eagerly();
    main();
keras训练数据集 train_keras.py
#!/usr/bin/python3

import os;
import numpy as np;
import tensorflow as tf;
import tensorflow_datasets as tfds;
from YOLOv3 import YOLOv3, Loss;
from preprocess import map_function;

os.environ['TF_ENABLE_AUTO_MIXED_PRECISION'] = '1';
#os.environ['TF_CPP_MIN_VLOG_LEVEL'] = '3';
#os.environ['CUDA_VISIBLE_DEVICES'] = '';
batch_size = 8; # images of different sizes can't be stack into a batch

def main():

    # yolov3 model
    yolov3 = YOLOv3((416,416,3,), 80);
    @tf.function
    def loss(outputs, labels):
        return Loss((416,416,3,),80)([outputs[0], outputs[1], outputs[2], labels[0], labels[1], labels[2]]);
    yolov3.compile(optimizer = tf.keras.optimizers.Adam(1e-4), loss = loss);
    # load downloaded dataset
    trainset = tfds.load(name = "coco2014", split = tfds.Split.TRAIN, download = False);
    trainset = trainset.map(map_function).shuffle(batch_size).batch(batch_size).prefetch(tf.data.experimental.AUTOTUNE);
    validationset = tfds.load(name = "coco2014", split = tfds.Split.VALIDATION, download = False);
    validationset = validationset.map(map_function).shuffle(batch_size).batch(batch_size).prefetch(tf.data.experimental.AUTOTUNE);
    yolov3.fit(trainset, epochs = 100, validation_data = validationset);
    yolov3.save('yolov3.h5');

if __name__ == "__main__":

    assert tf.executing_eagerly();
    main();
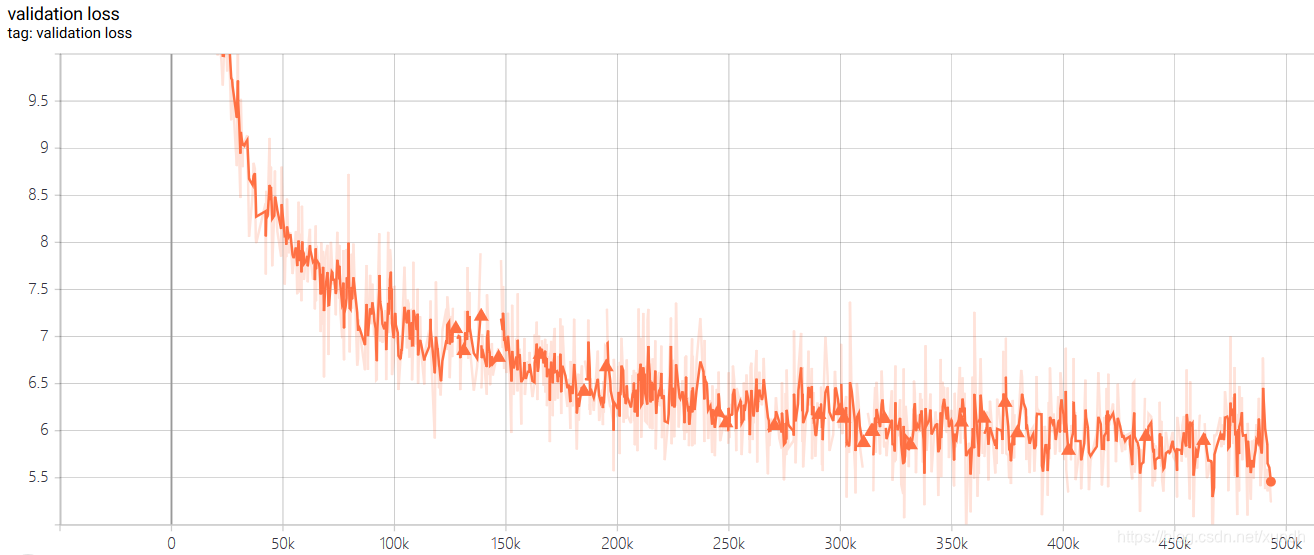
训练过程截图:
训练集损失函数:

测试集损失函数:
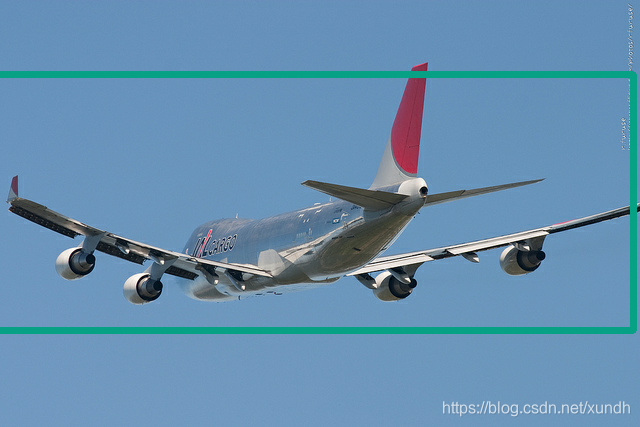
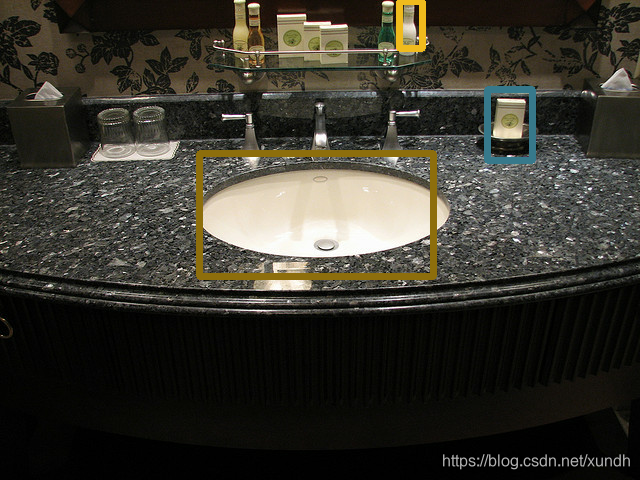
检测结果:
2. 使用训练好的模型预测Predictor.py
调用方式:
python3 Predictor.py <path/to/image>
#!/usr/bin/python3

import sys;
from os.path import exists;
import numpy as np;
import cv2;
import tensorflow as tf;
from YOLOv3 import YOLOv3, OutputParser;

class Predictor(object):

    anchors = {2: [[10, 13], [16, 30], [33, 23]], 1: [[30, 61], [62, 45], [59, 119]], 0: [[116, 90], [156, 198], [373, 326]]};

    def __init__(self, input_shape = (416,416,3), class_num = 80, yolov3 = None):

        if yolov3 is None:
            self.input_shape = input_shape;
            if exists("yolov3.h5"):
                # restore from serialized file
                self.yolov3 = tf.keras.models.load_model('yolov3.h5', compile = False);
            else:
                # restore from checkpoint
                self.yolov3 = YOLOv3(input_shape, class_num);
                optimizer = tf.keras.optimizers.Adam(1e-4);
                checkpoint = tf.train.Checkpoint(model = self.yolov3, optimizer = optimizer, optimizer_step = optimizer.iterations);
                checkpoint.restore(tf.train.latest_checkpoint('checkpoints'));
        else:
            self.input_shape = tuple(yolov3.input.shape[1:]);
            self.yolov3 = yolov3;
        self.parsers = [OutputParser(tuple(self.yolov3.outputs[l].shape[1:]), self.input_shape, self.anchors[l]) for l in range(3)];

    def predict(self, image, conf_thres = 0.5, nms_thres = 0.5):

        images = tf.expand_dims(image, axis = 0);
        resize_images = tf.image.resize(images, self.input_shape[:2], method = tf.image.ResizeMethod.BICUBIC, preserve_aspect_ratio = True);
        resize_shape = resize_images.shape[1:3];
        top_pad = (self.input_shape[0] - resize_shape[0]) // 2;
        bottom_pad = self.input_shape[0] - resize_shape[0] - top_pad;
        left_pad = (self.input_shape[1] - resize_shape[1]) // 2;
        right_pad = self.input_shape[1] - resize_shape[1] - left_pad;
        resize_images = tf.pad(resize_images,[[0,0], [top_pad,bottom_pad], [left_pad,right_pad], [0,0]], constant_values = 128);
        deviation = tf.constant([left_pad / self.input_shape[1], top_pad / self.input_shape[0], 0, 0], dtype = tf.float32);
        scale = tf.constant([
            self.input_shape[1] / resize_shape[1], self.input_shape[0] / resize_shape[0],
            self.input_shape[1] / resize_shape[1], self.input_shape[0] / resize_shape[0]
        ], dtype = tf.float32);
        images_data = tf.cast(resize_images, tf.float32) / 255.;
        outputs = self.yolov3(images_data);
        whole_targets = tf.zeros((0,6), dtype = tf.float32);
        for i in range(3):
            pred_xy, pred_wh, pred_box_confidence, pred_class = self.parsers[i](outputs[i]);
            pred_box = tf.keras.layers.Concatenate(axis = -1)([pred_xy, pred_wh]);
            # target_mask.shape = (h, w, anchor num)
            target_mask = tf.greater(pred_box_confidence, conf_thres);
            # pred_box_confidence = (pred target num, 1)
            pred_box_confidence = tf.boolean_mask(pred_box_confidence, target_mask);
            pred_box_confidence = tf.expand_dims(pred_box_confidence, axis = -1);
            # pred_box.shape = (pred target num, 4)
            pred_box = tf.boolean_mask(pred_box, target_mask);
            pred_box = (pred_box - deviation) * scale * [image.shape[1], image.shape[0], image.shape[1], image.shape[0]];
            # pred_class.shape = (pred target num, 1)
            pred_class = tf.boolean_mask(pred_class, target_mask);
            pred_class = tf.math.argmax(pred_class, axis = -1);
            pred_class = tf.cast(tf.expand_dims(pred_class, axis = -1), dtype = tf.float32);
            # targets,sgaoe = (pred target num, 6)
            targets = tf.keras.layers.Concatenate(axis = -1)([pred_box, pred_box_confidence, pred_class]);
            whole_targets = tf.keras.layers.Concatenate(axis = 0)([whole_targets, targets]);
        # nms
        descend_idx = tf.argsort(whole_targets[..., 4], direction = 'DESCENDING');
        i = 0;
        while i < descend_idx.shape[0]:
            idx = descend_idx[i];
            cur_upper_left = whole_targets[idx, 0:2] - whole_targets[idx, 2:4] / 2;
            cur_down_right = cur_upper_left + whole_targets[idx, 2:4];
            wh = whole_targets[idx, 2:4];
            area = wh[..., 0] * wh[..., 1];
            following_idx = descend_idx[i+1:];
            following_targets = tf.gather(whole_targets, following_idx);
            following_upper_left = following_targets[..., 0:2] - following_targets[..., 2:4] / 2;
            following_down_right = following_upper_left + following_targets[..., 2:4];
            following_wh = following_targets[..., 2:4];
            following_area = following_wh[..., 0] * following_wh[..., 1];
            max_upper_left = tf.math.maximum(cur_upper_left, following_upper_left);
            min_down_right = tf.math.minimum(cur_down_right, following_down_right);
            intersect_wh = min_down_right - max_upper_left;
            intersect_wh = tf.where(tf.math.greater(intersect_wh, 0), intersect_wh, tf.zeros_like(intersect_wh));
            intersect_area = intersect_wh[..., 0] * intersect_wh[..., 1];
            overlap = intersect_area / (area + following_area - intersect_area);
            indices = tf.where(tf.less(overlap, nms_thres));
            following_idx = tf.gather_nd(following_idx, indices);
            descend_idx = tf.concat([descend_idx[:i + 1], following_idx], axis = 0);
            i += 1;
        whole_targets = tf.gather(whole_targets, descend_idx);
        upper_left = (whole_targets[..., 0:2] - whole_targets[..., 2:4] / 2)
        down_right = (upper_left + whole_targets[..., 2:4])
        boundings = tf.keras.layers.Concatenate(axis = -1)([upper_left, down_right, whole_targets[..., 4:]]);
        return boundings;

if __name__ == "__main__":

    assert tf.executing_eagerly() == True;
    if len(sys.argv) != 2:
        print("Usage: " + sys.argv[0] + " <image>");
        exit(0);
    predictor = Predictor();
    img = cv2.imread(sys.argv[1]);
    if img is None:
        print("invalid image!");
        exit(1);
    boundings = predictor.predict(img);
    color_map = dict();
    for bounding in boundings:
        if bounding[5].numpy().astype('int32') in color_map:
            clr = color_map[bounding[5].numpy().astype('int32')];
        else:
            color_map[bounding[5].numpy().astype('int32')] = tuple(np.random.randint(low=0, high=256,size=(3,)).tolist());
            clr = color_map[bounding[5].numpy().astype('int32')];
        cv2.rectangle(img, tuple(bounding[0:2].numpy().astype('int32')), tuple(bounding[2:4].numpy().astype('int32')), clr, 2);
    cv2.imshow('people', img);
    cv2.waitKey();
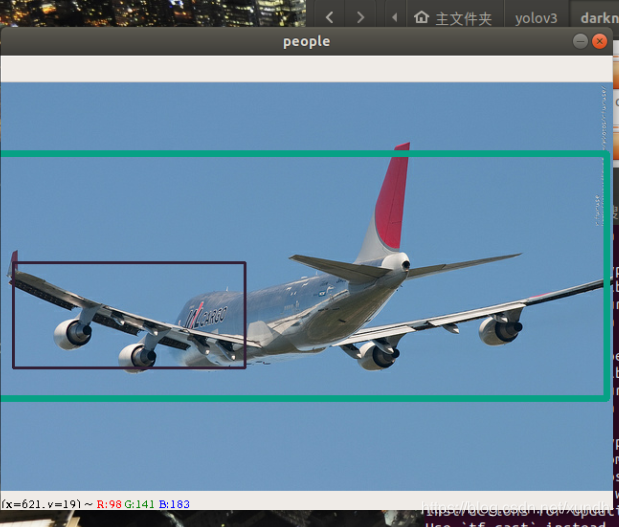
下面是运行效果:
python3 Predictor.py pics/detection1.png
3. 训练自己的数据集
标签文件格式
<path/to/image1> <target num>
<x> <y> <width> <height> <label>
<x> <y> <width> <height> <label>
...
<x> <y> <width> <height> <label>
<path/to/image2> <target num>
...
生成tfrecord文件
python3 create_dataset.py <path/to/annotation>
读取tfrecord可以使用:
from create_dataset import parse_function_generator;
trainset = tf.data.TFRecordDataset('trainset.tfrecord').map(parse_function_generator(num_classes = num_classes)).repeat(100).shuffle(batch_size).batch(batch_size).prefetch(tf.data.experimental.AUTOTUNE);
智能推荐
Linux驱动开发: USB驱动开发_linux usb 通信从设备开发-程序员宅基地
文章浏览阅读7k次,点赞86次,收藏192次。一、USB简介1.1 什么是USB? USB是连接计算机系统与外部设备的一种串口总线标准,也是一种输入输出接口的技术规范,被广泛地应用于个人电脑和移动设备等信息通讯产品,USB就是简写,中文叫通用串行总线。最早出现在1995年,伴随着奔腾机发展而来。自微软在Windows 98中加入对USB接口的支持后,USB接口才推广开来,USB设备也日渐增多,如数码相机、摄像头、扫描仪、游戏杆、打印机、键盘、鼠标等等,其中应用最广的就是摄像头和U盘了。 USB包括老旧的USB 1.1标准..._linux usb 通信从设备开发
注意: 如果你使用的是zsh,终端启动时 ~/.bash_profile 将不会被加载,解决办法就是修改 ~/.zshrc ,在其中添加:source ~/.bash_profile_如果你使用终端是zsh,终端启动时 ~/.bash_profile 将不会被加载,解决办法就是修改-程序员宅基地
文章浏览阅读2.6k次。Mac搭建Flutter环境_如果你使用终端是zsh,终端启动时 ~/.bash_profile 将不会被加载,解决办法就是修改
Qt知识点梳理 —— 代码实现菜单栏工具栏-程序员宅基地
文章浏览阅读379次,点赞5次,收藏9次。在清楚了各个大厂的面试重点之后,就能很好的提高你刷题以及面试准备的效率,接下来小编也为大家准备了最新的互联网大厂资料。《一线大厂Java面试题解析+核心总结学习笔记+最新讲解视频+实战项目源码》点击传送门即可获取!家准备了最新的互联网大厂资料。[外链图片转存中…(img-VMQDYeXz-1712056340129)][外链图片转存中…(img-JqBcGpUE-1712056340130)][外链图片转存中…(img-7Rrt8dF9-1712056340130)]
《设计模式入门》 9.代理模式_cglib需要引入第三方包-程序员宅基地
文章浏览阅读448次。代理模式可以说是我们在java学习中非常常见的一个设计模式了,在很多地方我们都可以看到代理模式的影子。比如:Spring 的 Proxy 模式(AOP编程 )AOP的底层机制就是动态代理 mybatis中执行sql时mybatis会为mapper接口通过jdk动态代理的方法生成接口的实现类 Feign对于加了@FeignClient 注解的类会在Feign启动时,为其创建一个本地JDK Proxy代理实例,并注册到Spring IOC容器可以看出,代理模式就是给..._cglib需要引入第三方包
前端开发:JS中向对象中添加对象的方法_一个对象如何添加另一个对象-程序员宅基地
文章浏览阅读1w次,点赞2次,收藏6次。在前端开发过程中,一切皆对象,尤其是在数据处理的时候,大部分时候也是处理对象相关的数据,所以对象在JS中是很重要的一个内容,也是必用的内容。本篇博文来分享一下关于在JS中对象里面添加对象的操作,虽然知识点不难,但是常用,所以总结一下存起来,方便查阅使用。通过本文的介绍,关于在JS中对象里面添加对象的操作就得心应手了,虽然该知识点不难但是重要和常用,尤其是对于刚接触前端开发不久的开发者来说更是如此,所以绝对掌握该知识点还是很有必要的,重要性不再赘述。欢迎关注,共同进步。_一个对象如何添加另一个对象
迁移学习在自然语言生成中的研究-程序员宅基地
文章浏览阅读257次,点赞3次,收藏8次。1.背景介绍自然语言生成(Natural Language Generation, NLG)是一种将计算机理解的结构化信息转换为自然语言文本的技术。自然语言生成可以用于多种应用,如机器翻译、文本摘要、对话系统等。随着深度学习技术的发展,自然语言生成的表现力得到了显著提高。迁移学习(Transfer Learning)是一种机器学习技术,它可以将在一个任务上学到的知识应用于另一个相关任务。在...
随便推点
SpringBoot引入第三方jar包或本地jar包的处理方式_springboot idea 直接启动 target 第三方 jar 包-程序员宅基地
文章浏览阅读262次。在开发过程中有时会用到maven仓库里没有的jar包或者本地的jar包,这时没办法通过pom直接引入,那么该怎么解决呢一般有两种方法第一种是将本地jar包安装在本地maven库 第二种是将本地jar包放入项目目录中这篇文章主要讲第二种方式,这又分两种情况,一种是打包jar包,第二种是打包war包jar包 先看看jar包的结构 用压缩工具打开一个jar包 打包后jar包的路径在BOOT-INF\lib目录下 ..._springboot idea 直接启动 target 第三方 jar 包
软件压力测试图片60张,Win10 64位用鲁大师界面cpu温度60上下,显卡40多。用压力测试7-8分钟cpu75左右,...-程序员宅基地
文章浏览阅读1.4k次。CPU正常情况下45-65℃或更低,夏天或者玩游戏时,温度会高点,不超过80都属于正常温度。高于80℃时,需要采取措施:要检查CPU和风扇间的散热硅脂是否失效;更换CPU风扇;给风扇除尘;在通风或者空调间中使用机器。显卡温度:显卡一般是整个机箱里温度最高的硬件,常规下50-70℃(或更低),运行大型3D游戏或播放高清视频的时候,温度可达到100℃左右,一般高负载下不超过110℃均视为正常范畴。如有..._windows cpu gpu 压测
Mac系统制作U盘安装盘,不能识别U盘的情况_making disk bootable不动-程序员宅基地
文章浏览阅读2.3w次,点赞2次,收藏5次。遇到的问题:OS10.12系统,使用Mac系统自带的磁盘工具,通过恢复来制作的U盘安装盘,开机按住option键,没有U盘的这个选项。原因:使用磁盘工具恢复,没有创建启动文件,使用命令行能创建。U盘抹掉,分区名为1。sudo /Applications/Install\ OS\ X\ El\ Capitan.app/Contents/Resources/createinstal_making disk bootable不动
LOJ6089 小Y的背包计数问题 背包、根号分治-程序员宅基地
文章浏览阅读129次。题目传送门题意:给出$N$表示背包容量,且会给出$N$种物品,第$i$个物品大小为$i$,数量也为$i$,求装满这个背包的方案数,对$23333333$取模。$N \leq 10^5$$23333333=17 \times 1372549$竟然不是质数性质太不优秀了(雾直接跑背包$O(N^2)$,于是咱们考虑挖掘性质、分开计算发现当$i < \sqrt{N}$时就是一个多..._背包 根号
验证码-程序员宅基地
文章浏览阅读110次。用.net实现网站验证码功能 收藏 一、验证码简介验证码功能一般是用于防止批量注册的,不少网站为了防止用户利用机器人自动注册、登录、灌水,都采用了验证码技术。所谓验证码,就是将一串随机产生的数字或字母或符号或文字,生成一幅图片, 图片里加上一些干扰象素(防止OCR),由用户肉眼识别其中的验证码信息,输入表单提交网站验证,验证成功后才能使用某项功能。常见的验证码有如下几种: 1、纯..._验证码的样本标签,是5个字符,每个字符的可能 取值范围是'0'~'9'、'a'~'z'共36
ImportError: undefined symbol: cudaSetupArgument_undefinded symbol: cudasetupargument-程序员宅基地
文章浏览阅读2.7k次,点赞2次,收藏3次。ImportError: undefined symbol: cudaSetupArgumentubuntu16.04How to solve?Step1.pip install -U torchvision==0.4.0链接: link.Step2.Problem:ImportError: cannot import name ‘PILLOW_VERSION’ from ‘PI..._undefinded symbol: cudasetupargument