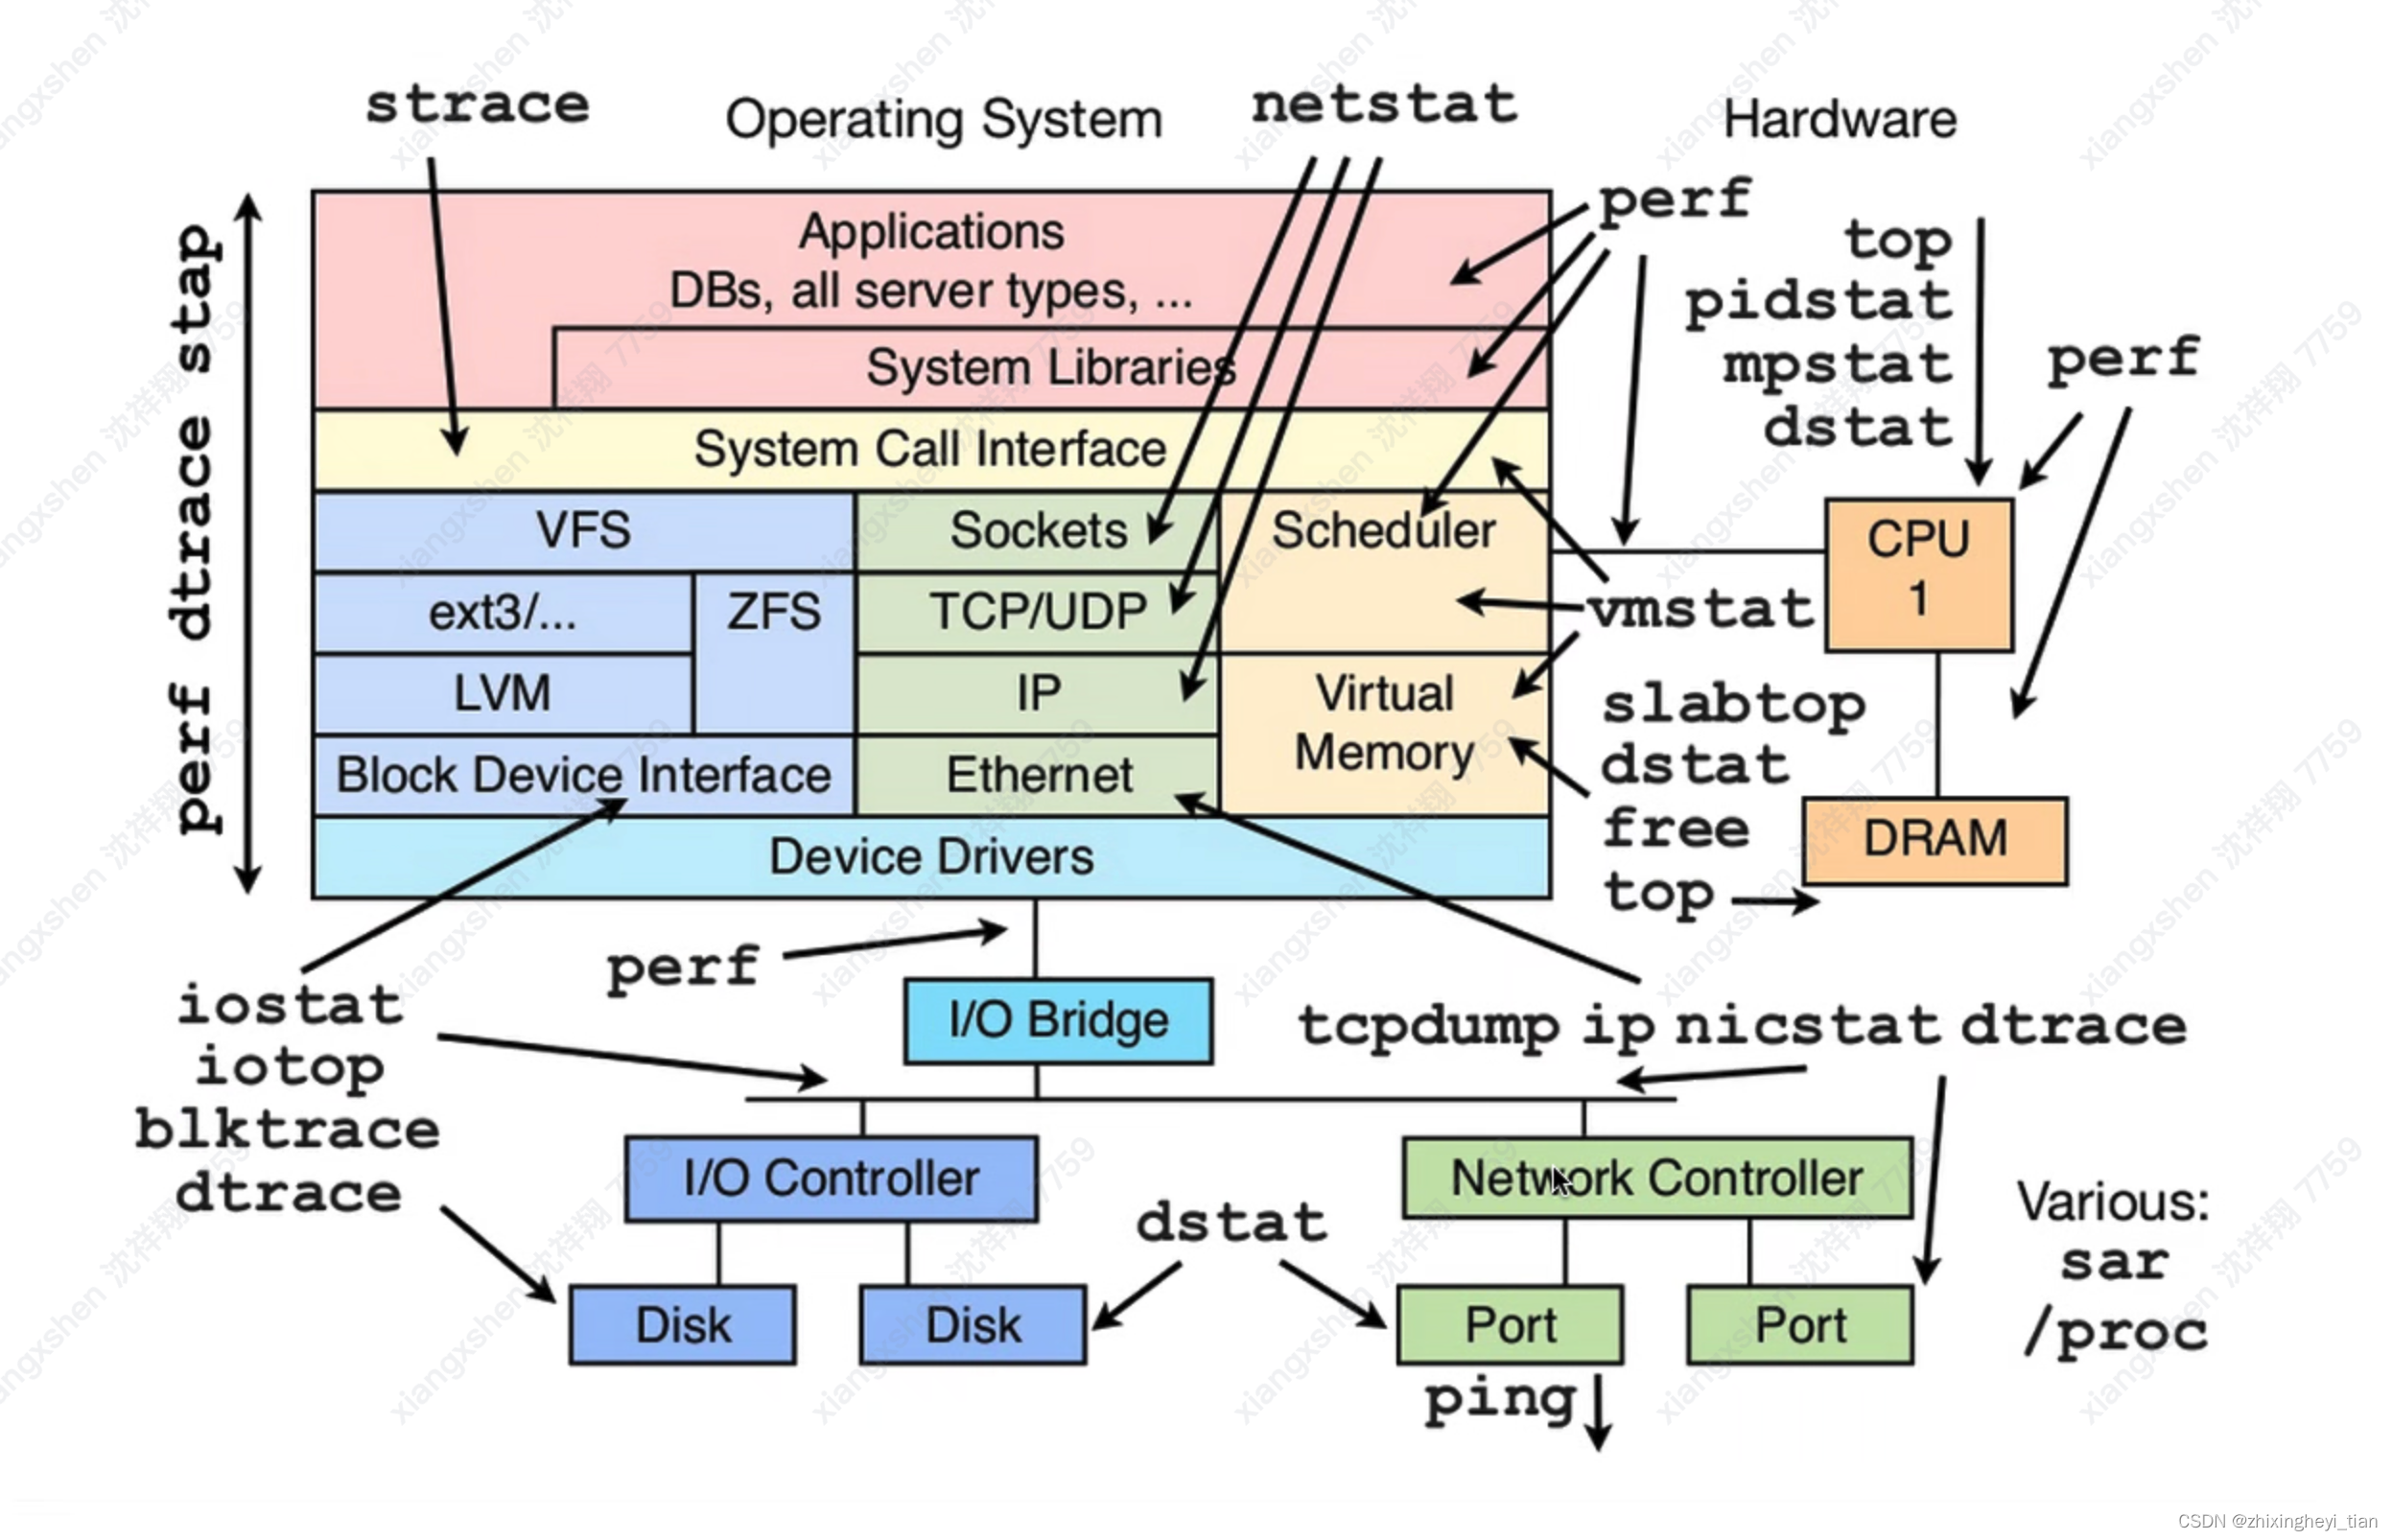
性能优化工具-程序员宅基地
CPU 优化的各类工具
network
netperf
服务端:
$ netserver
Starting netserver with host 'IN(6)ADDR_ANY' port '12865' and family AF_UNSPEC
$ cat netperf.sh
#!/bin/bash
count=$1
for ((i=1;i<=count;i++))
do
    echo "Instance:$i-------"
    # 下方命令可以替换为测试场景表格中的命令
    # -H 后填写服务器 IP 地址;
    # -l 后为测试时间,为了防止 netperf 提前结束,因此时间设为 10000;
    netperf -t TCP_STREAM -H 172.17.48.107 -l 10000 -- -m 1500 -R 1 &
done
$ bash netperf.sh 20
Instance:1-------
Instance:2-------
Instance:3-------
Instance:4-------
Instance:5-------
Instance:6-------
Instance:7-------
Instance:8-------
Instance:9-------
Instance:10-------
Instance:11-------
MIGRATED TCP STREAM TEST from 0.0.0.0 (0.0.0.0) port 0 AF_INET to 172.17.48.107 () port 0 AF_INET
MIGRATED TCP STREAM TEST from 0.0.0.0 (0.0.0.0) port 0 AF_INET to 172.17.48.107 () port 0 AF_INET
MIGRATED TCP STREAM TEST from 0.0.0.0 (0.0.0.0) port 0 AF_INET to 172.17.48.107 () port 0 AF_INET
Instance:12-------
MIGRATED TCP STREAM TEST from 0.0.0.0 (0.0.0.0) port 0 AF_INET to 172.17.48.107 () port 0 AF_INET
Instance:13-------
MIGRATED TCP STREAM TEST from 0.0.0.0 (0.0.0.0) port 0 AF_INET to 172.17.48.107 () port 0 AF_INET
Instance:14-------
MIGRATED TCP STREAM TEST from 0.0.0.0 (0.0.0.0) port 0 AF_INET to 172.17.48.107 () port 0 AF_INET
Instance:15-------
MIGRATED TCP STREAM TEST from 0.0.0.0 (0.0.0.0) port 0 AF_INET to 172.17.48.107 () port 0 AF_INET
Instance:16-------
MIGRATED TCP STREAM TEST from 0.0.0.0 (0.0.0.0) port 0 AF_INET to 172.17.48.107 () port 0 AF_INET
Instance:17-------
Instance:18-------
Instance:19-------
MIGRATED TCP STREAM TEST from 0.0.0.0 (0.0.0.0) port 0 AF_INET to 172.17.48.107 () port 0 AF_INET
MIGRATED TCP STREAM TEST from 0.0.0.0 (0.0.0.0) port 0 AF_INET to 172.17.48.107 () port 0 AF_INET
Instance:20-------
MIGRATED TCP STREAM TEST from 0.0.0.0 (0.0.0.0) port 0 AF_INET to 172.17.48.107 () port 0 AF_INET
MIGRATED TCP STREAM TEST from 0.0.0.0 (0.0.0.0) port 0 AF_INET to 172.17.48.107 () port 0 AF_INET
MIGRATED TCP STREAM TEST from 0.0.0.0 (0.0.0.0) port 0 AF_INET to 172.17.48.107 () port 0 AF_INET
MIGRATED TCP STREAM TEST from 0.0.0.0 (0.0.0.0) port 0 AF_INET to 172.17.48.107 () port 0 AF_INET
MIGRATED TCP STREAM TEST from 0.0.0.0 (0.0.0.0) port 0 AF_INET to 172.17.48.107 () port 0 AF_INET
[root]$ MIGRATED TCP STREAM TEST from 0.0.0.0 (0.0.0.0) port 0 AF_INET to 172.17.48.107 () port 0 AF_INET
MIGRATED TCP STREAM TEST from 0.0.0.0 (0.0.0.0) port 0 AF_INET to 172.17.48.107 () port 0 AF_INET
MIGRATED TCP STREAM TEST from 0.0.0.0 (0.0.0.0) port 0 AF_INET to 172.17.48.107 () port 0 AF_INET
MIGRATED TCP STREAM TEST from 0.0.0.0 (0.0.0.0) port 0 AF_INET to 172.17.48.107 () port 0 AF_INET
MIGRATED TCP STREAM TEST from 0.0.0.0 (0.0.0.0) port 0 AF_INET to 172.17.48.107 () port 0 AF_INET
iperf
基本使用用法
$ iperf -h
Usage: iperf [-s|-c host] [options]
       iperf [-h|--help] [-v|--version]

Client/Server:
  -b, --bandwidth #[kmgKMG | pps]  bandwidth to send at in bits/sec or packets per second
  -e, --enhancedreports    use enhanced reporting giving more tcp/udp and traffic information
  -f, --format    [kmgKMG]   format to report: Kbits, Mbits, KBytes, MBytes
  -i, --interval  #        seconds between periodic bandwidth reports
  -l, --len       #[kmKM]    length of buffer in bytes to read or write (Defaults: TCP=128K, v4 UDP=1470, v6 UDP=1450)
  -m, --print_mss          print TCP maximum segment size (MTU - TCP/IP header)
  -o, --output    <filename> output the report or error message to this specified file
  -p, --port      #        server port to listen on/connect to
  -u, --udp                use UDP rather than TCP
      --udp-counters-64bit use 64 bit sequence numbers with UDP
  -w, --window    #[KM]    TCP window size (socket buffer size)
  -z, --realtime           request realtime scheduler
  -B, --bind <host>[:<port>][%<dev>] bind to <host>, ip addr (including multicast address) and optional port and device
  -C, --compatibility      for use with older versions does not sent extra msgs
  -M, --mss       #        set TCP maximum segment size (MTU - 40 bytes)
  -N, --nodelay            set TCP no delay, disabling Nagle's Algorithm
  -S, --tos       #        set the socket's IP_TOS (byte) field

Server specific:
  -s, --server             run in server mode
  -t, --time      #        time in seconds to listen for new connections as well as to receive traffic (default not set)
      --udp-histogram #,#  enable UDP latency histogram(s) with bin width and count, e.g. 1,1000=1(ms),1000(bins)
  -B, --bind <ip>[%<dev>]  bind to multicast address and optional device
  -H, --ssm-host <ip>      set the SSM source, use with -B for (S,G)
  -U, --single_udp         run in single threaded UDP mode
  -D, --daemon             run the server as a daemon
  -V, --ipv6_domain        Enable IPv6 reception by setting the domain and socket to AF_INET6 (Can receive on both IPv4 and IPv6)

Client specific:
  -c, --client    <host>   run in client mode, connecting to <host>
  -d, --dualtest           Do a bidirectional test simultaneously
      --ipg                set the the interpacket gap (milliseconds) for packets within an isochronous frame
      --isochronous <frames-per-second>:<mean>,<stddev> send traffic in bursts (frames - emulate video traffic)
  -n, --num       #[kmgKMG]    number of bytes to transmit (instead of -t)
  -r, --tradeoff           Do a bidirectional test individually
  -t, --time      #        time in seconds to transmit for (default 10 secs)
  -B, --bind [<ip> | <ip:port>] bind ip (and optional port) from which to source traffic
  -F, --fileinput <name>   input the data to be transmitted from a file
  -I, --stdin              input the data to be transmitted from stdin
  -L, --listenport #       port to receive bidirectional tests back on
  -P, --parallel  #        number of parallel client threads to run
  -R, --reverse            reverse the test (client receives, server sends)
  -T, --ttl       #        time-to-live, for multicast (default 1)
  -V, --ipv6_domain        Set the domain to IPv6 (send packets over IPv6)
  -X, --peer-detect        perform server version detection and version exchange
  -Z, --linux-congestion <algo>  set TCP congestion control algorithm (Linux only)

Miscellaneous:
  -x, --reportexclude [CDMSV]   exclude C(connection) D(data) M(multicast) S(settings) V(server) reports
  -y, --reportstyle C      report as a Comma-Separated Values
  -h, --help               print this message and quit
  -v, --version            print version information and quit

[kmgKMG] Indicates options that support a k,m,g,K,M or G suffix
Lowercase format characters are 10^3 based and uppercase are 2^n based
(e.g. 1k = 1000, 1K = 1024, 1m = 1,000,000 and 1M = 1,048,576)

The TCP window size option can be set by the environment variable
TCP_WINDOW_SIZE. Most other options can be set by an environment variable
IPERF_<long option name>, such as IPERF_BANDWIDTH.
iperf 服务端:
$ iperf -s -i 1 -p 3389
------------------------------------------------------------
Server listening on TCP port 3389
TCP window size:  128 KByte (default)
------------------------------------------------------------
客户端:
$ cat iperf.sh
#!/bin/bash
count=$1
for ((i=1;i<=count;i++))
do
    echo "Instance:$i-------"
    iperf -c 172.17.48.107 -p 3389 -i 1 &
done
客户端执行:
$ bash  iperf.sh 10
Instance:1-------
Instance:2-------
Instance:3-------
Instance:4-------
Instance:5-------
Instance:6-------
Instance:7-------
Instance:8-------
Instance:9-------
Instance:10-------
[root@core_172.17.48.52 ~]$ ------------------------------------------------------------
Client connecting to 172.17.48.107, TCP port 3389
TCP window size:  198 KByte (default)
------------------------------------------------------------
[  3] local 172.17.48.52 port 52312 connected with 172.17.48.107 port 3389
------------------------------------------------------------
Client connecting to 172.17.48.107, TCP port 3389
------------------------------------------------------------
TCP window size:  194 KByte (default)
------------------------------------------------------------
Client connecting to 172.17.48.107, TCP port 3389
[  3] local 172.17.48.52 port 52316 connected with 172.17.48.107 port 3389
TCP window size:  400 KByte (default)
服务端反馈:
[ 10]  9.0-10.0 sec   377 MBytes  3.16 Gbits/sec
[ 10]  0.0-10.0 sec  2.36 GBytes  2.02 Gbits/sec
[  8]  9.0-10.0 sec   191 MBytes  1.60 Gbits/sec
[ 12]  9.0-10.0 sec   337 MBytes  2.83 Gbits/sec
[ 11]  9.0-10.0 sec   259 MBytes  2.17 Gbits/sec
[ 13]  9.0-10.0 sec   190 MBytes  1.60 Gbits/sec
[SUM]  9.0-10.0 sec  2.71 GBytes  23.3 Gbits/sec
[  7]  0.0-10.0 sec  2.41 GBytes  2.07 Gbits/sec
[  5]  0.0-10.0 sec  2.43 GBytes  2.08 Gbits/sec
[  4]  0.0-10.0 sec  1.81 GBytes  1.55 Gbits/sec
[  9]  0.0-10.0 sec  5.17 GBytes  4.44 Gbits/sec
[  6]  0.0-10.0 sec  2.70 GBytes  2.32 Gbits/sec
[  8]  0.0-10.0 sec  3.24 GBytes  2.78 Gbits/sec
[ 12]  0.0-10.0 sec  2.76 GBytes  2.37 Gbits/sec
[ 11]  0.0-10.0 sec  2.15 GBytes  1.85 Gbits/sec
[ 13]  0.0-10.0 sec  1.96 GBytes  1.68 Gbits/sec
[SUM]  0.0-10.0 sec  27.0 GBytes  23.1 Gbits/sec
或者客户端无需脚本, 直接使用 -P 并发参数
$ iperf  -c 172.17.48.107 -p 3389 -i 1  -t 1200 -P 10
------------------------------------------------------------
Client connecting to 172.17.48.107, TCP port 3389
TCP window size:  234 KByte (default)
------------------------------------------------------------
[ 13] local 172.17.48.52 port 35696 connected with 172.17.48.107 port 3389
[  3] local 172.17.48.52 port 35678 connected with 172.17.48.107 port 3389
[  4] local 172.17.48.52 port 35680 connected with 172.17.48.107 port 3389
[  5] local 172.17.48.52 port 35682 connected with 172.17.48.107 port 3389
[  6] local 172.17.48.52 port 35684 connected with 172.17.48.107 port 3389
[  7] local 172.17.48.52 port 35686 connected with 172.17.48.107 port 3389
[  8] local 172.17.48.52 port 35688 connected with 172.17.48.107 port 3389
[ 11] local 172.17.48.52 port 35690 connected with 172.17.48.107 port 3389
[  9] local 172.17.48.52 port 35692 connected with 172.17.48.107 port 3389
[ 12] local 172.17.48.52 port 35694 connected with 172.17.48.107 port 3389
[ ID] Interval       Transfer     Bandwidth
[ 13]  0.0- 1.0 sec   184 MBytes  1.54 Gbits/sec
[  3]  0.0- 1.0 sec   177 MBytes  1.48 Gbits/sec
[  4]  0.0- 1.0 sec   175 MBytes  1.47 Gbits/sec
[  5]  0.0- 1.0 sec   383 MBytes  3.21 Gbits/sec
[  6]  0.0- 1.0 sec   255 MBytes  2.14 Gbits/sec
[  7]  0.0- 1.0 sec   233 MBytes  1.95 Gbits/sec
[  8]  0.0- 1.0 sec   714 MBytes  5.99 Gbits/sec
[ 11]  0.0- 1.0 sec   229 MBytes  1.92 Gbits/sec
[  9]  0.0- 1.0 sec   224 MBytes  1.88 Gbits/sec
[ 12]  0.0- 1.0 sec   161 MBytes  1.35 Gbits/sec
[SUM]  0.0- 1.0 sec  2.67 GBytes  22.9 Gbits/sec
[ 13]  1.0- 2.0 sec   145 MBytes  1.22 Gbits/sec
[  3]  1.0- 2.0 sec   176 MBytes  1.48 Gbits/sec
[  4]  1.0- 2.0 sec   225 MBytes  1.89 Gbits/sec
[  5]  1.0- 2.0 sec   425 MBytes  3.56 Gbits/sec
[  6]  1.0- 2.0 sec   287 MBytes  2.41 Gbits/sec
[  7]  1.0- 2.0 sec   237 MBytes  1.99 Gbits/sec
[  8]  1.0- 2.0 sec   577 MBytes  4.84 Gbits/sec
[ 11]  1.0- 2.0 sec   249 MBytes  2.09 Gbits/sec
[  9]  1.0- 2.0 sec   247 MBytes  2.07 Gbits/sec
[ 12]  1.0- 2.0 sec   206 MBytes  1.73 Gbits/sec
[SUM]  1.0- 2.0 sec  2.71 GBytes  23.3 Gbits/se
iperf3
服务端
$ cat server.sh
for x in `seq 3400 3419`;do  iperf3 -s -i 1 -p $x &  done
$ bash server.sh
-----------------------------------------------------------
Server listening on 3400
-----------------------------------------------------------
-----------------------------------------------------------
Server listening on 3401
-----------------------------------------------------------
-----------------------------------------------------------
Server listening on 3402
-----------------------------------------------------------
-----------------------------------------------------------
Server listening on 3403
-----------------------------------------------------------
-----------------------------------------------------------
Server listening on 3404
-----------------------------------------------------------
-----------------------------------------------------------
Server listening on 3405
-----------------------------------------------------------
-----------------------------------------------------------
Server listening on 3406
-----------------------------------------------------------
客户端
$ cat iperf3client.sh

for x in `seq 3400 3409`;do iperf3   -c 172.17.48.107 -p $x -i 1  -t 1200 -P 10  &  done
- - - - - - - - - - - - - - - - - - - - - - - - -
[ 12] 120.00-121.00 sec  31.1 MBytes   261 Mbits/sec   45   41.7 KBytes
[ ID] Interval           Transfer     Bandwidth       Retr
[  8] 120.00-121.00 sec  25.0 MBytes   210 Mbits/sec   22   61.2 KBytes
[ 10] 120.00-121.00 sec  27.7 MBytes   233 Mbits/sec   69   79.3 KBytes
[ 10] 120.00-121.00 sec  28.1 MBytes   235 Mbits/sec   73   77.9 KBytes
[  6] 120.00-121.00 sec  29.4 MBytes   247 Mbits/sec   96   65.4 KBytes
[  8] 120.00-121.00 sec  19.8 MBytes   166 Mbits/sec   40    106 KBytes
[ 12] 120.00-121.00 sec  35.4 MBytes   297 Mbits/sec   15    154 KBytes
[ 12] 120.00-121.00 sec  24.7 MBytes   207 Mbits/sec   58   55.6 KBytes
[ 12] 120.00-121.00 sec  31.8 MBytes   267 Mbits/sec   73   82.0 KBytes
[ 14] 120.00-121.00 sec  27.0 MBytes   227 Mbits/sec   19   93.2 KBytes
[ 14] 120.00-121.00 sec  23.6 MBytes   198 Mbits/sec   31   89.0 KBytes
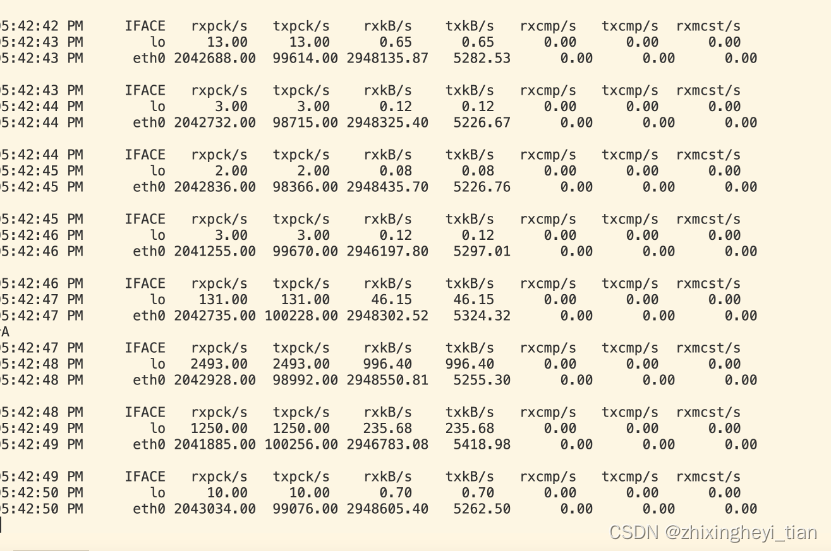
sar 检测
$ sar -n DEV 1
Linux 5.4.119-19.0009.40 (172.17.48.107)        04/16/2024      _x86_64_        (64 CPU)

11:54:47 AM     IFACE   rxpck/s   txpck/s    rxkB/s    txkB/s   rxcmp/s   txcmp/s  rxmcst/s
11:54:48 AM        lo      2.00      2.00      0.08      0.08      0.00      0.00      0.00
11:54:48 AM      eth0 2043634.00 158143.00 2949569.21   8463.96      0.00      0.00      0.00

11:54:48 AM     IFACE   rxpck/s   txpck/s    rxkB/s    txkB/s   rxcmp/s   txcmp/s  rxmcst/s
11:54:49 AM        lo   3708.00   3708.00   1232.12   1232.12      0.00      0.00      0.00
11:54:49 AM      eth0 2042823.00 159044.00 2948059.12   8619.72      0.00      0.00      0.00
磁盘读写速度测试
fdisk -lu
yum install libaio -y
yum install libaio-devel -y
yum install fio -y
如下,是顺序读、顺序写的benchmark
fio -bs=128k -ioengine=libaio -iodepth=32 -numjobs=1 -direct=1 -rw=read -time_based -runtime=600 -refill_buffers -norandommap -randrepeat=0 -group_reporting -name=fio-randread-lat -size=10G -filename=/dev/vdb

fio -bs=128k -ioengine=libaio -iodepth=32 -numjobs=1 -direct=1 -rw=write -time_based -runtime=600 -refill_buffers -norandommap -randrepeat=0 -group_reporting -name=fio-randread-lat -size=10G -filename=/dev/vdb
- fdisk -lu,查看云硬盘是否4KiB对齐
如下图所示,若返回结果中的 Start 值能被8整除即是4KiB对齐。否则请完成4KiB对齐后再进行测试。

智能推荐
攻防世界_难度8_happy_puzzle_攻防世界困难模式攻略图文-程序员宅基地
文章浏览阅读645次。这个肯定是末尾的IDAT了,因为IDAT必须要满了才会开始一下个IDAT,这个明显就是末尾的IDAT了。,对应下面的create_head()代码。,对应下面的create_tail()代码。不要考虑爆破,我已经试了一下,太多情况了。题目来源:UNCTF。_攻防世界困难模式攻略图文
达梦数据库的导出(备份)、导入_达梦数据库导入导出-程序员宅基地
文章浏览阅读2.9k次,点赞3次,收藏10次。偶尔会用到,记录、分享。1. 数据库导出1.1 切换到dmdba用户su - dmdba1.2 进入达梦数据库安装路径的bin目录,执行导库操作 导出语句:./dexp cwy_init/[email protected]:5236 file=cwy_init.dmp log=cwy_init_exp.log 注释: cwy_init/init_123..._达梦数据库导入导出
js引入kindeditor富文本编辑器的使用_kindeditor.js-程序员宅基地
文章浏览阅读1.9k次。1. 在官网上下载KindEditor文件,可以删掉不需要要到的jsp,asp,asp.net和php文件夹。接着把文件夹放到项目文件目录下。2. 修改html文件,在页面引入js文件:<script type="text/javascript" src="./kindeditor/kindeditor-all.js"></script><script type="text/javascript" src="./kindeditor/lang/zh-CN.js"_kindeditor.js
STM32学习过程记录11——基于STM32G431CBU6硬件SPI+DMA的高效WS2812B控制方法-程序员宅基地
文章浏览阅读2.3k次,点赞6次,收藏14次。SPI的详情简介不必赘述。假设我们通过SPI发送0xAA,我们的数据线就会变为10101010,通过修改不同的内容,即可修改SPI中0和1的持续时间。比如0xF0即为前半周期为高电平,后半周期为低电平的状态。在SPI的通信模式中,CPHA配置会影响该实验,下图展示了不同采样位置的SPI时序图[1]。CPOL = 0,CPHA = 1:CLK空闲状态 = 低电平,数据在下降沿采样,并在上升沿移出CPOL = 0,CPHA = 0:CLK空闲状态 = 低电平,数据在上升沿采样,并在下降沿移出。_stm32g431cbu6
计算机网络-数据链路层_接收方收到链路层数据后,使用crc检验后,余数为0,说明链路层的传输时可靠传输-程序员宅基地
文章浏览阅读1.2k次,点赞2次,收藏8次。数据链路层习题自测问题1.数据链路(即逻辑链路)与链路(即物理链路)有何区别?“电路接通了”与”数据链路接通了”的区别何在?2.数据链路层中的链路控制包括哪些功能?试讨论数据链路层做成可靠的链路层有哪些优点和缺点。3.网络适配器的作用是什么?网络适配器工作在哪一层?4.数据链路层的三个基本问题(帧定界、透明传输和差错检测)为什么都必须加以解决?5.如果在数据链路层不进行帧定界,会发生什么问题?6.PPP协议的主要特点是什么?为什么PPP不使用帧的编号?PPP适用于什么情况?为什么PPP协议不_接收方收到链路层数据后,使用crc检验后,余数为0,说明链路层的传输时可靠传输
软件测试工程师移民加拿大_无证移民,未受过软件工程师的教育(第1部分)-程序员宅基地
文章浏览阅读587次。软件测试工程师移民加拿大 无证移民,未受过软件工程师的教育(第1部分) (Undocumented Immigrant With No Education to Software Engineer(Part 1))Before I start, I want you to please bear with me on the way I write, I have very little gen...
随便推点
Thinkpad X250 secure boot failed 启动失败问题解决_安装完系统提示secureboot failure-程序员宅基地
文章浏览阅读304次。Thinkpad X250笔记本电脑,装的是FreeBSD,进入BIOS修改虚拟化配置(其后可能是误设置了安全开机),保存退出后系统无法启动,显示:secure boot failed ,把自己惊出一身冷汗,因为这台笔记本刚好还没开始做备份.....根据错误提示,到bios里面去找相关配置,在Security里面找到了Secure Boot选项,发现果然被设置为Enabled,将其修改为Disabled ,再开机,终于正常启动了。_安装完系统提示secureboot failure
C++如何做字符串分割(5种方法)_c++ 字符串分割-程序员宅基地
文章浏览阅读10w+次,点赞93次,收藏352次。1、用strtok函数进行字符串分割原型: char *strtok(char *str, const char *delim);功能:分解字符串为一组字符串。参数说明:str为要分解的字符串,delim为分隔符字符串。返回值:从str开头开始的一个个被分割的串。当没有被分割的串时则返回NULL。其它:strtok函数线程不安全,可以使用strtok_r替代。示例://借助strtok实现split#include <string.h>#include <stdio.h&_c++ 字符串分割
2013第四届蓝桥杯 C/C++本科A组 真题答案解析_2013年第四届c a组蓝桥杯省赛真题解答-程序员宅基地
文章浏览阅读2.3k次。1 .高斯日记 大数学家高斯有个好习惯:无论如何都要记日记。他的日记有个与众不同的地方,他从不注明年月日,而是用一个整数代替,比如:4210后来人们知道,那个整数就是日期,它表示那一天是高斯出生后的第几天。这或许也是个好习惯,它时时刻刻提醒着主人:日子又过去一天,还有多少时光可以用于浪费呢?高斯出生于:1777年4月30日。在高斯发现的一个重要定理的日记_2013年第四届c a组蓝桥杯省赛真题解答
基于供需算法优化的核极限学习机(KELM)分类算法-程序员宅基地
文章浏览阅读851次,点赞17次,收藏22次。摘要:本文利用供需算法对核极限学习机(KELM)进行优化,并用于分类。
metasploitable2渗透测试_metasploitable2怎么进入-程序员宅基地
文章浏览阅读1.1k次。一、系统弱密码登录1、在kali上执行命令行telnet 192.168.26.1292、Login和password都输入msfadmin3、登录成功,进入系统4、测试如下:二、MySQL弱密码登录:1、在kali上执行mysql –h 192.168.26.129 –u root2、登录成功,进入MySQL系统3、测试效果:三、PostgreSQL弱密码登录1、在Kali上执行psql -h 192.168.26.129 –U post..._metasploitable2怎么进入
Python学习之路:从入门到精通的指南_python人工智能开发从入门到精通pdf-程序员宅基地
文章浏览阅读257次。本文将为初学者提供Python学习的详细指南,从Python的历史、基础语法和数据类型到面向对象编程、模块和库的使用。通过本文,您将能够掌握Python编程的核心概念,为今后的编程学习和实践打下坚实基础。_python人工智能开发从入门到精通pdf